
My Irresistibly Floral DSP Card Creation
The theme today is CASEing ...
In am sure most of you understand what CASEing is...For those that don't here is a rough outline
I don't actually own the Falling Flowers stamp set which is what has been used in Jessie Holton's Card BUT I had purchased the thoroughly divine 'Irresistible Floral DSP' collection.
You can either Copy And Selective Edit OR Copy And Share Everything.
I have chose to Copy & Selective Edit.
This is my favourite way to CASE. As it gives you a base to work with and lets you create a card all of your own.
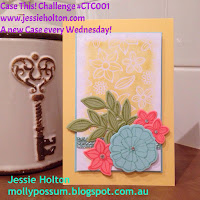
Today's CASE inspirations came from Jessie Holton's new CHALLENGE site and her very first challenge is this gorgeous creation! #CTC001
 |
| #CTC001 |
The other inspiration came from this sketch challenge from CasethisSketch & their sketch this week is this lovely design.
 |
| #CTS188 |
I don't actually own the Falling Flowers stamp set which is what has been used in Jessie Holton's Card BUT I had purchased the thoroughly divine 'Irresistible Floral DSP' collection.
I knew I could work with that & Jessie had used the same DSP on her card too. I also chose to use the same colour scheme as Jessie.
Here is my card
IRRESISTIBLY FLORAL
 |
| #IrresistiblyfloralDSP #KOCreationscards #Fussycutting #Resistembosstechnique #Windowsheet #Handmade |
- I started with Flirty Flamingo as my card base cut to 10.5 cm x 15 cm.
- I then cut a piece of Acetate Window Sheet to 10.5 x 18 cm. I folded that at 15 cm this will leave a 3 cm piece to attach to the card base.
- I cut the front of the card base in half at 7.5 cm
- The loose 7.5 cm piece I then cut in half again making 2 thinner strips.
- I joined the window sheet to the front of the card using 'Tear & Tape' and a small amount of glue to the outside of the 3 cm Acetate window flap and pressing that to the top inside of the card base.
- I added Tear & Tape to the inside on front 7.5 cm 'Flirty Flamingo' card base to secure this to the Acetate window.
- I took 1 of the 2 thin strips of 'Flirty Flamingo' and adhered that to the bottom of the Acetate Window Sheet in the same manner as previously mentioned.
 |
| #IrresistiblyfloralDSP #KOCreationscards #Fussycutting #Resistembosstechnique #Windowsheet #Handmade |
- For the front and the inside section I cut 1 strip off the 'Falling Flowers' sheet from the 'Irresistibly Floral DSP' collection to 10 cm x 16 cm
- I cut this strip into 3 sections
1 x 5.5 cm
1 x 3.5 cm
- I coloured these blending the 'Pool Party' & 'So Saffron' ink pads using 'Stamping Sponges'.
- Once blended the way I desired, I used my Paper-Piercing tool and a ruler to make a false stitch line placing a mark every 2 mm.
- I then used my 'Pool Party' Stampin' Write marker to add extra colour for the stitches.
- I fussy cut some of the flowers from the same sheet of DSP and coloured those with the sponges & ink then arranged them accordingly.
- I cut a small piece of 'Bermuda Bay' Sequin Trim and added that to my flower arrangement.
- I added enamel shapes in Peekaboo Peach to the fussy cut flower centres.
Enamel Shapes are part of this weeks 'Promotion' at top of the page.
- Using thick bakers twine in 'Whisper White' to edge the window sheet and the inside sponged DSP.
- Using A piece of 'Bermuda Bay' card stock I stamped in 'Whisper White' the sentiment from the Gift of Love stamp set.
- I cut this in half to create two thin strips and then trimmed one end to a point.
The 'GIFT OF LOVE' stamp set is only available as a hostess gift to those who host a party or work shop either online or in home. If you are interested in hosting your own feel free to contact me.
Blending Correctly
- To get a smooth blend using Stampin' Sponges & ink pads, I cut my round Stampin' Sponges down into 8 small wedges!
- I first press the chosen colour ink onto the stamp lid then holding the piece of sponge & pinching the sponge just above the widest end, wipe the ink in the lid all around it. Vigorously!
- I then dab the ink back onto the lid once or twice even three times, this helps to remove & spread evenly any large splotches that may have gathered.
- Always practice on a scrap piece first before starting on your project!
- Always use a scratch paper under your work, so you can work from the outside of your paper in a circling motion, moving inwards.
- DO NOT rub backwards & forwards!
- ALWAYS apply your ink from the sponge to paper in a circular motion, moving from the off the paper, onto the outside of your work, slowly reaching the centre.
- Reapply in this manner until the depth of colour that you require is achieved!
 |
| #IrresistiblyfloralDSP #KOCreationscards #Fussycutting #Resistembosstechnique #Windowsheet #Handmade |
I hope you enjoyed my card project today & my tips have been helpful.
If you would like further information please ask me below in the comments.
Thank you for stopping by.
If you would like to purchase any of the items used for this project please take a look at the carousal below.

