Showing posts with label #DIY. Show all posts

Wednesday, 26 February 2020

Modified Wiper Card using the Stampin' Up! Ladybug set

LADYBUG HOSTESS STAMP SET

MODIFIED WIPER CARD

Hello and Welcome 😊

#KOCreationsCards #ladybugs #2020hostessset #2020sab #wipercard #birthdaycard #DIY #Cardmaking #Stampinup 

As you can see from the pics above I have designed my own version of the "WIPER CARD"
I really like cards that fit neatly into envelopes for postage and have that surprise element. 
This design ticks both boxes for me!

At my last Demonstrator Party earlier in Feb my Hostess earned her Ladybug stamp set. She then purchased the matching dies. One of her party attendees booked a party from that and all coming wanted ideas on how to use this gorgeous set. This is what I came up with for my next party in early March.

FRONT VIEW CLOSED

#KOCreationsCards #ladybugdies #2020hostessset #2020sab #wipercard #birthdaycard #DIY #Cardmaking #Stampinup


Here is my template for my Modified Wiper Card. 
I have used 1 piece of A4 - I have used white here as it is easier to see.

MODIFIED WIPER CARD TEMPLATE

#KOCreationsCards #ladybugdies #2020hostessset #2020sab #wipercard #birthdaycard #DIY #Cardmaking #Stampinup

Items List.

Each item is linked directly to my store by the item number. 
To order your required item, simply click on the item number.

STAMPS and BUNDLES
  • Ladybug Stamps - Available ONLY as a Hostess set
  • Ladybug Dies - 153588
COLOURING TOOLS
  • Blackberry Bliss Stampin' Blends Combo Pack - 147932
  • Blackberry Bliss Stampin' Pad - 147092
  • Pumpkin Pie Stampin' Blends Combo Pack - 144599
  • Old Olive Stampin' Blends Combo Pack - 144597
  • Color Lifter - 144608
CARDSTOCK and DSP
  • Whisper White A4 Thick - 140490
  • Blackberry Bliss A4 - 133682
  • Highland Heather A4 - 147010
  • Acetate Window Sheets - 142314 I used this for wiper arm mechanism, but any cardstock will work just as well.
  • Peaceful Poppies DSP - 151324

EMBELLISHMENTS
  • Rhinestone Basic Jewels - 144220
ADHESIVES
  • Stampin' Dimensionals - 104430
  • Multipurpose Liquid Glue - 110755

OPEN VIEW

#KOCreationsCards #ladybugdies #2020hostessset #2020sab #wipercard #birthdaycard #DIY #Cardmaking #Stampinup


There are loads of tutorials on YouTube and I am guessing pictures on Pinterest too for where the wiper arm is placed and how the mechanism works.

I do hope you have enjoyed my card and can make sense of my simple instructions.
Any questions or comments please use the comment section directly below.
Thank you for visiting and have a wonderfully crafty day 😊

Wednesday, 12 February 2020

Step Fold Card Design for Colour INKpsiration Crew #CI71


Hello and welcome to this fortnights Colour INKspiration challenge #CI71  😊

If you missed it on the FB page then here is the Challenge Palette for #CI71


It's been a while since I have actually written a blog post. I decided to take a self imposed sabbatical from blogging, as I was finding it all far to time consuming and other areas of my Stampin' Up!® business were beginning to suffer.
When I realised this I decided to concentrate mainly on my home based classes and tutorials. Now I have my monthly classes running smoothly, I am finding I have a little spare time to write about what I am creating once again. 
I do hope you enjoy reading about my creations 😊

To create my card I decided on a super simple funfold step card design.

Tropical Birthday Card

#KOCreationscards #TimelessTropicalbundle #Birthdays #StampinUp #CardMaking #RepeatStamping #Crafts #DIY


Below I have added a quick graphic with the basic folding and scoring instructions for this simple step fold design.


Front View

#KOCreationscards #TimelessTropicalbundle #Birthdays #StampinUp #CardMaking #RepeatStamping #Crafts #DIY


Items List.

Each item is linked directly to my store by the item number. 
To order your required item, simply click the item number.

STAMPS and BUNDLES
COLOURING TOOLS
  • Pool Party Classic Stampin' Pad - 147107
  • Highland Heather Classic Stampin' Pad - 147103
  • Highland Heather Stampin' Blends Combo Pack - 147276
  • Pear Pizzaz Classic Stampin' Pad - 147104
  • Gray Granite Classic Stampin' Pad - 147118
  • Gray Granite (from Neutrals Stampin Write Markers set) - 147158
CARDSTOCK

EMBELLISHMENTS
ADHESIVES
  • Stampin' Dimensionals - 104430
  • Multipurpose Liquid Glue - 110755


For every $90 spent with me until the 31ST MARCH 2020 you can earn 1 free item from the Sale-A-Bration catalogue, as many times as you like. 

Click images below for your digital copies of the NEWEST Catalogues available.
                                                                                  
                                                                                          SAB CATTY
                         JAN - JUNE MINI CATTY


You can also click HERE to purchase any of the above items plus many more from the Annual Catalogue 

 All delivered directly to YOUR door!


I do hope you have enjoyed my card project created using the colours for the #CI71 challenge and that you have been inspired to try these colours out for yourself.


I can't wait to see all of your gorgeous projects being shared over at the Colour INKspirations Challenges page on FaceBook.


Colour INKspiration is a facebook group dedicated to inspiring us to create and share with colour palettes chosen by the Design Team.
If you love creating with colour then this page is for you. 
Click HERE to request to join, or click the Colour INKspiration Challenge banner below AND JOIN IN THE FUN 😊


Thank you so very much for visiting with me today.

I invite you to share your thoughts about my project in the comment section below.
Have a wonderful crafty day 😍

Sunday, 9 September 2018

Stamping Sunday Design Team blog hop - Making Christmas Bright bundle.


Hello everyone 😊
and
Welcome to the Stamping Sunday Blog Hop (Second Sunday) hosted by Sara Levin.

You are currently here with Kim Oliver - KO Creations Cards - Australia. I have a list of hop participants closer to the end of this post.

Today the Design Team are creating with the new suite 'Making Christmas Bright' bundle.
This is also what I used to create with as part of this months 'Tutorial Bundle' available at the end of the post.

Here are my projects for today's hop.


#kocreationscards #Christmascards #makingchristmasbrightbundle #lightbuilderpunch #diy #stampinup30 #2018holidaycatalogue
For this card I have heat embossed the word BRIGHT onto a die cut circle of Window Sheet. Beneath that I have stamped the small lights image, water coloured and then topped with some fussy cut bulbs that have been stamped, coloured and fussy cut then glued into position.

#kocreationscards #Christmascards #makingchristmasbrightbundle #lightbuilderpunch #diy #stampinup30 #2018holidaycatalogue

For my second card I wanted to use the Light builder punch that is available as part of the bundle and create a glowing light with the cap. But, when I went to use it I realised that I had lost the cap part of the stamp 😭
I must of misplaced it when I was creating for the Tutorial Bundle (found at the end of this post)
I was just extremely lucky that I had an embossed Bulb and Cap left over from my creative play and was able to use that for this project. It changed what I was planning but I still really like what I came up with.
Now to find that itty bitty stamp 😳 I know it's going to be a problem.


#kocreationscards #Christmascards #makingchristmasbrightbundle #lightbuilderpunch #diy #stampinup30 #2018holidaycatalogue
I stamped the small lights in Versamark over the top of the heat embossed word BRIGHT. I then used my Water Colour pencils and coloured thee wire and bulb area. I thought that if I added some fine tip glue over the bulbs it might make them appear brighter....But it didn't, I now have almost black lights with a coloured glowing area surrounding them 😂 Oh dear...we live and learn.

#kocreationscards #Christmascards #makingchristmasbrightbundle #lightbuilderpunch #diy #stampinup30 #2018holidaycatalogue


Thank you so very much for joining me today. Below you will find the hop list to continue on your Making Christmas Bright hop.


Would you like a copy of the 2018 Holiday Catalogue? 

Contact me NOW to get your very own copy

Love Crafting? 

Why not get your products at a 20% discount by joining today.

You can join my Stampin' Up!® team here ~ Join the 'Kreative Oasis' team today.  

Did you know you get to choose $235 of product for just $169 for your starter kit! (Excludes card making kits) Just by joining you get an automatic 20% discount on every product purchased for as long as you decide to stay with the company plus the opportunity to increase that discount by setting and reaching goals. All with my FULL support along the way! There is no obligation to stay or sell, the choice remains yours every step of the way. 

When shopping with me for the month of September please use the hostess code below.

PZD3MSJX

The carousel below has all of the items used for my project above.


As an added bonus for shopping with me YOU GET A FREE TUTORIAL BUNDLE with any product purchase over $50 during the month of SEPTEMBER using the 'Making Christmas Bright bundle" and ''Holiday Catalogue Embossing Folders ".


Free with product purchase of:  $50 Au

Or

Or alternatively you can purchase this bundle separately just by clicking below.
Please add a note with your payment with the word 'SEPTEMBER' for my reference. 
I will then email you the complete tutorial bundle within 48hrs


Thank you so very much for visiting today. I you have any questions please don't hesitate to ask in the comments section below.
I appreciate every comment.

Wednesday, 22 August 2018

For The Love Of Creating With SU - Holiday Catalogue Sneak Peek


Hello everyone 😊
Welcome to the quarterly hop all about Stampin' Up!® and the NEW PRODUCTS soon to be released!

We as Demonstrators get to play with these stunning new items before any body else. It's one of the perks of being a demonstrator and I for one love playing with new products and getting to share them with you all is part of the reason.
Get ready to see some amazing projects created by some very talented demonstrators from around the Stampin' Up!® world.

Here are my projects.

JOY

#KOCreationsCards #TinTileDynamicTIEF #CorrugatedDynamicTIEF #ChristmasCards #DIY #DIYChristmas #ShabbyChic #VintageChristmas #ShabbyVintage #CorrugatedDynamicTIEF #HolidayCatalogue2018

I am one of those people that have to have some extra special cards that I send to my treasured family and friends each year. These type of cards have to be hand delivered though, as I tend to create them a little bulky lol.

And as I simply adore Shabby Chic and Vintage looks, this is the style I have chosen to create my first couple of Christmas cards in.
AND Some of the new products lend itself to these looks extremely well!

I do get VERY excited about texture and I must say that while I was creating these two cards I started giggling and clapping like a little girl at Christmas time haha. I was just a bit happy that no-one was home at the time too lmao!

Here is a little info about what went into these designs.

 I have only used a small piece of Designer Series Paper for this card. The DSP and the corrugated Crumb Cake has been distressed around the edges.
The word joy has been coloured using sponge daubers and Bright Copper Shimmer Paint.
I also created a poinsettia to top my card with.
I mentioned this small Poinsettia that you can see in another post earlier today.
If you click the words Home Decor you can see the full post and how the basic Poinsettia's are made using my FREE pictorial instructions.

#KOCreationsCards #TinTileDynamicTIEF #CorrugatedDynamicTIEF #ChristmasCards #DIY #DIYChristmas #ShabbyChic #VintageChristmas #ShabbyVintage #CorrugatedDynamicTIEF #HolidayCatalogue2018

I will give you a list of the NEW PRODUCTS used on both of my cards.
These products will become available from the 5th of September.
Can't wait that long? 
Feel free to JOIN my team and you can order these items straight away!
  • Corrugated Dynamic Textured Impressions Embossing Folder - 148026 ~ pg13
  • Festive Farmhouse Elements - 147890 ~ pg13
  • Festive Farmhouse DSP - 147820 ~ pg13
  • Snowflakes And Stars Wire Elements - 147819 ~ pg29
  • Peaceful Noel Bundle - 149958 ~ pg29
  • Frosted and Clear Epoxy Droplets - 147801 ~ pg37
  • Shimmer Paint ~ Bright Copper - 147045 ~ pg38
  • Tin Tile Dynamic Textured Impressions Embossing Folder - 147906 ~ pg43
Have you got your copy of the new Holiday Catalogue yet?
Contact me NOW to get your copy.


Here is my next project

HAPPINESS

#KOCreationsCards #TinTileDynamicTIEF #CorrugatedDynamicTIEF #ChristmasCards #DIY #DIYChristmas #ShabbyChic #VintageChristmas #ShabbyVintage #CorrugatedDynamicTIEF #HolidayCatalogue2018
I have kept the Shabby Vintage feel for this card too, using a lot of the same elements from my first card.
The main difference between these two cards is the added piece of DSP behind the 'Tin Tile' embossed 'Cherry Cobbler' card stock and the label plate.
I created the sentiment label plate using 'Pretty Label' punch and the 'Bright Copper Shimmer Paint'. This was given a tarnished effect by rubbing Memento black ink around the edges and gently over part of the front. I also added metallic brads in copper to each end.
To bring the Crumb Cake colour from the background to the front I have added a pulled apart length of Burlap Ribbon behind the sentiment plate.

#KOCreationsCards #TinTileDynamicTIEF #CorrugatedDynamicTIEF #ChristmasCards #DIY #DIYChristmas #ShabbyChic #VintageChristmas #ShabbyVintage #CorrugatedDynamicTIEF #HolidayCatalogue2018

 I have used 'Old Olive' and 'Mossy Meadow' card stock for the sprigs. The Berries have been stamped using the two step stamp from the 'Peaceful Noel' stamp set, in 'Memento' and 'Cherry Cobbler' inks. One layer of the Berries has had the 'Clear Epoxy Droplets' added after colouring with the 'Dark Cherry Cobbler Stampin' Blends'.

I do hope you have enjoyed my projects today.
I also hope I have inspired you to start a 'Wish List' of some products you have seen today too.

I can't wait to see what you think of my Christmas Projects. Feel free to let me know in the comment section below.

To continue moving through the hop please click the link directly after my name from the list below.


When shopping with me for the month of August please use the hostess code below.

VF79YW4J

The carousel below has listed SOME of the items used for my project above. All other items will be available on the 5th September


As an added bonus for shopping with me YOU GET A FREE TUTORIAL BUNDLE with any product purchase over $50 during the month of AUGUST using the 'Darling Label Box' and '' Twinkle Twinkle Suite".


Free with product purchase of:  $50 Au

Or

Or alternatively you can purchase this bundle separately just by clicking below.
Please add a note with your payment with the word 'AUGUST' for my reference. 
I will then email you the complete tutorial bundle within 48hrs


Thank you so very much for visiting today. I you have any questions please don't hesitate to ask in the comments section below.
I appreciate each and every comment made.

Tuesday, 21 August 2018

Home Decor - Hand Made Christmas Ornaments - Poinsettia


Hello everyone 😊
 I have created for you some hanging Christmas Tree ornaments.
It's getting round to that time of year (soon any way) and hand made ornaments always look amazing.
Every year our Christmas Tree is filled with hand made items, from what my children and I make each year to hand sewn critters and shapes that have been given as gifts.

For this project, I have used some soon to be released products along with part of a bundle from the Annual Catalogue called 'Rooted In Nature'.

Here is my project.

Christmas Poinsettia's

#KOCreationsCards #StampinUp30 #Holiday #ChristmasOrnaments #DIY #Poinsettas #NaturesRoots #ShimmerPaint #HolidayCatalogue2018

For the above picture I have just lent the Poinsettia ornaments against a fir branch. This way you can see them in full light.
I have added to the edges of one Poinsettia a small amount of 'Bright Copper Shimmer Paint' and left the other two clean. Just so you can see the difference.
You may have also noticed some embellishments at the ends of the ornament ties.
The Copper Star is an embellishment that will soon be available to everyone from the upcoming Holiday Catalogue. The olive heart is from my own collection of beads that I have stashed away 😉
The ties have been created using Linen Thread. I am going to make some more of these and use some seasonal Striped Burlap Ribbon to hang the ornaments from. I think that woulld look amazing too.

Below I have added a quick little pictorial showing the steps for creating your own Poinsettia's

#KOCreationsCards #StampinUp30 #Holiday #ChristmasOrnaments #DIY #Poinsettias #NaturesRoots #ShimmerPaint #HolidayCatalogue2018

Just by using the 2 leaf framelits and 2 embossing framelits from the Natures Roots Framelits set you can create these gorgeous poinsettia's!
They really are so very simple. All you need is a little patience waiting for the large dollop of glue to dry a little and start to become tacky.

Why not give these a try yourself.
2 Sheets of Cherry Cobbler and 1 of Old Olive was all it took to create these 3 Poinsettia's plus 1 smaller Poinsettia.
"Later today as part of another blog hop (For The Love Of Creating With SU)  you will see the smaller poinsettia I have made for a Christmas card".

Hanging Poinsetta's

#KOCreationsCards #StampinUp30 #Holiday #ChristmasOrnaments #DIY #Poinsettas #NaturesRoots #ShimmerPaint #HolidayCatalogue2018

In the above picture you can see how they look hanging from a branch. They have an absolutely stunning appeal and look to them. All that texture from the embossing die really brings these Poinsettia's to life, don't you agree?

Well I do hope you have enjoyed my post today and I look forward to seeing what you think my creations.

When shopping with me for the month of August please use the hostess code below.

VF79YW4J

The carousel below has SOME of the items used for my project above. All other items used will be available from the 5th September 2018 


As an added bonus for shopping with me YOU GET A FREE TUTORIAL BUNDLE with any product purchase over $50 during the month of AUGUST using the 'Darling Label Box' and '' Twinkle Twinkle Suite".


Free with product purchase of:  $50 Au

Or

Or alternatively you can purchase this bundle separately just by clicking below.
Please add a note with your payment with the word 'AUGUST' for my reference. 
I will then email you the complete tutorial bundle within 48hrs


Thank you so very much for visiting today. I you have any questions please don't hesitate to ask in the comments section below.
I always respond to questions 😊

Tuesday, 17 July 2018

Home decor SU style - Scrap DSP use


Hello everyone 😊
Welcome to my blog. I am hopping today with a group of Stampin' Up!® Demonstrators from around the world. We are sharing with you our ideas for Home Decor items, all created using Stampin' Up!® products.

Today I have decided to share an idea for using up small bits of Designer Series Paper. And it's not a better time to do so! With the buy 3 get 1 free happening right now with Stampin' Up!® for the month of JULY.
More info further down this post.

Here is what I have created.

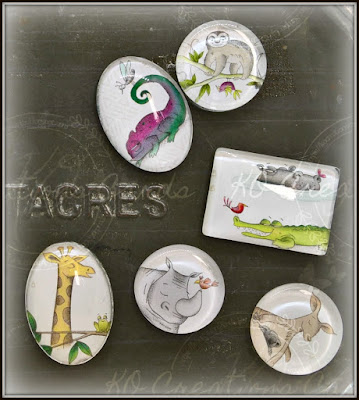
Decorative Fridge Magnets.

#KOCreationsCards #Buy3get1free #JulyPromo #StampinUp30 #DIY #HomeDecorSUStyle #FridgeMagnets #PaperCraft #DesignerSeriesPaper

What do you think?
Yes I know the sloth is upside down lol.

The reason these came about is because I had been creating for another blog hop (ESAD a few days ago) and had these little bits laying around on my desk. I hate throwing anything away if I can help it.
I kept thinking about how I could use these pretty strips and make something just a little different too.
I started going through my bits and bobs containers and I found these ~ Cabochon domes. They had been given to me (my sister is a jeweller) They got me to thinking...I have made these into necklaces before using DSP, but .... this time I needed something for the home. I kept digging and found the Adhesive Magnetic Sheet scraps from when I had put my thinlits inside my stamp cases. 
And from there the small niggle became a full blown idea, which began to turn into a planwith the plan then becoming finished magnets! 
In all honesty I could have kept going and made loads more.
Something I am now seriously considering doing for an upcoming State Demo Crafting get together next month in Tassie. Do you think they would love these as a swap??
Please let me know what you think. of this idea.

1 set of 3 using 'Natures Poem' DSP

#KOCreationsCards #Buy3get1free #JulyPromo #StampinUp30 #DIY #HomeDecorSUStyle #FridgeMagnets #PaperCraft #DesignerSeriesPaper


 Here are the steps to create these beautiful Fridge Magnets.

  • Get your supplies together - Clear Cabochon Domes, Scrap pieces of DSP, Adhesive Magnetic Sheets or scraps of them ~these can be purchased at any craft store..
  • Use a scrap piece of DSP trace the shape of the cabochon on it and cut it out. 
  • Glue to the cabochon using the fine-tip glue pen, so that the pattern is facing the top of the dome. 
  • Leave to dry for a minute and then trace the Cabochon shape onto the back of the Magnetic sticky sheet covering. 
  • Cut it out with scissors and adhere to the back of the cabochon. 
 Voila, you have created your very own magnet set. 

1 set of 3 using 'Tropical Escape' DSP

#KOCreationsCards #Buy3get1free #JulyPromo #StampinUp30 #DIY #HomeDecorSUStyle #FridgeMagnets #PaperCraft #DesignerSeriesPaper

AND

1 set of 6 using the 'Animal Expidition' DSP 

#KOCreationsCards #Buy3get1free #JulyPromo #StampinUp30 #DIY #HomeDecorSUStyle #FridgeMagnets #PaperCraft #DesignerSeriesPaper


I am one of those people that has their children's art works and quite a few school notes stuck all over the fridge with magnets. 
Quite often I will also grab the odd magnet from the $2 shop too, if I see one I like. That's probably one of the reasons I liked creating these so much 😂😂😂


Well I do hope that you have enjoyed this idea, I was pretty excited creating them.

To continue moving through this wonderful hop please click the name directly after mine from the list below.


When shopping with me for the month of July please use the hostess code below.

 CK6EDWBD

Now as mentioned earlier during JULY you can purchase 3 packs of DSP and get 1 pack FREE!

 HERE IS THE LIST OF WHAT IS AVAILABLE ALONG WITH THEIR CORRESPONDING CODES.

The carousel below has listed all of the items used for my project above.


As an added bonus you get Free with any product purchase over $50 during the month of July using the 'Stitched All Around' and 'Tropical Chic' Bundles.


Free with product purchase of:  $50 Au

Or

 Alternatively you can purchase this bundle separately just by clicking below.
Please add a note with your payment with the word 'JULY' for my reference. 
I will then email you the complete tutorial bundle within 48hrs


Thank you so very much for visiting today. I you have any questions please don't hesitate to ask in the comments section below.
I always respond to questions 😊

Wednesday, 27 June 2018

Enjoy The Little Things In Life Blog Hop ~ 3D Project


Welcome to this months Enjoy The Little Things In Life video blog hop.

We are sharing with you some 3D Projects created using New Products from the New Annual Catalogue. 


You are currently here with Kim Oliver ~ KOCreations Cards. You have reached my page from Kelly Kent's of My Paper Craft Journey Kelly is the Video Blog Hop crew's special guest for the month of June.. I do hope that you enjoyed Kelly's project. I simply adored the unique use of puzzle die. It looks amazing inlaid/recessed like that doesn't it!
I have a list of hop participants closer to the end of this post.


I have created a Night Light Gift Box using part of the Little Twinkle suite found of page 83 of the Annual Catalogue.


Here is my Night Light Box

#KOCreationsCards #DIY #BabyGifts #NewBaby #DIYNightLight #LittleTwinkle #StampinUp30 #BabyBoy #DIYGiftIdeas #3Dcraft #Papercraft #LightBox

This adorable Night Light can be used as a gift box for new baby or on it's own as a gift.

I have some measurements written on the template design for you below.


Along with these templates for your DSP you will need 5 x 3-15/16" x 3-15/16 (10cm x 10cm) squares of 'Silver Foil Sheet' plus 1 square the same size of  'Silver Glimmer Paper'. You will also need 1 x Silver Foil Sheet at 4"x 4" (10.2cm x 10.2cm) square (for underside of lid)

*Please  note that the templates pictured are showing the reverse side (sorry about that)


Here is the Video showing the creating process.
The video WAS nearly an hour long, but I managed to edit is down to 33 minutes for you.

Little Twinkle Night Light Box


Thank you for visiting today.
      
I do hope you have enjoyed this video and my design.
There are more wonderful 3D ideas with accompanying videos to be seen just by following the links below.


To continue moving through the hop please click the name directly after mine from the list below.


When shopping with me for the month of June please use the hostess code below.

 UBYDSWHR

The carousel below has listed all of the items used for my projects above.


As an added bonus you get Free with any product purchase over $50 during the month of June using the 'Sea Of Textures' and 'Abstract Impressions' Bundles.


Free with product purchase of:  $50 Au

Or

Or alternatively you can purchase this bundle separately just by clicking below.
Please add a note with your payment with the word 'JUNE' for my reference. 
I will then email you the complete tutorial bundle within 48hrs


Thank you so very much for visiting today. I you have any questions please don't hesitate to ask in the comments section below.
I always respond to questions 😊