Showing posts with label #papercrafts. Show all posts

Sunday, 26 August 2018

Crazy Crafters blog hop with Patsy Waggoner


Hello and welcome to another Crazy Crafter's blog hop.

You are currently here with me (Kim Oliver - KOCreations Cards) and I have a complete list of blog hop partcipants closer to the end of this post.

Today our special guest and source of inspiration is none other than the lovely Patsy Waggoner of Stamps To Die For.
I love Patsy's work mainly because she uses DSP so well. I am a bit of a paper hoarder, Okay I HUGE paper hoarder 😕 and because of this I tend to only use small pieces instead of bigger ones for my cards.......
So,
today I got brave and chopped my gorgeous Frosted Floral DSP and paired it with the matching bundle called 'First Frost'

Here is my Project.

Frosted Christmas

#KOCreationsCards #FrostedFloral #HolidayCatalogue2018 #StampinUp30 #Vintage #ShabbyChic #ChristmasCards #CardMaking #PaperCrafts #DIYcrafts #PrimitiveDesigns

This card is not your everyday Christmas card, there is no traditional red and greens anywhere here. I have used Mint Macaron, Crumb Cake and Bright Copper
I have used a new suite for today called the 'Frosted Floral' suite. It comprises of Designer Series Paper, a Stamps set and matching Framelits along with loads of gorgeous embellishments. All of these items will be available to you from the 5th of September.

#KOCreationsCards #FrostedFloral #HolidayCatalogue2018 #StampinUp30 #Vintage #ShabbyChic #ChristmasCards #CardMaking #PaperCrafts #DIYcrafts #PrimitiveDesigns

Basic Instructions

  • My card base is half and A4 sheet. Cut Portrait style at 10.5cm then score landscape at 14.9cm
  • The label was created using Shimmery White card stock and has been adhered using Dimensionals.
  • The image used is from the Bundle 'First Frost' and has been stamped off the label. The stamp itself was coloured using Stampin' Write Markers in Blackberry Bliss, Mint Macaron and Shaded Spruce.
  • I stamped this image again on a scrap piece of Shimmery White by colouring the stamp in the same manner as above and Die cut it using the matching Framelits. This was adhered over the top of the first image using Mini Dimensionals.
  • The sentiment has been stamped in Blackberry Bliss, using the Stamparatus.  I then daubed Bright Copper Shimmer paint randomly over the stamp and re-stamped over the top.
  • I honoured Patsy today by using a full card front sized piece of this gorgeous 'Frosted Floral' pearlized DSP cut at 10.1cm x 14.5cm. This has had Bright Copper Shimmer Paint lightly scrunched over the surface. 
  • I sanded the edges of the DSP ever so lightly, just to enhance the already distressed look the DSP has. This was adhered to my card base using MultiPurpose Liquid Glue.
  • I used the Corrugated Dynamic TIEF to create the piece of distressed cardboard positioned behind my label. This has also had Bright Copper Shimmer Paint daubed/wiped randomly in places.
  • I used a 30 cm length of Copper Trim uncut, but pulled out wide over the corrugated card stock. I held this in place with glue dots before wrapping Linen Thread around the trim and corrugated card piece.
  • I added to this a Corrugated Element (also daubed with Shimmer Paint cause I just LOVE THE STUFF!) with a bow of Linen Thread and a Copper Metallic Brad. All adhered to the trim using a glue dot.
#KOCreationsCards #FrostedFloral #HolidayCatalogue2018 #StampinUp30 #Vintage #ShabbyChic #ChristmasCards #CardMaking #PaperCrafts #DIYcrafts #PrimitiveDesigns

I do hope you have enjoyed my primitive style Christmas card today

I would love to hear what you think of it 😍

To continue moving through the hop please click the name directly after mine from the list below..


Thank you so very much for visiting my blog today. 


When shopping with me for the month of August please use the hostess code below.

VF79YW4J

The carousel below has listed all of the items used for my project above. 

As an added bonus for shopping with me YOU GET A FREE TUTORIAL BUNDLE with any product purchase over $50 during the month of AUGUST using the 'Darling Label Box' and '' Twinkle Twinkle Suite".


Free with product purchase of:  $50 Au

Or

Or alternatively you can purchase this bundle separately just by clicking below.
Please add a note with your payment with the word 'AUGUST' for my reference. 
I will then email you the complete tutorial bundle within 48hrs


Thank you so very much for visiting today. I you have any questions please don't hesitate to ask in the comments section below.
I appreciate each and every comment x

Wednesday, 11 April 2018

International Blog Highlights - Baby


Hello again 😊 and welcome.

#kocreationscards #alittlewild #littleloves #babycards #cardmaking #papercrafts #stampinup #newarrivals #welcomebaby #bears #bees #honeybears


I am participating in the International Blog Highlights that Kylie Bertucci holds each month. This showcases ideas from around the world
 PLUS
 Our peers (YOU) get to vote for your favourite projects.
You can VOTE for my project HERE
Each month has a different theme.

This month we have the theme of BABY.

I love creating for the arrival of new little bundles of joy. Each baby is as individual as you or I and so should the cards be.


Here is my Project.

Honey Bear

#kocreationscards #alittlewild #littleloves #babycards #cardmaking #papercrafts #stampinup #newarrivals #welcomebaby #bears #bees #honeybears

Items used

  • Cards stock - Whisper White thick, Daffodil Delight and Early Espresso (10 cm x  10cm piece)
  • Inks - Lemon Lime Twist (LLT) , Garden Green, Early Espresso, Pumpkin Pie and Soft Sky.
  • Stampin' Blends - Crumb Cake light and dark, Calypso Coral light, Daffodil Delight light and dark, Pink Pirouette light and Colour Lifter.
  • Stamp - A Little Wild
  • Dies - Little Loves, Stitched Shapes and Layering Ovals.
  • Embossing Folder - Hexagons dynamic impressions textured embossing folder (TIEF)
  • Stamping Sponges
  • Ombre Ribbon -  LLT
Method
  • Score Whisper White card stock at 10.5 cm portrait style and fold and burnish on score line. 
  • Cut at 14.9 cm. This will give you 2 card bases. 
  • Cut Daffodil Delight to 14.9cm x 10.1cm. Cut out the Largest stitched shape oval from the centre. Lightly spritz and run through big shot in Hexagon TIEF
  • Cut 1 WW card base in half, so you have 2 pieces at 10.5cm x 14.9cm. Use one for sponging and the other for sentiments and stamping images.
  • Stamp images in Early Espresso ink except for the flower. Stamp this in Pumpkin Pie and Lemon Lime Twist
  • Colour images with stampin' Blends and then die cut them.
  • For the background oval - *Sponge a layer of LLT over to create the hill. Then Lightly sponge Garden Green over the bottom half, this makes the hill lighter on top and also adds a little depth. Sponge Soft Sky over the top half moving upwards and in a circular motion away from the hill so that it becomes lighter at the top.
  • Cut out this with the Stitched Shapes largest oval die.
  • From the Early Espresso 10 x 10 piece cut out another oval using the stitched shapes oval again but also layer it with the largest Layering Oval. This will give you the straight edge frame for the Daffodil Delight hexagon embossed card front layer. Glue fame into position.
  • Glue the DD card front to the base.
  • Adhere the die cut images to the sponged oval and then adhere this into position using dimensionals.
  • Stamp and cut sentiments into banners and then adhere those where desired.
  • Tie a length of LLT Ombre ribbon around the card and tie in a bow.
*NOTE - Make sure you create the sponged area larger than your oval will be. Also to get a sharp hill tear a scrap of paper to shape and use this as a mask.

Open View 

#kocreationscards #alittlewild #littleloves #babycards #cardmaking #papercrafts #stampinup #newarrivals #welcomebaby #bears #bees #honeybears


I do hope that you ahev enjoyed my project today.

If you did and would like to vote for it please click below to VOTE.


My card is #6 in the gallery. To VOTE for it please hover your mouse over hthe card until a little heart appears in the corner. Click the heart and you have registered your vote.
Thank you so very much x


This lovely little picture below is of me with MY new catalogue.
I must say I L.O.V.E IT!
Sorry the front is all I can show you atm. 

#stampingup30 #stampinup #colorrevamp #colourrevamp #retiringproducts #kocreationscards #2018annualcatalogue #joinmyteam

BUT
If you want to see whats inside NOW then JOIN!
It's obligation free to join.
Try it for 3 months and see if you like it all while enjoying a 20% discount with no obligations or strings.
Your starter kit can be chosen anyway you like! For $169.00 you get $235.00 of product. You can pre-order a new product suite too before everyone else with the Demo Pre-order period!
Or if you are not sure what to put in your starter kit? Contact me and I will help you make great choices!

JOIN HERE

To become part of the Kreative Oasis team and reap the rewards of being a demo all while enjoying support and training from me and both of my uplines!


Below you will find a carousel containing links to all items that were used to create this project with, PLUS
 Hostess Codes and TUTORIALS.

When shopping with me for the month of APRIL please use the hostess code below.

 SSMHTGAS


As an added bonus you get Free with any product purchase of $50 during the month of APRIL is this fabulous tutorial bundle using the Myths and Magic suite PLUS the True Gentleman suite.


Free with product purchase of:  $50 AU 

Or 

You can purchase this bundle separately just by clicking below.
Please add a note with your payment with the word 'APRIL' for my reference. 
I will then email you the complete tutorial bundle within 48hrs


This is TUTORIAL available for purchase world wide.

Thank you so very much for visiting today. If you have any questions please don't hesitate to ask in the comments section below.

I appreciate every comment made and I always respond to a question 😊


Wednesday, 28 March 2018

Enjoy The Little Things In Life Design Team Blog Hop - Technique


Welcome back everyone 😊

I am desiging today with the 'Enjoy The Little Things I Life' Design Team, this hop is hosted by Martha Groeger.

Today we are all sharing a technique.
I decided on which technique to do when I had a fantastic response to a card I created last week. I was asked specifically to share what I do.
So, my technique is watercolouring.

You are here with me Kim Oliver - KOCreations Cards.
I have a list of hop participiants closer to the end of this post.


Here are my projects.

From the Heart

#kocreationscards #southernserenade #watercolor #watercolour #petalpalette #cardmaking #stampinup #papercrafts #techniques #enjoythelittlethingsinlife


Happy Birthday

#kocreationscards #southernserenade #watercolor #watercolour #petalpalette #cardmaking #stampinup #papercrafts #techniques #enjoythelittlethingsinlife


Here is my video showing how I created these water colour cards.


Items Used for cards in video

  • Card Stock : A4 Crumb Cake keeping scrap pieces for oval focal etc, A4 Thick Very Vanilla, A4 Early Espresso plus the scrap pieces for sentiments.
  • Petal Palette Clear-Mount bundle and Southern Serenade stamp set
  • Ink Pads: Blushing Bride, Garden Green, Pumpkin Pie and Chocolate Chip.
  • Stiched Shapes framelits.
  • Pearl Basic Jewels, Rhinestone Basic Jewels.
  • Stampin' Blends: Dark Crumb Cake and Bronze.
  • Copper trim.
  • Burlap ribbon.
  • Decorative Ribbon Border Punch.
  • Aqua Painter.
  • Adhesives: Foam Adhesive Strips, Multi Purpose Liquid Glue (tombow), Glue Dots.

Basic Instructions

  1. Place Crumb Cake card stock into Stampin' Trimmer portrait style and score the length at 10.5 cm, Fold on score line turn and cut in half at 14.9 cm =  2 Crumb Cake bases @ 10.5cm x 14.9cm in landscape orientation. 
  2. Cut 2 pieces of  Early Espresso card stock at 14.5 x 10.1 cm.  Cut two more pieces, 1 at 2.3cm x 9.7cm and another at 7.9cm x 9.7cm for split panel card
  3. Cut 2 pieces of Very Vanilla card stock at 14.1 cm x 9.7 cm. Cut two more pieces, 1 at 2.1cm x 9.7 cm and another at 7.7cm x 9.7cm for split panel card. 
  4. Layer the two strips of Very Vanilla onto the Early Espresso leaving the edge showing along the length of one side only.
  5. Adhere the stamped Very Vanilla layers to the Early Espresso layers for both cards. 
  6. For the Baronia flower card only adhere the two strips of layered Early Espresso and Very Vanilla together and adhere to the painted Very Vanilla card stamped image with foam strips.
  7. Punch Decorative Ribbon Border an trim to size from a piece of Early Espresso card stock
  8. Stamp sentiments onto scrap pieces of Very Vanilla
  9. Layer one for the split panel card over stamped, painted and fussy cut image with a crumbcake stitched oval behind. 
  10. Placethe other on Petal Palette rose card front after layering and stapling together. Hold in place using glue dots.
  11. Colour pearls with Stampin' Blends Dark Crumb Cake and Bronze and adhere them and rhinestones into desired positions.

Conversion from metric to imperial


Southern Petals

Group picture

#kocreationscards #southernserenade #watercolor #watercolour #petalpalette #cardmaking #stampinup #papercrafts #techniques #enjoythelittlethingsinlife


To continue moving through the hop please click the name directly after mine.


If you are looking to purchase any of the items I used to create with today then please use the carousel below.
It has most items listed and is linked directly to my store.

When shopping with me for the month of March please use the hostess code below.

 EA6AHBAH


As an added bonus you get Free with any product purchase of $50 during the month of MARCH this fabulous tutorial bundle using the Myths and Magic suite PLUS the True Gentleman suite.


Free with product purchase of:  $50 AU 

Or 

You can purchase this bundle separately just by clicking below.
Please add a note with your payment with the word 'MARCH' for my reference. 
I will then email you the complete tutorial bundle within 48hrs


This is available for purchase world wide.

Thank you so very much for visiting today. If you have any questions please don't hesitate to ask in the comments section below.

I appreciate all comments .
I will always respond to a question 😊

Wednesday, 25 October 2017

Enjoy The Little Things In Life- Video Blog Hop - Christmas


Welcome everyone 😊
For todays' blog I am hopping with the "Enjoy the little things in life - Design Team. We will try to help you to be more creative and give you some great ideas and tips which will include a video of how we made our projects. 
We have an incredibly amazing team of demonstrators from around the world that are part of this hop.
This months theme is Christmas.

Currently you are visiting me - Kim Oliver of Australia, so have a look at the list at the end of the post to see who is next


I have chosen to create some Decor items for Christmas this hop.

Honeycomb Christmas Ornaments


#KOCreationscards #Merrymusic #DIYChristmas #Honeycombchristmasornaments #Stampinup #Papercrafts #Cardmaking #Homedecor


I have taken a few photo's to show the glueing pattern for the oval decoration and the circle on also.

#KOCreationscards #Merrymusic #DIYChristmas #Honeycombchristmasornaments #Stampinup #Papercrafts #Cardmaking #Homedecor

#KOCreationscards #Merrymusic #DIYChristmas #Honeycombchristmasornaments #Stampinup #Papercrafts #Cardmaking #Homedecor


Here is my Vidoe Turoial.


#KOCreationscards #Merrymusic #DIYChristmas #Honeycombchristmasornaments #Stampinup #Papercrafts #Cardmaking #Homedecor

To keep moving through the hop please just click the name directly after mine.


If you are looking to purchase any of the tiems I used to create these gorgeous decorations with then please feel free to use the carousel below.
It has all items listed and is linked directly to my store.


Thank you so much for visiting today.
If you have any questions please ask them in the comments section below.
I always reply 😉

Sunday, 22 October 2017

ESAD 2017 Holiday Catalogue Fancy Folds and 3D projects blog hop

No automatic alt text available.


Welcome everyone 😊
Today I am participating in a blog hop with ESAD.
Our theme this month is 3D projects.

What is ESAD? I hear you ask.
Well, FOR MORE INFORMATION please refer directly below.

Image may contain: text

I chose to create a trio of shadow boxes for a display ready for Christmas.

I can hang this on my wall or pop it on a shelf, wherever the fancy takes 😉

Here is my Shadow Box
decor item for Christmas.

DECK THE HALLS


#KOCreationscards #Christmas #Carolsofchristmas #Christmaspines #DIYchristmasifts #DIY #Shadowboxes #Homedecor #Stampinup #Cardmaking #Papercrafts


I have used a selection of gorgeous stamp sets and DSP for this gorgeous decor item.
For a full list of items please refer to the carousel at the end of my blog.

Here is a quick template using 12 x 12 DSP shadow box each score line is 2cm apart. So score at 2,4,6,and 8 cm then turn and score again until all four edges have been scored. Turn and score two lines 4 cm long 1 at 10cm. and another 2cm before the other four score lines. Refer to picture below. Turn and score opposite ends identically.
Trim away corners following xxxx cut lines.


 Follow instructions as above to complete the shadow boxes..

The stamp sets used are Carols of Christmas stamp set and the Christmas Pines stamp set.

ANGLED VIEWS

#KOCreationscards #Christmas #Carolsofchristmas #Christmaspines #DIYchristmasifts #DIY #Shadowboxes #Homedecor #Stampinup #Cardmaking #Papercrafts


I adore the Christmas ephemera available at the moment. 
They create the most gorgeous wreath, what do you think?

#KOCreationscards #Christmas #Carolsofchristmas #Christmaspines #DIYchristmasifts #DIY #Shadowboxes #Homedecor #Stampinup #Cardmaking #Papercrafts


To continue moving through this fabulous hop please use the next button below. The lovely Sharon Dalton is next on the list

No automatic alt text available.

If you are searching for a full list of items that I used to create this DIY decor item.
Please refer to the carousel below.

Thank you so very much for visiting with me today. If you have any questions please ask them in the comment section below.
I always reply.


Sunday, 8 October 2017

Stamping Sunday Blog Hop DT - Mini Pizza Boxes


Welcome back everyone 😊
Today I am sharing with you all a project I designed using the Mini Pizza Boxes.

These gorgeous little mini Memory Keeping Boxes can be used as a decor item as well as a cute way to preserve those cherished memories and special occasions.
They can even be personalised with a photo in the front frame or used as is with their sweet quotes left visible.

They can be given as a gift for weddings or new baby arrivals, even engagements, or just given to someone you feel would love a little box of uplifting quotes. Or create one and keep it for your own purposes, just because you can 😉.

I designed these little boxes as I tend to keep little pieces of my life that make me smile and feel happy, a flower or leaf from here, a picture from there or even a lock of hair from my children.
These boxes are perfect for that purpose.

Memory Keeping Boxes


#KOCreationscards #Pizzaboxes #Memoriesandmore #Memorykeeping #Minimemorykeepingboxes #Treasuredmemories #Stampinup #Papercrafts #Decor #DIY #Inspirationalsquotes


Showing box envelopes, inserts and accordion sections.


Tools Needed

  1. Mini Pizza Boxes!
  2. Memories and More pack (I used the Petal Garden pack) 
  3. Co-ordinating DSP roughly 5 sheets of 6 x 6 size (I used the Petal Garden DSP)
  4. 1 and a 1/2 sheets A4 whisper white (not thick!)
  5. 2 A4 pieces of Co-ordinating coloured card stock. (I used Old Olive) 
  6. Ink pads (I used Old Olive and Rich Razzleberry)
  7. 3 lengths of co-ordinating ribbon 
  8. Window Sheet
  9. Stampin' Trimmer
  10. Envelope Punch Board
  11. Layering Square framelits
  12. Bigshot
  13. Bone folder
  14. Stampin' Sponge
  15. Adhesives - Fast Fuse, Tombow Multipurpose Glue, Dimensionals, Glue Dots and Foam Adhesive Strips

Cutting Guides

For full instructions please watch video below.

Pizza Box

  • Score all folds of Pizza box before putting it together. This makes sure that the box goes together nicely  and stays together.

Memories and More pack

For quotes and pictures on accordion pull out
  • Choose  16 - 18 of the smaller Memories and More cards and trim to 7.4cm in length so that they are square. They are 7.4 cm wide already. 11 of these are for the accordion and a minimum of two for inside of each envelope, possibly one for the front quote (depends on your choices)
For back cover quote
  • Choose a larger Memories and More card for the back quote and trim to 8.5cm

Co-ordinating DSP

2 small Envelopes 
  • cut 1 sheet to 5 ¼ inches square and the other x 5 ⅛" square. One is for the inside pop up envelope the other is to be placed on the accordion.
*Find the half way point on one edge to start the scoring and punching process with the punch board for making of the envelopes.
*Keep off cuts to use as the side covers for outside and inside if you like the pattern you chose. This may save you another sheet of DSP

Front and inside covers
  • You will need 3 sheets trimmed to 8.5cm square.
Side Covers outside and inside edges
  • 1 sheet of 6 x 6 DSP cut at 2.4 x 8.4, you should get enough to cover all sides inside and out  with an extra piece left over.
Front Frame
  • 2 sheets of contrasting colours cut 1 at 7.8cm square and the other at 8.3cm square.  

White A4 Card Stock

Accordion pull out piece
  • cut two lengths from the A4 at 8 x 29.7 cm. Score these pieces at 8,16 and 24 cm respectively then burnish and fold.
Envelope pop up (front inside)
  • The  ½ A4 piece needs to be trimmed to 7.5 wide x 16cm long then scored at 8cm.

Coloured A4 Card Stock

Accordion contrast and small Memories and More card backings 
  • Cut both of these sheets the full length at 7.7cm wide then trim each length to 7.7 cm so you end up with 12 7.7 cm squares. You will need 11 of them.

Ink Pads

  • Using a sponge ink the edges of all your trimmed DSP pieces (not cards or card stock)

Ribbon

Cut your ribbon into 3 lengths, 2 x 30cm and 1 at 15cm

Window Sheet

  • For frame cover, cut this at 8cm x 8cm square


Here is the video


Just a note that this video is roughly 19 minutes in length. The last couple of minutes has been distorted slightly by a glitch with my camera, this part is still watchable and fully understandable.


Closed View

#KOCreationscards #Pizzaboxes #Memoriesandmore #Memorykeeping #Minimemorykeepingboxes #Treasuredmemories #Stampinup #Papercrafts #Decor #DIY #Inspirationalsquotes


To continue through the hop to see more wonderful ideas using these Mini Pizza Boxes please click the name after mine.


If you are looking for any of the items I used to create these gorgeous little mini memory keeping boxes with, Then please use the carousel below.


Thank you so very much for visiting my blog today. I hope you enjoyed the videos and also found some inspiration along the way.

If you have any questions please ask them in the comments section below.
I always reply 😉

Sunday, 9 July 2017

ESAD Blog Hop - Favourites from the 2017/18 Annual Stampin' Up! catalogue


Welcome back everyone 😊
This post is all about the ESAD blog hop
and out favourites from the 2017-2018 catalogue.. We hope to inspire your creativity by using some of our favourite products from the new catalogue.


You are currently here with me Kim Oliver, I have a full list of all the other participating members closer to the end of this post.

Now I couldn't actually pick a favourite!! It's true! 
I am in love with so much of the product that is available in this years catalogue it's RIDONKULOUS!...Can YOU pick a favourite??

 Well I needed help choosing, seriously!
Then luckily I received an order for a 1st Birthday card...
Whew! Choice was made lol 😊


Can you guess which suite I chose...
The order was for a little boy, does that help hehehe
You guessed it! I used the 'Birthday Delivery Bundle'
It has a whole suite to match and is super easy to create with, the DSP has matching stamps AND matching dies!!! The dies actually match the pictures on the paper OMG what more could you ask for! There are matching ribbons as well as matching embellishments too
It's that good projects almost create themselves! Shhhhh

Okay enough chit chat
Here is my card

Surprise

#birthdaymemoriessuite #KOCreationscards #stampinup #popandtwistcard #firstbirthdaycard #cardmaking #boysbirthday #animalsonparade #papercrafts #funfolds


Look at those adorable animals on parade!
I used the honeycomb balloons for some added dimension on the card front and also fussy cut the three balloons to let them wander off the card front, behind the bear. The sentiment is from the 'Birthday Delivery' stamp set and has been stamped in Pacific Point.
My card base is Pacific Point card stock with  whisper white card stock as a contrasting layer.

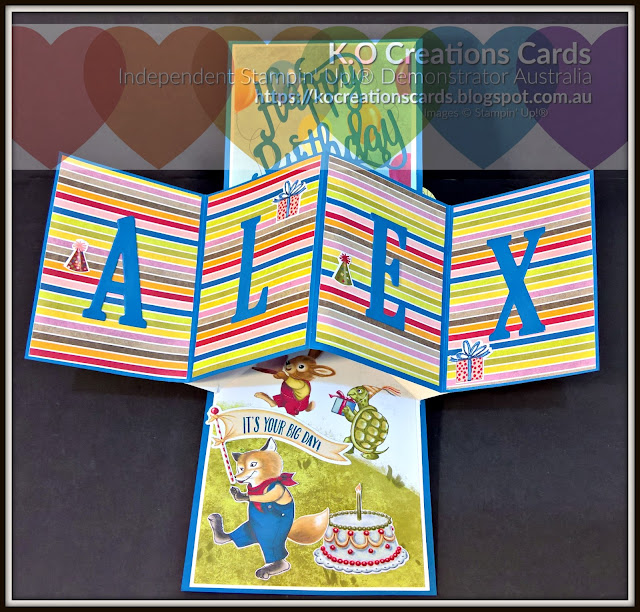
Now if you have just skipped ahead and looked at the pictures below you will have noticed that the surprise is that this card is a Pop and Twist card.

Now I am not writing down all of the instructions. That would take FOREVER!!
 BUT,
 I will add the Youtube video from Maymay Made it Crafts.
This is where I got the instructions from.
They were super easy to follow, as the heading says lol.
I just adjusted the sizes to suit our metric measurements.


Open view of Pop and Twist card

#birthdaymemoriessuite #KOCreationscards #stampinup #popandtwistcard #firstbirthdaycard #cardmaking #boysbirthday #animalsonparade #papercrafts #funfolds


This open view really shows the die cut images off quite nicely. Don't you think?
The fox and banner, the present, the cake and the party hats were all cut from the DSP using the matching dies the 'Birthday Friends Framelits' set.. How awesome is that!  No fussy cutting required!
 This whole card was made using one sheet of DSP.
The stripes used are just the opposite side of the animal parade sheet used for the front and inside images..

Half Open View

#birthdaymemoriessuite #KOCreationscards #stampinup #popandtwistcard #firstbirthdaycard #cardmaking #boysbirthday #animalsonparade #papercrafts #funfolds


I know Alex's Mum loved his card made special for his very first birthday!
 Alex's first Birthday was actually yesterday. 
So, Happy Belated Birthday Alex, I hope you had an amazing day little man.

Frontal and Inside View

#birthdaymemoriessuite #KOCreationscards #stampinup #popandtwistcard #firstbirthdaycard #cardmaking #boysbirthday #animalsonparade #papercrafts #funfolds


Well thank you so very much for visiting my blog, I do hope you have enjoyed my creative efforts today. 
Here is the list for the other participating members. 
You can either click the name after mine or use the NEXT button to be taken directly to Sandra Mastello's awesome project and blog.


Blog hop participants:


If you are looking to purchase any of the items I used to create my project with, then look no further than the carousel below.
It has every item listed for your convenience and is listed directly to my online store.