Showing posts with label #Homedecor. Show all posts

Wednesday, 20 June 2018

Home Decor SU Style Blog Hop


Hello everyone ๐Ÿ˜Š
Welcome to my blog. I am hopping today with a group of Stampin' Up!® Demonstrators from around the world. We are sharing with you our ideas for Home Decor items, all created using Stampin' Up!® products.

I started with the idea of somehow using our gorgeous Copper Tea Tins that are available from our 2018/2019 Annual catalogue (page 14) and went from there.

I wanted to make a gift that could be given for any reason.
It could be a Get Well, New Home, Thinking Of You or a Birthday.

Here is what I came up with.

Tea Room Coasters

#KOCreationscards #StampinUp30 #TeaRoomSuite #HomeDecor #HomeDecorSUStyle #HandMadeGifts #LoveItChopIt #DIY

I have created a set of 6 coasters that fit perfectly inside the stunning Copper Tea Tin.
I made six so that each coaster could be reversible by having the reverse side of the DSP.


I have a few shots of some of the processes I went through to create this gorgeous little gift set.

Firstly I covered my tin.
These stunning little Tea Tins come in a box of 4 and are part of the 'Tea Room' suite (pg14)and are perfect for creating gifts.
You can see from the pictures below that I cut a strip of the 12 x 12 'Tea Room' DSP at 3-⅛" (8cm) . I applied TomBow glue to the reverse side and glued it to the copper Tea Tin one side at a time.

#KOCreationscards #StampinUp30 #TeaRoomSuite #HomeDecor #HomeDecorSUStyle #HandMadeGifts #LoveItChopIt #DIY
After I finished covering the tin, I created a label using the 'Stitched All Around' framelits and a flower stamped in 'Crushed Curry' from the 'Botanical Bliss' stamp set. I stamped the sentiment in versamark and heat embossed it with Copper embossing powder (refer pictures below) I held the label in place with dimensionals and tied 'Silver and Petal Pink Bakers Twine' from one side of the label, around the tin to the other side of the label.

#KOCreationscards #StampinUp30 #TeaRoomSuite #HomeDecor #HomeDecorSUStyle #HandMadeGifts #LoveItChopIt #DIY
Once the tin was completed I moved on to creating my coasters. This took a little more work than expected, basically because my jigsaw cutting was...well to put it bluntly CRAP! 
I had been to my local hardware store only last week and picked up some MDF packing board (for free). And purchased a new jigsaw at the same time. Now I haven't actually used a jigsaw since High School Wood/Metal shop class ๐Ÿ˜ฑ
How hard could it be....right!
HAHAHA It turns out that it's quite difficult.  Keeping the darn thing in a straight line was near to impossible to start with. So, loads of sanding had to be done just to smooth the bumpy edges off the first couple of coaster bases.
#KOCreationscards #StampinUp30 #TeaRoomSuite #HomeDecor #HomeDecorSUStyle #HandMadeGifts #LoveItChopIt #DIY
When I had cut and sanded all 6 coasters, I applied the 'Tea Room' Specialty DSP. My coaster bases are 3.5" x 3.5" (8.8cm x 8.8cm) The DSP was cut ⅛" (3mm) larger there were 12 DSP pieces. To adhere the paper to the bases, I painted TomBow glue all over the MDF and placed my pre-cut DSP pieces over the top. When the glue had dried, I sanded the excess paper away from the edges. I then coated side edges of the MDF with Versamark Ink and Copper Embossing Powder. Once heated it gives a sweet copper finish to the coasters edges that matches the tin beautifully.

#KOCreationscards #StampinUp30 #TeaRoomSuite #HomeDecor #HomeDecorSUStyle #HandMadeGifts #LoveItChopIt #DIY
I needed to make the coasters water resistant so, I sprayed a Krylon Acrylic sealer over them. Around 10 layers was applied. I left it to dry and then did the same to the reverse side. This means that the coasters can now be wiped with a wet/damp cloth to be kept clean.

You could store the coasters in this cute tin or fill the tin up with tea bags/leaves and and be prepared for a cuppa anytime with family and friends, all while keeping your table/bench tops drip/cup mark free ๐Ÿ˜‚


I do hope you have enjoyed my little home decor gift idea. There are plenty more ideas to be seen just by following the hop list below.
To continue moving through this wonderful hop please click the name directly after mine from the list below.


When shopping with me for the month of June please use the hostess code below.

 UBYDSWHR

The carousel below has listed all of the items used for my projects above.


As an added bonus you get Free with any product purchase over $50 during the month of June using the 'Sea Of Textures' and 'Abstract Impressions' Bundles.


Free with product purchase of:  $50 Au

Or

Or alternatively you can purchase this bundle separately just by clicking below.
Please add a note with your payment with the word 'JUNE' for my reference. 
I will then email you the complete tutorial bundle within 48hrs


Thank you so very much for visiting today. I you have any questions please don't hesitate to ask in the comments section below.
I always respond to questions ๐Ÿ˜Š

Friday, 18 May 2018

For The Love of Creating with Stampin' Up! quarterly Blog Hop


Welcome ๐Ÿ˜Š
My name is Kim and I am the host of this blog hop. We are an International group of Stampin' Up!® Demonstrators whom all adore creating with our Stampin' Up!® products and sharing those creations/projects with you.

This blog hop will be held every 3 months (quarterly) sharing with you our ideas using some of the gorgeous New Products that are soon becoming available.

You are currently here me me Kim Oliver - KOCreations Cards

I am sharing with you today items I have created for my Team Members using the absolutely STUNNING  'Share What You Love' Gotta Have It All Bundle! 

This bundle below has 3 FREE ITEMS plus a Limited Edition stamp set 'Statement Of The Heart' that is only available with the bundle and ONLY AVAILABLE FOR THE MONTH OF MAY.
 After this month everything else will be available, separately only. No FREE items and the Limited Edition stamp set becomes unavailable all together.


Here are my projects.

Thank You

#KOCreationsCards #ShareWhatYouLove #GottaHaveItAllBundle #StampinUp30 #StampinUpDemonstrator #JoinMyTeam #HomeDecor #Shadowboxes
  
This gorgeous gift in shades of Rich Razzleberry above, was made for my lovely Team Member Christine to celebrate her upcoming 2 year anniversary as a demonstrator with me.
I simply adore this 'Statement Of The Heart' Sentiment
It really does epitomise us all as crafter's. We all love giving and sharing what we do and hope that it makes a difference in others lives..
I also created one in March, you can view that one in the video below. This was made for another wonderful Team Member ~ Brenda
for reaching Qualified Recruit.


AND.....I have created for a Give Away!

This one below is cool shades of Blues and Greens has been created for one lucky person to WIN during the month of MAY just for shopping with me!

#KOCreationsCards #ShareWhatYouLove #GottaHaveItAllBundle #StampinUp30 #StampinUpDemonstrator #JoinMyTeam #HomeDecor #Shadowboxes

Thank you so very much for visiting my blog today, I do hope you have enjoyed my projects.

To visit the gorgeous Donna Gray's blog to see her wonderful projects please click the Next button.

Or alternatively you can click the name directly after mine from the list below.


When shopping with me for the month of MAY please use the hostess code below.

 S3CN7DWF

Just by shopping with me for the MONTH OF MAY ONLY you will go into the draw to win this gorgeous Home Decor and matching Thank You card.

#KOCreationsCards #ShareWhatYouLove #HomeDecor #Winthisjustforshoppingwithme
As an added bonus you get Free with any product purchase over $50 during the month of May this fabulous tutorial bundle using CARRY OVER products.
(Carry Over products are items that carry from one current catalogue to the next)


Free with product purchase of:  $50 AU 

Or 

Or alternatively you can purchase this bundle separately just by clicking below.
Please add a note with your payment with the word 'MAY' for my reference. 
I will then email you the complete tutorial bundle within 48hrs


Thank you so very much for visiting today. I you have any questions please don't hesitate to ask in the comments section below.
I always respond to questions ๐Ÿ˜Š

Tuesday, 15 May 2018

Kelly's Stamping Friends Birthday Blog Hop


Hello everyone ๐Ÿ˜Š

I am participating today in a fantastic hop helping the wonderful Kelly Kent celebrate her Birthday.

SO
Lets Wish Kelly a HUGE

HAPPY BIRTHDAY 

You have most likely reached here from the lovely Kristel Rimmer's page.
You are currently here with me (Kim Oliver - KOCreations Cards)
I have NEXT button further down this post for you to click and keep moving through the hop.

For my project today I have created something new.
Well new for me anyway ๐Ÿ˜†

I have chosen to create a framed sampler with a Ocean/Sea theme.

Here is my project

By The Sea

#KOCreationsCards #Seasampler #StampinUp30 #SeaOfTextures #LillypadLake #MagicalMermaid #HomeDecor #KellysStampingFriends
I have never created a sampler of anything before and wasn't sure where to start.
So using an A4 sized framed shadow box, I decided to give it a whirl and designed my sampler to fit.
I used only products that will be available from the 2018/2109 catalogue. This catalogue goes LIVE from the 1st June 2018

 Items Used.

  • NEW Bundles (Stamp and Die sets) ~ Sea Of Textures 148358 , Lillypad Lake 148366
  • Carry Over Stamp sets ~ Magical Mermaid, High Tide, 
  • Thinlits ~ Layering Circles Framelits
  • Punch ~ 1" circle 
  • DSP ~ Tranquil Textures 146333
  • Card Stock ~ Whisper White -Thick, Foil Sheet - Gold.
  • Ink pads ~ Tranquil Tide, Mint Macaron, Real Red, Night Of Navy, So Saffron, Fresh Fig and Blushing Bride
  • Tools ~ Wink Of Stella, Aqua Painters, Paper Snips, Paper Piercing Tool, Big Shot and Stampin' Trimmer.
  • Emebellsihments ~ Share What You Love Artisan Pearls 146927, Copper Trim, Solid Bakers Twine - Whisper White.
  • Adhesives ~ Multipurpose Liquid Glue, Dimensionals - Mini and Normal,

Close up shot

#KOCreationsCards #Seasampler #StampinUp30 #SeaOfTextures #LillypadLake #MagicalMermaid #HomeDecor #KellysStampingFriends

I thought a closer view would show a little bit more of the detail in this sampler. I found it really hard to capture a good shot to show it's true beauty.

I am elated with the finish on this even though I struggled to capture it.
This took me 3 days to complete, as I mentioned earlier I had never created a sampler before. I am not even sure what I will do with it lol. Perhaps a gift for someone special. 

Up next we have Denise Beutler


Thank you for visiting x

When shopping with me for the month of MAY please use the hostess code below.

 S3CN7DWF

Just by shopping with me for the MONTH OF MAY ONLY you will go into the draw to win this gorgeous Home Decor and matching Thank You card.

#KOCreationsCards #ShareWhatYouLove #HomeDecor #Winthisjustforshoppingwithme
The carousel below has links to items that can currently be purchased.
Don't forget the Hostess code for MAY when purchasing.

 S3CN7DWF


As an added bonus you get Free with any product purchase over $50 during the month of May this fabulous tutorial bundle using CARRY OVER products.
(Carry Over products are items that carry from one current catalogue to the next)


Free with product purchase of:  $50 AU 

Or 

Or alternatively you can purchase this bundle separately just by clicking below.
Please add a note with your payment with the word 'MAY' for my reference. 
I will then email you the complete tutorial bundle within 48hrs


Thank you so very much for visiting today. I you have any questions please don't hesitate to ask in the comments section below.
I always respond to questions ๐Ÿ˜Š

Sunday, 13 May 2018

Stamping Sunday Blog Hop - Petal Palette


Hello everyone ๐Ÿ˜Š
and
Happy Mothers day to you all.

Welcome to the Stamping Sunday Blog Hop (Second Sunday) hosted by Sara Levin.

You are currently here with Kim Oliver - KO Creations Cards - Australia. I have a list of hop participants closer to the end of this post.

I am hoping to inspire today using the Petal Palette stamp set along with the Petals and More thinlits.

But first let me introduce my MUM.


My Mum's name is Nancy.
This photo was taken during our trip to Sydney together.
I took my Mum for a short holiday when I attended the Onstage 2018 event, as neither of us had been to Sydney before. We certainly managed to pack in loads over the time we were there.
My Mum loves crafting of all types. She really just loves creating from wood craft to creamics to paper craft and even jewlery making. Mum can and will turn her hand to most crafts and is very adept at what ever she tries. She even volunteers weekly at an ageed care facility helping them with their craft days.

So, my gift to Mum this Mothers Day will be some Stampin'Up!® products plus my own hand created card and gift tag.


Here are my projects

Detailed Petals 

For MUM

Gift tag and card set

#KOCreationsCards #PetalPalette #MothersDay #Gifttag #giftset #handmadegifts #ILoveMyMum #StampinUp30 #PaperCraft #CardMaking 

I created the card first using using a mix of new and carry over products.
I didn't add a sentiment as when I actually created this card I wasn't sure what I was going to use it for.
But I think it will do nicely for my Mum.
She loves flowers and I can write a special and meaningful message inside.

Product List

  • Stamps - Petal Palette.
  • Thinlits - Petals and More.
  • Card Stock - Thick Whisper White, Night Of Navy and Blushing Bride. 
  • Designer Paper - Delightfully Detailed Laser Cut Specialty Paper.
  • Inks - Blushing Bride, Night Of Navy
  • Pens - Night Of Navy Stampin' Blends Marker
  • Embellishments - Frames Elements, Gold Metallic Thread, *Pearl Basic Jewels (*Retiring)
  • Tools - Aqua Painter, Paper Piercing Tool, Big Shot, Tag Topper Punch.
  • Adhesives - Multipurpose Liquid Glue (TomBow) Mini Glue Dots, Dimensionals.
I then decided that a sweet gift tag would be nice addition for the gifts I have put away for Mum to giver her today.

Gift Tag

#KOCreationsCards #PetalPalette #MothersDay #Gifttag #giftset #handmadegifts #ILoveMyMum #StampinUp30 #PaperCraft #CardMaking 

I created the tag, so it has a blank opposite side. This means I can write something on it if required.

Here is a quick snap shot of the two items together.

#KOCreationsCards #PetalPalette #MothersDay #Gifttag #giftset #handmadegifts #ILoveMyMum #StampinUp30 #PaperCraft #CardMaking 


Don't they look great together ๐Ÿ˜
Now all thats left to do is write on and in them and give them to Mum with her special gifts.

Happy Mothers Day Everyone.


To continue moving through the hop please click the name directly after mine from the list below.


When shopping with me for the month of MAY please use the hostess code below.

 S3CN7DWF

Just by shopping with me for the MONTH OF MAY ONLY you will go into the draw to win this gorgeous Home Decor and matching Thank You card.

#KOCreationsCards #ShareWhatYouLove #HomeDecor #Winthisjustforshoppingwithme

The carousel below has all items used for my MOTHERS DAY PROJECT listed and is linked directly to my store for your convenience.


As an added bonus you get Free with any product purchase over $50 during the month of May this fabulous tutorial bundle using CARRY OVER products.
(Carry Over products are items that carry from one current catalogue to the next)


Free with product purchase of:  $50 AU 

Or 

Or alternativley you can purchase this bundle separately just by clicking below.
Please add a note with your payment with the word 'MAY' for my reference. 
I will then email you the complete tutorial bundle within 48hrs


Thank you so very much for visiting today. I you have any questions please don't hesitate to ask in the comments section below.
I always respond to questions ๐Ÿ˜Š

Wednesday, 25 October 2017

Enjoy The Little Things In Life- Video Blog Hop - Christmas


Welcome everyone ๐Ÿ˜Š
For todays' blog I am hopping with the "Enjoy the little things in life - Design Team. We will try to help you to be more creative and give you some great ideas and tips which will include a video of how we made our projects. 
We have an incredibly amazing team of demonstrators from around the world that are part of this hop.
This months theme is Christmas.

Currently you are visiting me - Kim Oliver of Australia, so have a look at the list at the end of the post to see who is next


I have chosen to create some Decor items for Christmas this hop.

Honeycomb Christmas Ornaments


#KOCreationscards #Merrymusic #DIYChristmas #Honeycombchristmasornaments #Stampinup #Papercrafts #Cardmaking #Homedecor


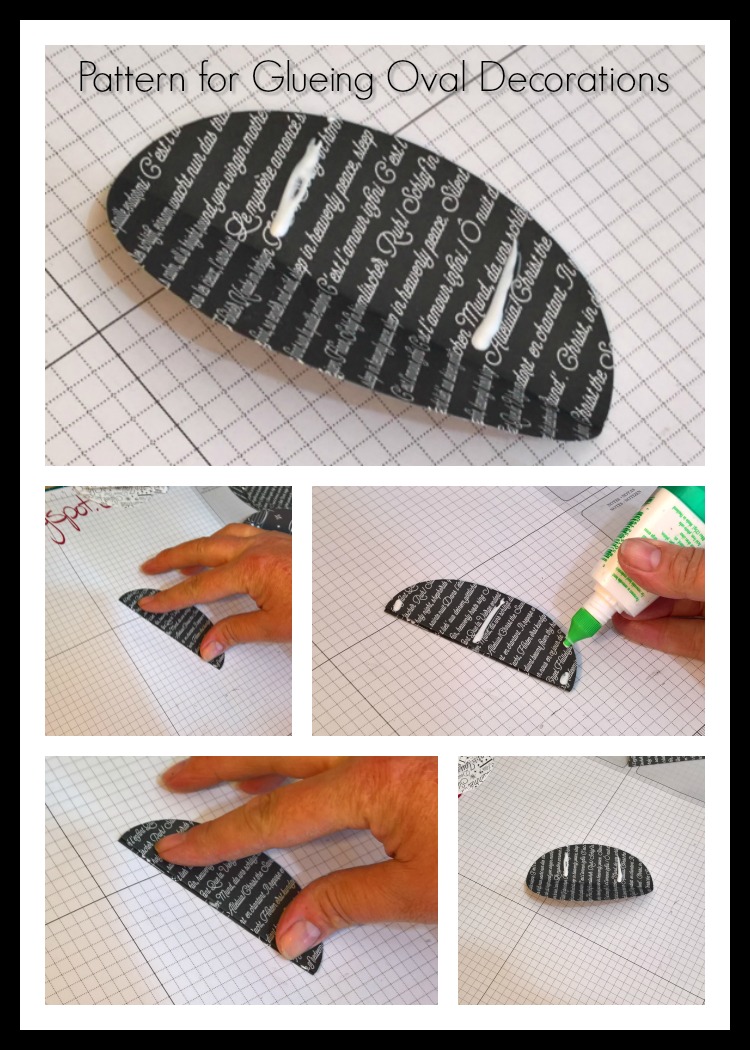
I have taken a few photo's to show the glueing pattern for the oval decoration and the circle on also.

#KOCreationscards #Merrymusic #DIYChristmas #Honeycombchristmasornaments #Stampinup #Papercrafts #Cardmaking #Homedecor

#KOCreationscards #Merrymusic #DIYChristmas #Honeycombchristmasornaments #Stampinup #Papercrafts #Cardmaking #Homedecor


Here is my Vidoe Turoial.


#KOCreationscards #Merrymusic #DIYChristmas #Honeycombchristmasornaments #Stampinup #Papercrafts #Cardmaking #Homedecor

To keep moving through the hop please just click the name directly after mine.


If you are looking to purchase any of the tiems I used to create these gorgeous decorations with then please feel free to use the carousel below.
It has all items listed and is linked directly to my store.


Thank you so much for visiting today.
If you have any questions please ask them in the comments section below.
I always reply ๐Ÿ˜‰

Sunday, 22 October 2017

ESAD 2017 Holiday Catalogue Fancy Folds and 3D projects blog hop

No automatic alt text available.


Welcome everyone ๐Ÿ˜Š
Today I am participating in a blog hop with ESAD.
Our theme this month is 3D projects.

What is ESAD? I hear you ask.
Well, FOR MORE INFORMATION please refer directly below.

Image may contain: text

I chose to create a trio of shadow boxes for a display ready for Christmas.

I can hang this on my wall or pop it on a shelf, wherever the fancy takes ๐Ÿ˜‰

Here is my Shadow Box
decor item for Christmas.

DECK THE HALLS


#KOCreationscards #Christmas #Carolsofchristmas #Christmaspines #DIYchristmasifts #DIY #Shadowboxes #Homedecor #Stampinup #Cardmaking #Papercrafts


I have used a selection of gorgeous stamp sets and DSP for this gorgeous decor item.
For a full list of items please refer to the carousel at the end of my blog.

Here is a quick template using 12 x 12 DSP shadow box each score line is 2cm apart. So score at 2,4,6,and 8 cm then turn and score again until all four edges have been scored. Turn and score two lines 4 cm long 1 at 10cm. and another 2cm before the other four score lines. Refer to picture below. Turn and score opposite ends identically.
Trim away corners following xxxx cut lines.


 Follow instructions as above to complete the shadow boxes..

The stamp sets used are Carols of Christmas stamp set and the Christmas Pines stamp set.

ANGLED VIEWS

#KOCreationscards #Christmas #Carolsofchristmas #Christmaspines #DIYchristmasifts #DIY #Shadowboxes #Homedecor #Stampinup #Cardmaking #Papercrafts


I adore the Christmas ephemera available at the moment. 
They create the most gorgeous wreath, what do you think?

#KOCreationscards #Christmas #Carolsofchristmas #Christmaspines #DIYchristmasifts #DIY #Shadowboxes #Homedecor #Stampinup #Cardmaking #Papercrafts


To continue moving through this fabulous hop please use the next button below. The lovely Sharon Dalton is next on the list

No automatic alt text available.

If you are searching for a full list of items that I used to create this DIY decor item.
Please refer to the carousel below.

Thank you so very much for visiting with me today. If you have any questions please ask them in the comment section below.
I always reply.


Sunday, 14 May 2017

Stamping Sunday Blog Hop - Lovely Friends


Welcome to a new blog hop called Stampin Sunday, this hop is hosted by the lovely and talented Sara Levin. You may know her by her blog name The Artful Inker
We will be doing a monthly hop every second Sunday of each month! So mark it on your calenders!!

Today we are show casing the gorgeous 'Lovely Friends' stamp and thinlits sets.
Available for purchase from the 1st June in my online store.

#Lovelyfriends #Homedecor #Loveitchopit #KOCreationscards #Rubberstamping #Stampingsunday 

I hope you enjoy our projects and find some inspiration along the way. 
You are here with me Kim Oliver and you will find a list of other all of the wonderful people participating towards the end of this post.

The 'Lovely Friends' stamp set has matching 'Lovely Laurel' thinlits dies set.
The stamp set itself is a two step stamp set. It has 23 individual photopolymer stamps.
The thinlits dies is a 10 piece set. The dies create a laurel and a banner that can be used as a pop up inside your card. The set also includes a die for the smallest flower, a decorative label,  a small branch with leaves and little label accents too.

What is a Photopolymer stamp I hear you ask ?? 

Well it's a type of resin and is wonderful because it sticks extremely well on to acrylic blocks. It is durable and the transparant nature of these stamps makes it easier to line up images without the need of a guide. This is a feature that is particularly helpful with two step stamps (like this set), borders and backgrounds.


Here is my project for this fabulous first hop. I do hope you like it ๐Ÿ˜Š

Shadow Box Card and Gift Box

#Lovelyfriends #Homedecor #Loveitchopit #KOCreationscards #Rubberstamping #Stampingsunday

This is a 3D project that has a card attached to the back.
It really is a gift in itself, but one that has a dual purpose..
It's a card and it can be popped onto a shelf and used as decor too!.
Perfect for a personalised house warming gift, don't you think!
The matching gift box is perfect for adding a candle or smaller tealights or even some specialty chocolates ๐Ÿ˜‹ yummy

Inside View

#Lovelyfriends #Homedecor #Loveitchopit #KOCreationscards #Rubberstamping #Stampingsunday

New Products Used

  1. Lovely Friends Stamp set
  2. Lovely Laurel Thinlit dies
  3. Pick a Pattern DSP
  4. Berry Burst Ink Pad
  5. Lemon Lime Twist card stock
  6. Lemon Lime twist Finely Woven ribbon.
  7. Pearl Basic Jewels

Method.

Directions for making and putting together the actual shadow box are after this.
  1. The shadow box itself has been created using 1 sheet of Pick a Pattern DSP (available 1st June) that has been trimmed to 25 x 27cm...
  2. I stamped the sentiment using Memento Black ink onto thick whisper white card stock, making sure the ink was dry before touching. 
  3. I then trimmed it down so that there was 2 mm between the writing and the edge ... roughly 12 x 14 cm.
  4. I created the matting underneath the stamped sentiment by  cutting a piece of basic black to 13 x 15cm. This sits central to the scoring lines for the shadow box ( This shadow box instructions are below)
  5. I die cut my laurels using the new Lemon Lime Twist (a new in colour) card stock.
  6. The little flowers have been stamped using the smallest two step flower stamps in the new  Berry Burst colour (A new in colour)  I stamped the solid colour first using the stamp off technique to get a lighter colour.
  7. I stamped the tiny hearts also in the Berry Burst ink. 
  8. I added a small pearl to the centre of each flower.
  9. I also created the same sentiment for the back/inside of this shadow box ...It just helped make the sentiment stamped on the pop up banner more touching.
  10. I used Thick Whisper White for the banner and stamped the sentiment before gluing the front part to the moveable interlocking backs. The dies for this create scored areas for folding where appropriate to create your pop up mechanism.
  11. The Laurels also have interlocking pieces on bottom end and the dies also create scored areas to aid in folding in the correct spots.
  12. I used glue dots to attach the flowers to the laurels.

Instructions for the shadow box

#Lovelyfriends #Homedecor #Loveitchopit #KOCreationscards #Rubberstamping #Stampingsunday


Front and Open view
side by side


#Lovelyfriends #Homedecor #Loveitchopit #KOCreationscards #Rubberstamping #Stampingsunday

I have made up a couple of pictures steps for the box and lid instructions. 
You can find them below with the written instructions under each picture. 

I hope the instructions are clear enough.


Box Instructions


  1.  Trim a A4 piece of cardstock down to 25.5 x 20cm. 
  2.  For the 25.5 side score at 1cm - 8cm-17.5 and 24.5 cm
  3.  Turn and score the 20cm side at 7cm and 13 cm
  4.  Turn again and score two lines (Do not score in the middle) but top and bottom at 5cm and 21cm...see the first diagram above.
  5.  Trim out areas with scribbled area by cutting along the lines with crosses. Making sure to angle your cuts so that all flaps fit snugly.
  6.  Burnish all of your folds. 
  7.  Stamp images where desired. 
  8.  Add snail adhesive to the fold and hold end flaps. Then turn over and add snail adhesive to the inside of 1 cm fold over ends. (Found at the ends of the centre strip)
  9.  Put box together making, sure the the edges line up. 
  10.  The 1cm fold over flaps are the last to be folded in to place.


Lid Instructions 


  1. Cut a piece os DSP to 12.5 x 15.5cm.
  2. Score the 12.5 cm side at 1.5cm - 3m - 9.5cm - and 11cm
  3. Turn and score the 15.5 cm side at 1cm - 3cm - 12.5 cm and 14cm
  4. Trim areas along cut lines as marked above, making sure to angle your cuts so that all fold and hold flaps will fit snugly. 
  5. Burnish all folds. 
  6. Turn over and add snail adhesive to the 1.5 cm short end flaps. 
  7. Turn back over and adding snail adhesive to the inside 1.5 cm long fold over flaps. 
  8. Assemble lid and decorate as desired. I used the Lemon Like twist ribbon.


Well thats about it for me.
I do hope you enjoyed my project.
Please click on the next name after mine to continue through the hop.


I have added some of the items that I used that are currently available to the carousel below. All other products will be available in my store from June the 1st.

Don't forget the MAY Hostess Code if purchasing from me.

33EJUTN4


If you would like to be updated on special deals, hostess codes and even tutorials then sign up to my monthly news letter below.


Thank you so very much for stopping by my blog today.
 If you have any questions please ask in comments below.
I always reply.

Have a wonderful day x