Hello everyone 😊
Welcome once again to my blog.
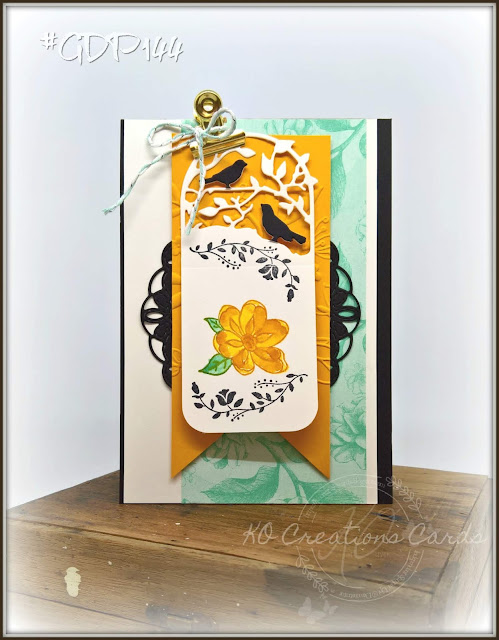
I am here today to share with you a project I created using some new products.
Botanical Bliss bundle, Stitched All Around Bundle and the Lovely Floral Dynamic Textured Embossing Folder
Welcome once again to my blog.
I am here today to share with you a project I created using some new products.
Botanical Bliss bundle, Stitched All Around Bundle and the Lovely Floral Dynamic Textured Embossing Folder
I adore mixing and matching sets! I have said it many times before, so one more time won't hurt 😆 It's one of the things that I simply LOVE about Stampin' Up!®...Just how well EVERYTHING mixes and matches.
I have also used some lovely NEW Colours too 😍.
Full list with links to products in carousel towards bottom of this post.
I have entered my project into this weeks Global Design Project's challenge #GDP144
Here is my project
Thank you so much for visiting today 😍
I do hope you have enjoyed my project.
If you have any questions please ask in comment section below.
I have also used some lovely NEW Colours too 😍.
Full list with links to products in carousel towards bottom of this post.
I have entered my project into this weeks Global Design Project's challenge #GDP144
 |
| #CaseTheDesignerCharletMallett #GDP144 |
CASEing the Designer Charlet Mallett
CASE = Copy And Selective EditHere is my project
Pure Bliss
 |
| #KOCreationsCards #GDP144 #BotanicalBliss #StitchedAllAround #LovelyFloralDynamicTIEF #StampinUp30 |
Items Required.
- Cardstock ~ Basic Black A4, Shimmery White (Half A4) and Mango Melody (6cm x 13.1cm)
- DSP ~ Tea Room
- Inks ~ Mango Melody, Balmy Blue, Granny Apple Green and Memento Ink Pad - Tuxedo Black
- Punches ~ Detailed Trio
- Stamps & Dies ~ Botanical Bliss (stamp) Bundle (Botanical Tags Framelits dies), Stitched All Around (stamp) Bundle (Stitched Labels Framelits dies)
- Folders ~ Lovely Floral Dynamic Textured Impressions Embossing Folder
- Ephemera ~ Gold Library Clips, Silver and Pool Party Bakers Twine.
- Adhesives ~ Dimensionals, Mini Glue Dots and Multipurpose Liquid Glue.
- Tools ~ Clear Blocks D and C, Big Shot, Aqua Painters and Sponge Daubers
Basic Instructions
- Cut Basic Black A4 card stock in half lengths ways. Then take one half and score at 14.9cm, fold and burnish.
- Cut a Shimmery White card front piece @9.7cm x 14.9cm. Glue to card front .6cm from right edge.
- Cut a strip of 'Balmy Blue' 'Tea Room' DSP @7.1cm x 14.9cm and glue to the Shimmery White cardstock 4mm from right edge of the Shimmery White.
- Using the spare strip of Basic Black cardstock and the Big Shot, die cut a bird Silhouette tag topper from the Botanical Tags plus a doily from the Stitched Tags. Trim two birds from the Tag topper die cut and put aside.
- Glue the Basic Black doily to the centre of the card layers.
- Cut the strip of Mango Melody cardstock into a banner and place in the Lovely Floral embossing folder. Run through Big Shot.
- Using the scrap piece left over from the Shimmery White card front cut the Bird Silhouette tag topper and trim the sides to match. Cut off at 12cm and round the corners at the bottom using the Detailed Trio punch.
- Glue the two black birds to the 'Shimmery White' tag topper silhouette.
- Using two sponge Daubers add Mango Melody to one and Granny Apple Green to the other, ink up the flower from the Botanical Bliss stamp set. Huff (hot breath on ink) and stamp image.
- Add Mango Melody to one corner of the Clear Block C and Balmy Blue to the other. Using the small Aqua Painter add colour to the stamped flower image.
- Stamp the floral flourish in Memento ink at the top and bottom of the coloured flower.
- Put the Mango Melody banner and the tag together using the Gold Library clip. Tie a small piece of Silver and Pool Party twine in a bow to the Library Clip to finish.
- Put dimensionals on the reverse side - top half of the Mango Melody banner and adhere to the card base and layers central to the doily.
There you go, you have recreated this card.
Angled View
 |
| #KOCreationsCards #GDP144 #BotanicalBliss #StitchedAllAround #LovelyFloralDynamicTIEF #StampinUp30 |
I do hope you have enjoyed my project.
If you have any questions please ask in comment section below.
When shopping with me for the month of JULY please use the hostess code below.
CK6EDWBD
The carousel below has listed all of the items used for my project above.
As an added bonus you get Free with any product purchase over $50 during the month of July using the 'Stitched All Around' and 'Tropical Chic' Bundles.
Free with product purchase of: $50 Au
Or
Or
Or alternatively you can purchase this bundle separately just by clicking below.
Please add a note with your payment with the word 'JULY' for my reference.
I will then email you the complete tutorial bundle within 48hrs
I will then email you the complete tutorial bundle within 48hrs
Thank you so very much for visiting today. I you have any questions please don't hesitate to ask in the comments section below.
I always respond to questions 😊


Fantastic! Loving all the layers. Thanks for playing along this week at Global Design Project. xo Charlet
ReplyDelete