Showing posts with label #Garden. Show all posts

Sunday, 17 December 2017

Crazy Crafters Blog Hop - Rose Wonder - Water Colour

Image may contain: text

Welcome back everyone, it's so very lovely of you to stop by 😊

Today I am joining the Crazy Crafters for a blog hop.
I will have a complete list of blog participants toward the end of this post.

We are all CASEing Su Mohr.
This is the card of Su's that I have chosen to CASE


Those that follow my blog know that I really enjoy water colouring, well colouring of any kind really. So this card was one that jumped out at me straight away.

The elements I chose to use were the layers of a solid white with a nature theme over the water colour background.

Here is my card.

Rose Wonder

#KOCreationscards #Rosewonder #Roses #Garden #Cardmaking #Watercolour #Artycards #Stampinup

The elements I chose to use were the layers of a solid nature over the water colour background.
For my first card I also chose to create a banner style sentiment.
I had so much fun creating this card that I decide to create another.
I nearly didn't add the die cut overlay as I loved the actual painting, but in the end I did. I thought I could always paint another lol.


#KOCreationscards #Rosewonder #Roses #Garden #Cardmaking #Watercolour #Artycards #Stampinup


I also took a number of  photo's to aid you in creating you own version of arty style cards...

#KOCreationscards #Rosewonder #Roses #Garden #Cardmaking #Watercolour #Artycards #Stampinup

Thank you for visiting my blog today. To continue moving through the hop please click the name directly after mine.


If you are searching for any of the items I used to create my cards with today then please check the carousel below. It has all relevant items listed and is linked directly to my store for your convenience.


Thank you so very much for visiting me today.
If you have any questions please don't hesitate to ask them in the comments section.
I ALWAYS REPLY.
😊

Wednesday, 13 December 2017

International Highlights - Stampin Blends - Birthday Blooms


Hello everyone and welcome back to my blog.

Today I am taking part in the International Blog Highlights which are hosted by Kylie Bertucci

You can VOTE for your favourite project during these highlights.
Vote by clicking HERE.

OR CLICK BUTTON BELOW

The theme for this month is All Things Flowers.
I find that I tend to be drawn to floral themes a lot lately, and this is one of those times.
The colours in flowers range from muted hues to rich and vibrant. I chose rich and vibrant today for my floral card.


My card is number 13 in the Gallery. Register your VOTE by clicking on the heart in the top right
corner of the picture.

Here is my card.

You Are The Extra In My Ordinary

The sentiment is from the 'So Many Shells' stamp set

#KOCreationscards #Birthdayblooms #uplifting #Yellowrose #Flowers #Garden

By repeat stamping the rose image in the background and then layering the same image just coloured and fussy cut the results are so striking.
For interest I splattered some dark daffodil delight over the black and white stamped images.
To colour my gorgeous rose I used the NEW Stampin' Blends now available from Stampin' Up!
I love how vibrant the colours are, don't you?

 The colours I used for my card are Light and Dark Daffodil Delight combined with Light Pumpkin Pie blended into the darker sections of the flower. The leaves are Light and Dark Old Olive blended.
I added my highlights just by using the Colour Lifter pen.
 For my sentiment I used the water colour markers on my stamp. Colour used were Old Olive and Daffodil Delight along with Basic black.


 I must say that these Stampin' Blend pens are just RIDICULOUSLY EASY to use!

Have you tried them yet? I was so pleasantly surprised when I started! The colours just glide on for both the brush tip and pen tip. No dragging on the paper, no catching, pilling and if you add a bit too much colour to your project or put some colour where you don't want it, FEAR NOT!
Just grab the Colour Lifter and rub it on the area you want it gone from!
SIMPLE!


A point of interest too is that you can purchase your set any way you like.... 
One at a time, 
In colour pairs 
OR
 Just go all out and purchase the whole set in one hit! 

There are choices to suit every budget!


Don't forget if you like my card to vote by clicking the image below.
 My card is card number 13 in the gallery.
To register your vote for your card choice just click on the heart in the top right of the picture.


Would you like to purchase any of the items used to create my card with?
Then please use the carousel below, it has all of the items listed and is linked directly to my store for your convenience.


Thank you so very much for visiting me today.
If you have any questions please don't hesitate to ask them in the comments section.
I ALWAYS REPLY.
😊

Tuesday, 12 December 2017

Water Colour - The Painted Rose

Hello everyone 😊

I have caught a bug!

A bug called water colour painting!

I recently visited a close friend who has some STUNNING roses growing in her garden.

I took some photo's for inspiration

Dianne's Roses


I have been working with water colours over the last week for another blog that will go LIVE on the 17th of Dec 2017.

I have always had a tendency to paint or draw, but many years ago I aquired a brain injury that dulled that side of my personality. 
I have found that side of my craftiness has resurfaced for short periods of time over the last few years while card making. . 
The last few weeks that "URGE or NEED" to paint has grown Soooo much stronger.
I finally gave into it yesterday and started a small project, but with serious intent.
I thought, why not paint a small image and mount it as a card.
And to tell the truth water colour is the easiest and most forgiving medium to restart my painting efforts.

I admit I still have a loooong way to go before I am at the level I felt I was many years ago, but I am over the moon to know that I still have a drop of talent left.

Below is a shot of the near finished work before final touches and mounting.

Now to hopefully keep painting and improving on my efforts.

In Progress


Below is the finished card.
I do hope you like it.

The Painted Rose


#kocreationscards #watercolourpainting #watercolorpainting #roses #garden #inspiredbynature #naturalbeauty #papercraft #cardmaking #stampinup


I am seriously thinking I might keep this card! I feel an emotional attachment developing hahaha. Downside of art.


I have a list of all colours used to create my water colour with, in the carousel below..
The carousel is linked directly to my store


Thank you so very much for visiting me today.
If you have any questions please don't hesitate to ask them in the comments section.
I ALWAYS REPLY.
😊

Sunday, 13 August 2017

Stamping Sunday Blog Hop - Tabs For Everything


Welcome to  the Stampin Sunday blog hop, Every month on the first Sunday we all get together and showcase an item from the current catalogues. It could be a stamp set, a bundle or a whole suite!
 
#KOCreationscards #Tabsforeverything #Gracefulgarden #Sheetmusic #Vintage #Roses #Garden #Cardmaking #Stampinup
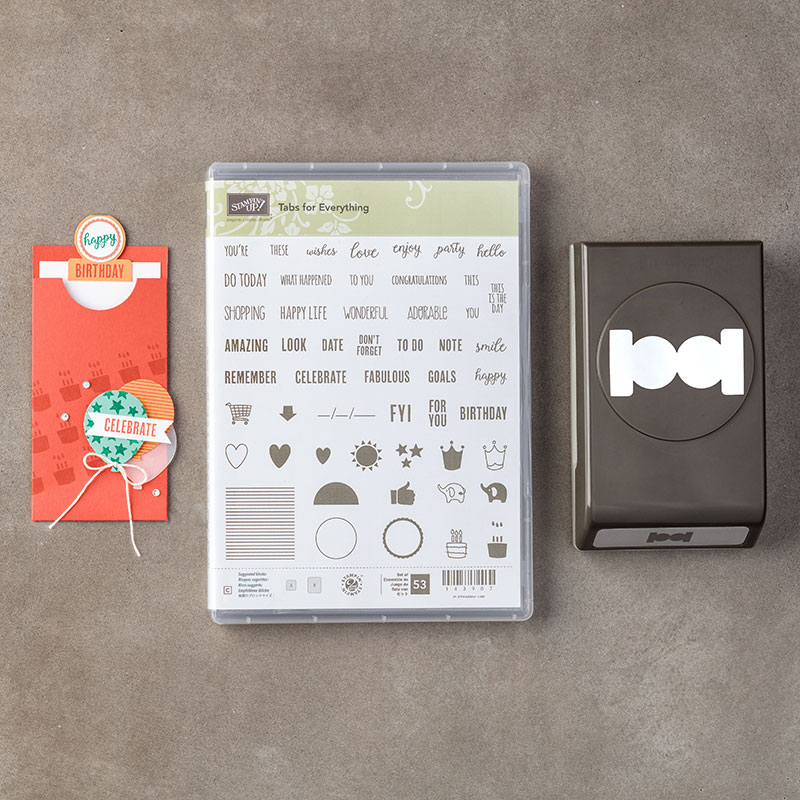
Today we are using the versatile Tabs For Everything stamp and punch set. This set is currently available in a bundle. I love bundles, they are awesome because you get to save 10% percent on the total purchase price when you purchase these items as a bundle.

You can purchase your bundle HERE

Tabs For Everything bundle.

I combined this fabulous and versatile bundle with the Sheet Music background stamp and the Graceful Garden stamp set to create a little gift set with.
 I created a card and matching Pillow box

I have also added this set to Kylie Burtuccis International Highlights with the theme Teachers Gifts. Votng for this goes LIVE from the 16th August at 8am.
You can vote for my project my by clicking on the button below, My Project is number 11. Just click the little heart in the top right corner to vote.
 Vote for Me

Love Tabs Gift Set

#KOCreationscards #Tabsforeverything #Gracefulgarden #Sheetmusic #Vintage #Roses #Garden #Cardmaking #Stampinup


My card base is thick Whisper White card stock with a layer of Chocolate Chip card stock.
I stamped my Sheet Music onto normal whisper white using the stamping off technique.
This gave me a faded and patchy look which lent itself more to the vintage feel I was after.

Using the stamp-a-ma-jig so I could stamp 2 colours on the same stamp I stamped my rose in Rich Razzleberry first cleaning off any excess colour from the leaf area before stamping. I then cleaned my stamp and inked it in Lemon Lime Twist again wiping of any excess only this time from the petals.
Once completely stamped I water coloured the whole flower, stem and leaves. Blending Rich Razzleberry, Lemon Lime Twist Pumpkin Pie and Daffodil Delight. I added clear Wink of Stella around the highlights of the rose plus 3 clear Perfect Accents..I made them clear by removing the white backing!
When all of the colour was dry I stamped the rose outline again in Rich Razzleberry to redefine the image and then fussy cut it out.

Pillow Box

Basic Directions.


You can down load a free template for 3 different size pillow boxes HERE
I decorated my pillow box to match my card. I used the same elements from the card just on a smaller scale.

Open and Angled View of Card Only

#KOCreationscards #Tabsforeverything #Gracefulgarden #Sheetmusic #Vintage #Roses #Garden #Cardmaking #Stampinup
I have also added this gift set to the Global Design Project challenge this week #GDP099 with the theme of Wedding/Anniversary, this gift set fitted their theme to perfection!

The layers beneath the rose are wide black dotted white Washi Tape, Linen Thread, Black Mini Sequins and a doily cut in half. I placed the rose on top mounted on Mini Dimensionals.
I used the Tabs For Everything as a means to attach my sentiment and placed it beside the rose with multipurpose glue.
 For the inside of my card I simply stamped the smaller rose and quickly gave it a colour wash to match the front.


Please click on the next name after mine to continue through the hop.


If you would like to purchase any of the items I used to create these projects with then please look no further than the carousel below. It has all items listed and is linked directly to my store.
When ordering on line with me please remember to use the
Hostess Code for August
VSF96XYM
All those who use the code and enter their contact details go into the draw for the 2 monthly prizes that are available. 1 prize is for orders up to $100 and the other prize is for orders $100 and over


Wednesday, 2 August 2017

Daisy Delight , Lovely Words and Layered Leaves

#KOCreationscards #Daisydelight #Daisies #Embossing #Cardmaking #Masking #CI14 #Flowers #Garden #Nature #Layeredleaves #Detailedfloralthinlits
Welcome back everyone 😊

Yesterday I shared a card created using the fabulously versatile Daisy Delight bundle and using a colour palette from the Colour INKspiration challenge. 
You can see that card HERE
These are the colours that make up the challenge for  #CI14 Love creating? Love Colour and different palletes? Just click the challenge number and ask to join the Facebook Group to be able to take part yourself.
These colours are Smoky Slate, Rich Razzleberry, Soft Sky and Night of Navy.

Here is Today's card.

Lovely

#KOCreationscards #Daisydelight #Daisies #Embossing #Cardmaking #Masking #CI14 #Flowers #Garden #Nature #Layeredleaves #Detailedfloralthinlits

For this gorgeous card creation I started by cutting a rectangle of thick Whisper White using the Detailed Floral Thinlits edge die . 
I sponged Rich Razzleberry on my thick Whisper White card base in the area that I was going to leave a gap.
I LIGHTLY spritzed both of my die cut pieces with water and ran them through the Layered Leaves dynamic Textured Impressions Embossing Folder ( or TIEF for short) As I wanted to deboss the leafy image I made sure I had the card the right way round.
I really like the effect of the debossed leaves behind my daisies.

Do you think that the sponged colour gives this card the illusion of 3D?? 

I punched out 3 daisy images and coloured them by using a dauber and Rich Razzleberry. I then added Night of Navy and Rich Razzleberry card stock using the Blossom Builder punch. 
Another versatile punch and a must have if you enjoy building your own flowers like I do!
I finished my flowers by adding a Faceted Gem to each centre.
The sentiment is from the centre cut out from a Lovely Words diecut and layered in Night of Navy and Smoky Slate to create a shadow effect
The leaves behind the Daisy have been cut using the leaf die from the eclectic layers thinlits in Smoky Slate card stock.

Angled and Open View

#KOCreationscards #Daisydelight #Daisies #Embossing #Cardmaking #Masking #CI14 #Flowers #Garden #Nature #Layeredleaves #Detailedfloralthinlits

For the inside I used the ink and wipe method for the daisy stamp. Firstly inking in Night of Navy, wiping and then inking in Rich Razzleberry. Stamping once turning and without re-inking stamping again.


If you would like to purchase any of the items I used to create this card project with today then look no further than the carousel below. It has all itmes listed and is linked directly to my store.
When ordering on line with me please remember to use the
Hostess Code for August
VSF96XYM
All those who use the code and enter their contact details go into the draw for the 2 monthly prizes that are available. 1 prize is for orders up to $100 and the other prize is for orders $100 and over.


For the month of August everyone...Demo's Customers absolutely EVERYONE can pre-order this fabulous set that will be available in the new Holiday Catalogue set to be released in September!
To order your Stamp set, Die set or 
EVEN BETTER 
save 10% and buy the bundle! 
Then just click HERE


Thank you so very much for stopping by my blog today. 
I hope you have enjoyed my creative efforts 😊
If you have any questions please feel free to suse the comments section to ask them. 
I always reply!

Tuesday, 1 August 2017

Daisy Delight #CI14


#KOCreationscards #Daisydelight #Daisies #Embossing #Cardmaking #Masking #CI14 #Flowers #Garden #Nature

Welcome back everyone 😊
Today I have been working with a colour palette from Colour INKspiration
 Every fortnight they choose a different Colour challenge for everyone to have try their hand at, You can join the FB group by clicking HERE and asking to join.
Here is this fortnights colours.

 They are Smoky Slate, Rich Razzleberry, Soft Sky and Night of Navy

As just recently the Daisy Delight bundle has become orderable again in Australia! - Jumps for joy lol I adore this bundle, it is perfect for soooo many occasions and is really great value for money.

 If you purchase the Daisy Delight Stamp and Punch set ( 145361) as a bundle then you will save 10% as with all bundles available from Stampin' Up!® 

So,  in honour of being back in stock I chose the Daisy Delight bundle to use for this gorgeous colour palette.

AND
Here is my card.
I actually made two cards. 
But I will share the other card tomorrow  though 😉

Thank You....for your kindness

#KOCreationscards #Daisydelight #Daisies #Embossing #Cardmaking #Masking #CI14 #Flowers #Garden #Nature
For my card base I used thick Whisper White card stock with layers of Night of Navy and Whisper White. 
I made a circle mask using my layering circles framelits and softly sponged Soft Sky and Night of Navy inside.
I then mixed embossing paste with a drop of Smoky Slate ink refill and using the clouds mask from the Pattern Party Decorative Masks. I let the clouds be outside the circle area.
When this was dry I stamped the stem of the daisy in Night of Navy.
I punched the daisy with the Daisy punch and whisper white, then daubed Rich Razzleberry over the centre and ends. I cut this in half and doubled over. Chopping out a couple of petals and arranging them in a falling manner below the main flower.
I added a large faceted gem to the centre.
To finish the front I used the Iridescent sequins from the metallics sequins.

Open and Angled View 

#KOCreationscards #Daisydelight #Daisies #Embossing #Cardmaking #Masking #CI14 #Flowers #Garden #Nature

For the inside I used the ink and wipe method for the daisy stamp. Firstly inking in Night of Navy, wiping and then inking in Rich Razzleberry.


If you would like to purchase any of the items I used to create this card project with today then look no fi=urther than the carousel below. It ahs all itmes listed and is linked directly to my store.
When ordering online with me please remember to use the
Hostess Code for August
VSF96XYM
All those who use the code and enter their contact details go into the draw for the 2 monthly prizes that are available. 1 prize is for orders up to $100 and the other prize is for orders $100 and over.


Thank you so much for stopping by my blog today and
I hope you enjoyed my creative efforts 😉


Sunday, 30 July 2017

Crazy Crafters Blog Hop with Susan Wong

Image may contain: text

Welcome back everyone 😊
I am once again joining in with the Crazy Crafters for a blog hop. This week we are all CASEing the works of Susan Wong

Image may contain: 1 person, smiling, closeup and outdoor

Here is the card from Susan's blog I have chosen to CASE

Bella & Friends for Fancy Friday - Susan Wong

The elements of this card that I was drawn to was something I have used just recently, which was more accidental before than on purpose.. I smudged ink when painting and couldn't cover it so chopped it out with a punch...You can see that card HERE.
The little bite out of the card in my opinion is just so cute and this time I decided it would be used on purpose lol

and here is my card

Hearts For You

#KOCreationscards #Labeleralphabet #Happybirthdaygorgeous #Butterfliesthinlits #Flowers #Garden #Nature #Sequins #Cardmaking Stampinup
I started by embossing the butterfly with embossing paste. I used the swallow tail thinlit from the Butterflies thinlit set to do this with! I mixed the embossing paste with Crumb Cake ink and then spread over the thinlit onto the card, when covered lift thinlit to reveal the pattern. *Wash thinlit and tools immediately! 
I cut out the butterfly in vellum and overlaid  this so the embossing peeped through. I trimmed off the tails so that the bottom of my butterfly wasn't past the bottom of mt card.
I stamped the leaf stems in Wild Wasabi and the flowers in Berry Burst using the Happy Birthday Gorgeous stamp set. 
I topped this with a sentiment 'FOR YOU' using the Labeler Alphabet stamp set and a piece of Berry Burst seam binding ribbon.
This colour scheme was inspired by the Global Design Project Teams weekly challenge.

Aren't they just divine!

Angled View 

#KOCreationscards #Labeleralphabet #Happybirthdaygorgeous #Butterfliesthinlits #Flowers #Garden #Nature #Sequins #Cardmaking #Stampinup
My Card base is Thick Whisper White card stock with a layer of Berry Burst card stock.
Using the Berry Burst card stock and tied the Whisper White twine around the card, I tied in a strip of black mini sequins and then tied a bow combined with a Corrugated Element. 
I finished the card with some of the black mini sequins glued over the flower centres and a couple of small hearts from the Hearts and Stars Elements.
 I used the 1" punch to chop out the half circle from the card front. 

Open and Angled View

#KOCreationscards #Labeleralphabet #Happybirthdaygorgeous #Butterfliesthinlits #Flowers #Garden #Nature #Sequins #Cardmaking #Stampinup
For the inside I stamped the same images as the front in the bottom right corner, adding some of the sequins and a small wooden heart.
I adore how this card finished, it is just so sweet and pretty and still manages to remain clean and relatively simple too.

To continue moving through this hop please click the name after mine.


I do hope you enjoyed my card projects today.
If you are wanting to purchase any of the items I used to create my card with, then please use the carousel below. It has all of the items used and is linked directly to my store.

When shopping with me don't forget to enter the Hostess code for July


Thank you so much for visiting with me today. 
If you have any questions please feel free to ask them in comments below. 
I always reply