Showing posts with label #Fussycutting. Show all posts

Sunday, 10 September 2017

Crazy Crafters Blog Hop with Stesha Bloodhart

Image may contain: text

Welcome everyone ๐Ÿ˜Š
Today I am part of a larger group 'The Crazy Crafters' and we are all joining together today to hop with our special guest Stesha Bloodhart.

Image may contain: 1 person, smiling, eyeglasses and closeup

All of us have chosen a design from Stesha's work to CASE.
'CASE' is Copy And Selective Editing
We then share those selected works with you all ๐Ÿ˜Š

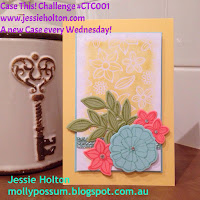
This is what I have chosen to CASE


Here is what I have made using Stesha's card as inspiration.

THANKS


#KOCreationscards #Paintedharvest #Sunflowers #Cardmaking #Fussycutting #Embossing #Givingthanks

The elements I chose from Stesha's card are the following
  • Stitched shape
  • Fussy cut element
  • Linen Thread


INSIDE AND ANGLED VIEW


#KOCreationscards #Paintedharvest #Sunflowers #Cardmaking #Fussycutting #Embossing #Givingthanks

What I added to the design was the following

  • Layered Leaves embossing.
  • Die cut leaves

Instead of fussy cutting out the whole sentiment I used the masking technique and inked Thanks onto the stitched shape.


To continue moving through the hop to be even more inspired please click the name after mine.


If you would like to purchase any of the items I used to create my card project with then please use the carousel below.
If you purchase from me please use this hostess code for the month of September
4JSTUBKF
All orders accompanied with contact details go into  my monthly draw for 2 separate prizes.
Good luck!


Thank you so much for visiting with me today.
If you have any questions please use the comments section below.
I always reply ๐Ÿ˜Š

Monday, 17 July 2017

Magical Mermaid Wishes Water Colouring


Welcome back everyone ๐Ÿ˜Š

Today I am sharing with you a  card using water colours and the Magical Mermaid stamp set.

Close Up of Colouring.

#KOCreationscards #magicalmermaid #watercolouring #cardmaking #GDP095 #fussycutting #rubberstamping #masking


I am entering this card into the Global Design Project weekly challenge. #GDP095
Their challenge theme this week is  Kids.


I have seen masks that you can purchase that give you a ragged edge to ink or paint within. This creates a type of frame. 
SU doesn't have these as yet, So I made my own! I just used card stock and tore a ragged edged shape from the centre. 

Here is a picture of my makeshift mask.


Pretty simple eh! And it is re-usable! Just let it dry ๐Ÿ˜

Here's How.
Focal Background.
  • To hold the mask in place I used snail adhesive all around the edges. 
  • I then stuck it to my clothes! lol YES my clothes and the carpet too! I did this to get rid of the excess stickiness, I wanted it to stay in place but not tear any paper when it was removed. I stuck it to the Watercolour paper in the position I wanted.
  • I then inked two blocks with my chosen colours (Bermuda Bay and So Saffron) 
  • I sprayed water onto my watercolour paper and also onto the blocks holding the colour. 
  • I used my Aqua Painters, as wet as I could make them and washed the colour over the area I wanted for both colours.
  • With the remaining colour on the blocks, I just smooshed it on top of the washed colours.
  • I then used my aqua painter to mix and blend them just a little. 
  • I left this to dry.

Magical Mermaid Kisses

#KOCreationscards #magicalmermaid #watercolouring #cardmaking #GDP095 #fussycutting #rubberstamping #masking

For the rest of the focal.
  • While the water colouring was drying, I stamped the mermaid image onto Shimmery White card stock using Memento black ink. 
  • I blotted this and then made sure it was dry with my heat tool. I didn't want any smudging!
  • Once the black ink was completely dry, I fussy cut her out.
  • I then coloured my mermaid using aqua painters.
  • Her hair is So Saffron, her skin/body is Powder Pink and her tail is Bermuda Bay mixed with So Saffron. 
  • To add extra glimmer I used the Wink of Stella pen.
  • AND just to add a few more highlights along her tail, I used the whisper white re-inker to touch the scales along the centre and down the length of her tail.. 
  • To complete the scene I stamped put my mask back in place over the watercolour paper. I then trimmed to size and glued the front to the basic black card stock layer.. 
  • I stamped my images in Tranquil Tide and Sahara Sand.
  • I then added some Pearl basic jewels along the sandy bottom stamped images.
  • I placed the mermaid onto mini dimensionals.
  • My sentiment is also from the magical mermaid stamp set and has been masked so I could split the original sentiment into two and place at the top and bottom of my card.

Angled and Open view


#KOCreationscards #magicalmermaid #watercolouring #cardmaking #GDP095 #fussycutting #rubberstamping #masking


Well I do hope you enjoyed my card today.
If you are wanting to purchase any of the items I used to create my card with, then please use the carousel below. It has all of the items used and is linked directly to my store.

When shopping with me don't forget to enter the Hostess code for July


Thank you so much for visiting with me toady. 
If you have any questions please feel free to ask them in comments below. 
I always reply


Tuesday, 11 July 2017

You Move Me - My Heart Flutters card with tutorial.

Welcome back once again ๐Ÿ˜Š
Today I am sharing with you some cards made while I was trying to get a tutorial created.  The My Heart Flutters card was such a hit and I did have a few requests for a tutorial.

I ended up doing a live video  as the youtube version was taking far too long to actually upload. I would have had to do a voice over too as my children were in the background arguing rather loudly hehehe
The joys of school holidays ๐Ÿ˜

Okay with out further ado.

Here are my cards

My Heart Flutters

ลต
Whole Lot of Lovely DSP

#KOCreationscards #cardmaking #stampinup #youmoveme #myheartflutters #wholelotoflovely #fussycutting


Now as promised I did create a 'How To' video but it was done LIVE then uploaded to youtube. As it was filmed LIVE you will hear me chatting to people who pop in to take a look. I also keep saying gold foil ๐Ÿ˜…but it is actually silver foil. The joys of LIVE hehehe.


Side By side and Open views


#KOCreationscards #cardmaking #stampinup #youmoveme #myheartflutters #wholelotoflovely #fussycutting

All 3 cards Together


#KOCreationscards #cardmaking #stampinup #youmoveme #myheartflutters #wholelotoflovely #fussycutting


I do hope you have enjoyed my post today.

If you are looking to purchase any of the items I used to create with then please use the carousel below. It has all items used and is linked directly to my store.
When shopping with me don't forget to enter the Hostess code for July
ZB34WRCT

Thank you so much for visiting.
If you have any questions please ask them in comments below.
I always reply.

Saturday, 3 September 2016

Irresistibly Floral

My Irresistibly Floral DSP Card Creation

The theme today is CASEing ...

In am sure most of you understand what CASEing is...For those that don't here is a rough outline

You can either Copy And Selective Edit OR Copy And Share Everything.

I have chose to Copy & Selective Edit. 
This is my favourite way to CASE. As it gives you a base to work with and lets you create a card all of your own.
Today's CASE inspirations came from Jessie Holton's new CHALLENGE site and her very first challenge is this gorgeous creation! #CTC001

#CTC001


The other inspiration came from this sketch challenge from CasethisSketch & their sketch this week is this lovely design.

#CTS188

I don't actually own the Falling Flowers stamp set which is what has been used in Jessie Holton's Card BUT I had purchased the thoroughly divine 'Irresistible Floral DSP' collection. 
I knew I could work with that & Jessie had used the same DSP on her card too. I also chose to use the same colour scheme as Jessie.

Here is my card

IRRESISTIBLY FLORAL


#IrresistiblyfloralDSP #KOCreationscards #Fussycutting #Resistembosstechnique #Windowsheet #Handmade


  • I started with Flirty Flamingo as my card base cut to 10.5 cm x 15 cm. 
  • I then cut a piece of Acetate Window Sheet to 10.5 x 18 cm. I folded that at 15 cm this will leave a 3 cm piece to attach to the card base. 
  • I  cut the front of the card base in half at 7.5 cm 
  • The loose 7.5 cm piece  I then cut in half again making 2 thinner strips.
  • I joined the window sheet to the front of the card using 'Tear & Tape' and a small amount of glue to the outside of the 3 cm Acetate window flap and pressing that to the top inside of the card base.
  • I added Tear & Tape to the inside on front 7.5 cm 'Flirty Flamingo' card base to secure this to the Acetate window.
  • I took 1 of the 2 thin strips of 'Flirty Flamingo' and adhered that to the bottom of the Acetate Window Sheet in the same manner as previously mentioned.

#IrresistiblyfloralDSP #KOCreationscards #Fussycutting #Resistembosstechnique #Windowsheet #Handmade

  • For the front and the inside section I cut 1 strip off the 'Falling Flowers' sheet from the 'Irresistibly Floral DSP' collection to 10 cm x 16 cm
  • I cut this strip into 3 sections
1 x 7 cm 
  1 x 5.5 cm
  1 x 3.5 cm
  • I coloured these blending the 'Pool Party' & 'So Saffron' ink pads using 'Stamping Sponges'.
  • Once blended the way I desired, I used my Paper-Piercing tool and a ruler to make a false stitch line placing a mark every 2 mm. 
  • I then used my 'Pool Party' Stampin' Write marker to add extra colour for the stitches.
  • I fussy cut some of the flowers from the same sheet of  DSP and coloured those with the sponges & ink then arranged them accordingly.
  • I cut a small piece of 'Bermuda Bay' Sequin Trim and added that to my flower arrangement. 
  • I added enamel shapes in Peekaboo Peach to the fussy cut flower centres.

Enamel Shapes are part of this weeks 'Promotion' at top of the page.

  • Using thick bakers twine in 'Whisper White' to edge the window sheet and the inside sponged DSP.
  • Using A piece of 'Bermuda Bay' card stock I stamped in 'Whisper White' the sentiment from the Gift of Love stamp set. 
  • I cut this in half to create two thin strips and then trimmed one end to a point.

The 'GIFT OF LOVE' stamp set is only available as a hostess gift to those who host a party or work shop either online or in home. If you are interested in hosting your own feel free to contact me.

Blending Correctly

  • To get a smooth blend using Stampin' Sponges & ink pads, I cut my round Stampin' Sponges down into 8 small wedges! 
  • I first press the chosen colour ink onto the stamp lid then holding the piece of sponge & pinching the sponge just above the widest end, wipe the ink in the lid all around it. Vigorously! 
  • I then dab the ink back onto the lid once or twice even three times, this helps to remove & spread evenly any large splotches that may have gathered. 
  • Always practice on a scrap piece first before starting on your project!
  • Always use a scratch paper under your work, so you can work from the outside of your paper in a circling motion, moving inwards.
  • DO NOT rub backwards & forwards! 
  • ALWAYS apply your ink from the sponge to paper in a circular motion, moving from the off the paper, onto the outside of your work, slowly reaching the centre.
  • Reapply in this manner until the depth of colour that you require is achieved!
Happy Blending!


#IrresistiblyfloralDSP #KOCreationscards #Fussycutting #Resistembosstechnique #Windowsheet #Handmade

I hope you enjoyed my card project today & my tips have been helpful.

If you would like further information please ask me below in the comments.


Thank you for stopping by.


If you would like to purchase any of the items used for this project please take a look at the carousal below.