Showing posts with label #Watercolouring. Show all posts

Wednesday, 13 March 2019

#CI51 Colour INKspiration Crew


Hello and welcome to this fortnights Colour INKspiration challenge #CI51  😊

You have reached Kim Oliver - KOCreations Cards. There is a NEXT button a little further down where you will find even more gorgeous projects and inspiration from the Colour INKspiration Crew.

You have joined me from Nicole Wilson's page 😊 

Here is the Challenge Palette for #CI51

Berry Burst, Mango Melody, Highland Heather and Pear Pizzazz

You must use all 5 of these gorgeous colours for this challenge, plus you can add to your design any of  these colours (White, Black or Very Vanilla) and or any of the Metallics.


Here are my projects for the #CI51 challenge
I have used the stamp set called 'Fable Friends' for both of my card projects.

Mother Duck

#CI51 #KOCreationscards #FableFriends #Sponging #Watercolouring #StampinUp


Who has heard the nursery rhyme about 5 little Ducks & Mother Duck? This rhyme is what came to mind when I saw these darling images.

Birthday Squirrel

#CI51 #KOCreationscards #FableFriends #Sponging #Watercolouring #StampinUp

& this cute little guy, well he just melted my heart. I paired the 'Fable Friends' stamp set with the background stamp 'Crackle Paint''

I do hope you have enjoyed my card created using this colour challenge #CI51 and that you have been inspired to try it our for yourself. I can't wait to see all of your gorgeous projects being shared over at the Colour INKspirations Challenges page on FB.

All items that I have used for this project have been listed in the carousel at the end of this post, with each picture linking to it's purchase point.

Up next we have sharing her beautiful floral inspirations the lovley Kathryn Mangelsdorf


Colour INKspiration is a facebook group dedicated to inspiring us to create and share with quarterly colour palettes chosen by the Design Team.
If you love creating with colour then this page is for you. 
Click HERE to request to join, or click the Colour INKspiration Challenge banner below AND JOIN IN THE FUN 😊


Thank you so very much for visiting my blog today. 

Monday, 17 July 2017

Magical Mermaid Wishes Water Colouring


Welcome back everyone 😊

Today I am sharing with you a  card using water colours and the Magical Mermaid stamp set.

Close Up of Colouring.

#KOCreationscards #magicalmermaid #watercolouring #cardmaking #GDP095 #fussycutting #rubberstamping #masking


I am entering this card into the Global Design Project weekly challenge. #GDP095
Their challenge theme this week is  Kids.


I have seen masks that you can purchase that give you a ragged edge to ink or paint within. This creates a type of frame. 
SU doesn't have these as yet, So I made my own! I just used card stock and tore a ragged edged shape from the centre. 

Here is a picture of my makeshift mask.


Pretty simple eh! And it is re-usable! Just let it dry 😁

Here's How.
Focal Background.
  • To hold the mask in place I used snail adhesive all around the edges. 
  • I then stuck it to my clothes! lol YES my clothes and the carpet too! I did this to get rid of the excess stickiness, I wanted it to stay in place but not tear any paper when it was removed. I stuck it to the Watercolour paper in the position I wanted.
  • I then inked two blocks with my chosen colours (Bermuda Bay and So Saffron) 
  • I sprayed water onto my watercolour paper and also onto the blocks holding the colour. 
  • I used my Aqua Painters, as wet as I could make them and washed the colour over the area I wanted for both colours.
  • With the remaining colour on the blocks, I just smooshed it on top of the washed colours.
  • I then used my aqua painter to mix and blend them just a little. 
  • I left this to dry.

Magical Mermaid Kisses

#KOCreationscards #magicalmermaid #watercolouring #cardmaking #GDP095 #fussycutting #rubberstamping #masking

For the rest of the focal.
  • While the water colouring was drying, I stamped the mermaid image onto Shimmery White card stock using Memento black ink. 
  • I blotted this and then made sure it was dry with my heat tool. I didn't want any smudging!
  • Once the black ink was completely dry, I fussy cut her out.
  • I then coloured my mermaid using aqua painters.
  • Her hair is So Saffron, her skin/body is Powder Pink and her tail is Bermuda Bay mixed with So Saffron. 
  • To add extra glimmer I used the Wink of Stella pen.
  • AND just to add a few more highlights along her tail, I used the whisper white re-inker to touch the scales along the centre and down the length of her tail.. 
  • To complete the scene I stamped put my mask back in place over the watercolour paper. I then trimmed to size and glued the front to the basic black card stock layer.. 
  • I stamped my images in Tranquil Tide and Sahara Sand.
  • I then added some Pearl basic jewels along the sandy bottom stamped images.
  • I placed the mermaid onto mini dimensionals.
  • My sentiment is also from the magical mermaid stamp set and has been masked so I could split the original sentiment into two and place at the top and bottom of my card.

Angled and Open view


#KOCreationscards #magicalmermaid #watercolouring #cardmaking #GDP095 #fussycutting #rubberstamping #masking


Well I do hope you enjoyed my card today.
If you are wanting to purchase any of the items I used to create my card with, then please use the carousel below. It has all of the items used and is linked directly to my store.

When shopping with me don't forget to enter the Hostess code for July


Thank you so much for visiting with me toady. 
If you have any questions please feel free to ask them in comments below. 
I always reply


Thursday, 15 June 2017

Stampin Dreams Blog Hop - Carry Over Products


"Welcome to the Stampin' Dreams Blog Hop, running monthly. You are currently visiting with me Kim Oliver from Australia. I hope you enjoy my project/cards showcasing some of my favourite Carry Over Products from the old catalogue to the awesome new 2017-2018 catalogue.


#KOCreationscards #Countrylivin #Sunshinesayings #Watercolouring #Imarty #Stampinup #Rubberstamping #Guitars #Cowboys


I have chosen the 'Country Livin''and 'Sunshine Sayings' stamp sets as my Carry Over products along with the fabulous aqua painters and Stampin' Write Markers.

Here is my card


A Life Time Of Love


#KOCreationscards #Countrylivin #Sunshinesayings #Watercolouring #Imarty #Stampinup #Rubberstamping #Guitars #Cowboys

My card stock is thick Whisper White with a layer of Dapper Denim for contrast.
I stamped my images using the memento black ink and let dry before water colouring with the Aqua painters.
I was after a real water colour feel with my images so I was really rough and super quick when painting. Skipping between the sections so the colours do not bleed into each other. Let dry a little before adding in the darker areas for a truer water colour effect.
Using the large stitched shapes ovel I die cut the coloured pickup. Layering this with dapper denim card stock really gave it a lift.
I then fussy cut the boots and the guitar. I am a little bit of a operfectionist and beacuse these items weren't in perspective, I tried to give a little perspective to them by layering.
I glued the guitar directly on to the pick up image and behind the boots.
The boots have been raised using dimenionals, to bring them forward a little more.

*TIPS: 

  1. To colour using markers just scribble the colour onto a clear block then pick up colour as needed with the aqua painters.
  2. When water colouring on thick whisper white you have to use a wet brush (but not dripping) and be as quick as possible. Do not rub back and forth but keep your brush moving in one direction.


Angled View

#KOCreationscards #Countrylivin #Sunshinesayings #Watercolouring #Imarty #Stampinup #Rubberstamping #Guitars #Cowboys


I hope the project you have seen here on my blog today has inspired and brightened your day. 
Please see the list below and hop through all of the people on the list to see all our projects. I would hate for you to miss any!"


If you would like to purchase any of the items I used to create my set with, then please check the carousel below.
It has everything you need.

The HOSTESS code for the month of JUNE is


Like to host an event and earn some Stampin Rewards?? June is the month to do it!

 Your event can be online or in home, which ever suits your needs best.
Now is the perfect time to take advantage of the extra HOST BENEFITS in June and get that item you just can't live without.
You can contact me HERE for more information.
http://kocreations.stampinup.net/

Thank you so very much for visiting my blog today. 
If you have any questions please use the coment section below. 
I always reply!


Wednesday, 17 May 2017

May 2017 - International Blog Highlights - Masculine

Image may contain: text

Hello crafters :)

Today I am taking part in an International Gallery Blog. This Gallery has photo's of Stampin' Up! demonstrators works from all over the world and is Hosted by Kylie Bertucci.
Our theme today is Masculine.
Voting goes live from 8 am Wednesday 17th May
You can vote for my project by clicking HERE or wait until you find the button further down to click on .

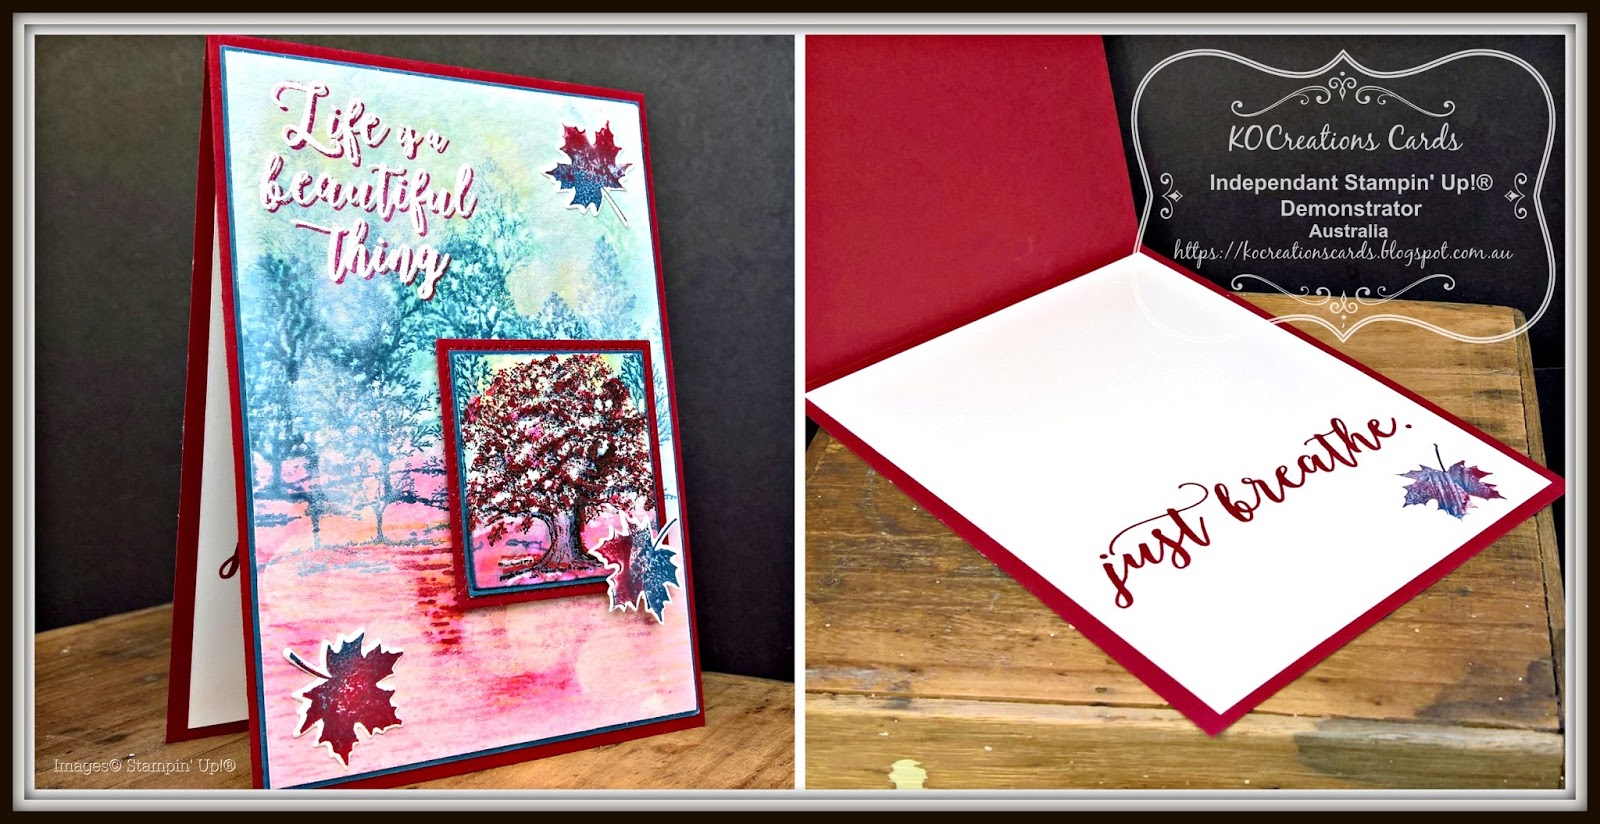
I created my project using three stamp sets today 'Lovely as Tree' and  'Colorful Seasons' and 'High Tide'

The colours in my project were inspired by the Colour Inskpiration Colour challenge #CI09
If you would like to join in you don't need a blog. All you need to do is join the group HERE and then create and then upload your photo of your project to the group page.
It's that easy!


 All I can say about these colours are WOW!
They look absolutely stunning put together like this don't they!

Here is my project.

Autumn Days

Front view

#Colorfulseasons #Lovelyasatree #KOcreationscards #Hightide #Autumnintassie #Bokehtechnique #Smooshing #Watercolouring #Masculinecard #Unisex

For my project I was inspired as mentioned by the #CI08 colours, but also the picture that was used.
It is currently Autumn here in Tasmania where I live, so this scene that I have created reminds me of an Autumn day nearing it's end at dusk, just after rain 💦

The Bokeh effect over the top really helps to soften the effect and gives a dreamy quality but still enables the impact of these bright and vibrant colours to shine...My favourite place is in the middle of the bush lol can you tell 😊

  Angled and Inside View

#Colorfulseasons #Lovelyasatree #KOcreationscards #Hightide #Autumnintassie #Bokehtechnique #Smooshing #Watercolouring #Masculinecard #Unisex


The sentiment on the front along with the three leaves are from the 'Colorful Seasons' stamp set.
The sentiment has been stamped once in Cherry Cobbler.
Then stamped again in versamark and heat embossed in White Stampin' Emboss powder.
The trees are from the 'Lovely as a Tree' stamp set.
For the inside I used the sentiment from the 'Colorful Seasons' stamp set stamped in Cherry Cobbler and added a single die cut leaf.

If you enjoyed my project I would love it if you could vote for me over at Kylie's Blog...You can vote by clicking the blue VOTE button


All but 1 of the items used are available now in my store.
  • Colorful Seasons stamp (142726 pg 147) and Seasonal Layers thinlits (143751 pg 216)  will be available in my store from the 1st June 2017

For a full list of all other items please refer to the carousel below.

Don't forget the MAY Hostess Code if purchasing from me.

33EJUTN4


If you would like to be updated on special deals, hostess codes and even tutorials then sign up to my monthly news letter below.


Thank you so much for stopping by.
Any questions you may have please ask in comments below.
I always reply x

Wednesday, 3 May 2017

Flourishing Fairy Celebrations


Welcome back to my blog crafters

Today I am sharing a card made for a sweet little girl who is turning 7 on Thursday.

I created this card using the 'Fairy Celebration' stamp set mixed with 'Falling Flowers' stamp set and the matching May Flowers dies

Happy Birthday

#KOCreationcards #Imbringingbirthdaysback #Fairycelebration #Fallingflowers #Mayflowerframelits #Watercolouring


For the original card I chose to use the same colour as a layer as the colour I used for the flowers and spots.

I adored how this turned out. By adding a small flourish and flower to the top left corner inside the card  I carried the theme through nicely.

I loved it so much that when I had completed it I decided to make 3 more to put with and order for my outlet. I had been asked for a certain few cards and birthday cards for younger girls was one request.  These are perfect!

I also make cards for friends, family and of course my customers, just to say thank you 😍. 
Then there is the Random Act of Kindness cards too... A wonderful group I am part of that exists soley to bring a smile to others. We share ideas using current Stampin' Up! product and it is so much nicer to find a card in your ail box than a bill!. 
You join, add your name to the files and monthly event and then randomly select  a few names of a list of particpating people. Then send them out the cards, it's that simple! Oh the theme is ecouragement...not birthdays, christmas etc.. Only as some people don't celebrate these times and occasions.


Below you can see some of the steps that are taken to create these cards. I wrote a description for the steps under the picture.

Creating Steps


#KOCreationcards #Imbringingbirthdaysback #Fairycelebration #Fallingflowers #Mayflowerframelits #Watercolouring
   

  1. Trim all cards stock to size and then stamp and die cut flowers.
  2. Stamp images, then mask and daub colour inside masked area. I used Wild Wasabi for this.
  3. Colour images...I coloured with a single colour at a time....moving through the images.  Once completed I added Clear Wink of Stella over the top of the flowers and Fairy wings. The cards are very sparkly IRL...I tried to capture it, but failed ...sorry.
  4. Die cut the are previously masked. Then die cut out a scalloped oval in matching coloured card stock to flowers and spots. Also cut an oval in the diamond glitter paper.
  5. Assemble layers.
  6.  NOT PICTURED. I covered the fairy wings and spots with Fine-Tip glue.


#KOCreationcards #Imbringingbirthdaysback #Fairycelebration #Fallingflowers #Mayflowerframelits #Watercolouring


And here are all 4 cards together. 

#KOCreationcards #Imbringingbirthdaysback #Fairycelebration #Fallingflowers #Mayflowerframelits #Watercolouring


I hope you enjoyed these cards. 

If you are looking for a cpmplete list of items used to create a set for yourself then please check the carousel below. 
I have added then here for your convenience.
Three ink pad colours that I used are now retired, so if not available any more in store, they can be substituted with a similar shade. (retired colours were Cucumber Crush, Delightful Dijon and Watermelon Wonder)

When shopping with me online please use the MAY HOSTESS CODE 33EJUTN upon checkout. 

You can be entered into the draw to win some fab prizes just for shopping with me, as long as yu enter your contact details too!


Want to stay up to date with news and offers from me, then please join my news letter mailing list by clicking below. I only send out 1 email a month.


Thank you so much for stopping by today and I hope you found some inspiration.

If you ahve any questions pleask ask them in comments below. 
I always reply!

Tuesday, 28 March 2017

Just Peeking in To Say Hi - #GDP080


Welcome Back Crafters

#Prettykitty #Loveitchopit #Petalsandpaisleys #Watercolouring #KOCreationscards #GDP080 #Richrazzleberry #Handmade #Cardmaking #Bellaandfriends

I do apologise for not being present over the last week. 
My youngest daughter has been home from school with me, quite unwell for nearly 2 weeks...
We did some craft together, as well as keeping her school work as up to date as possible. But unfortunately that didn't leave alot of time for blogging....
She went back to school yesterday and I held an in home workshop class yesterday :) That kept me on my toes...we made a double slider card which I will blog about tomorrow ( I wanted to get that done last week lol)...so keep your eyes peeled!

Okay getting straight into it. I went and had a peek at GDP this morning, just to see what their challenge was this week.
 I was so very happy to see that the Design Team had chosen to CASE Louise Sharp!!! I adore her work!
And this is the project they have CASEd and challenged us to do also.


Isn't it just gorgeous! I love everything Louise creates though...so I am a little biased, lol.

I chose to keep the basic layout for my CASE, but changed the colours and the tag shape with my project.

Here is my CASE.


Pretty Kitty

Front View

#Prettykitty #Loveitchopit #Petalsandpaisleys #Watercolouring #KOCreationscards #GDP080 #Richrazzleberry #Handmade #Cardmaking #Bellaandfriends

The Designer Series Paper I chose is from the Petals and Paisleys suite. I just adore the Rich Razzleberry colour. 
The diagonal stripes brings the other colours into the mix...Cajun Craze, Mint Macaron and Crushed Curry. There is another striped colour, but I didn't use any ink in that colour.
I used all four of the colours mentioned for my stamped water coloured image.
I used the Sticthed shapes framelit (second largest square) to create the rectangle...These dies are just perfect for adding a more polished look to any card.

Close Up

#Prettykitty #Loveitchopit #Petalsandpaisleys #Watercolouring #KOCreationscards #GDP080 #Richrazzleberry #Handmade #Cardmaking #Bellaandfriends
For the flowers on the image, I first coloured them lightly with stampin' Write markes. I mixed Fine-tip Glue with ink scribbled onto a block from a stampin' Write marker and using a fine brush applied the coloured glue. This will give a shiny and dimensional look to the flowers when dried.
It is quite dificult to see in the picture though.

Inside View

#Prettykitty #Loveitchopit #Petalsandpaisleys #Watercolouring #KOCreationscards #GDP080 #Richrazzleberry #Handmade #Cardmaking #Bellaandfriends

I always stamp the inside of my cards to match the front theme, and I couldn't resist doing the same today. Especially with such a cute stamp set!

Side View

#Prettykitty #Loveitchopit #Petalsandpaisleys #Watercolouring #KOCreationscards #GDP080 #Richrazzleberry #Handmade #Cardmaking #Bellaandfriends

For the sentiment I white embossed the words. I decided that I wanted some dimension to my banner, so using my bone folder I made my banner wavy. I added 2 dimensionals under the upward wave and snail adhesive where it sits against the tab.
I wanted to pick up the white colour more, so to help do this I added Thick Bakers Twine under the sentiment in Whisper White.

I loved the first card so much I made 3 more :)
#Prettykitty #Loveitchopit #Petalsandpaisleys #Watercolouring #KOCreationscards #GDP080 #Richrazzleberry #Handmade #Cardmaking #Bellaandfriends

If you would like to see a list of products or even purchase any of the products I used. I have listed them for your convenience in the carousal below.


Thank you so very much for stopping by my blog and taking a look. I will be back again tomorrow with another post for you all.
If you have any questions, please ask them in comments below. 
I will always reply!

Enjoy your day xx

Wednesday, 12 October 2016

'For You' A Colour Challenge from #GDP057

FOR YOU


Welcome to my blog once again.
Today I have created a card using the Global Design Teams colour challenge (below)

Rich Razzleberry - Mint Macaron - Blushing Bride

 I took a couple of days to think about these colours...they reminded me of a more Vintage /Victorian era.
So I went to my cave and had a play this afternoon and came up with this gorgeous design. 

'FOR YOU'

#Birthdayblooms #KOCreationscards #Handmadecards #Oldworld #Yearsgoneby #Stampinup #Watercolouring


I am not sure if it is the colours, the roses or even the ribbon!?! But when I finally put them all together this card certainly has an old world feel to it. 
What do you think?

'INSIDE VIEW'

#Birthdayblooms #KOCreationscards #Handmadecards #Oldworld #Yearsgoneby #Stampinup #Watercolouring

This card is very basic, but I do love the effect.
I started with a Rich Razzleberry card base cut at 10.5 c 15 cm. I then cut to fit the Rich Razzleberry DSP from the Petals and Paisleys DSP which has lovely Mint Macaron design on the reverse side and another Rich Razzleberry layer, all to go under the water colour paper.

I stamped my images using the Roses from the Birthday Blooms stamp set. First in Blushing Bride and then in Mint Macaron, wiping the ink of with a baby wipe where I didn't require either colour. 
I then proceeded to water colour the stamped image with my inks and Aqua Painters. 
I used the Rich Razzleberry ribbon from the Trio pack that co-ordinates with the Petals and Paisley DSP and layered that with a strip of the Mint Macaron DSP. 
I added a bow to finish it all off.
The sentiment is from the Birthday Blooms stamp set

 'FRONT VIEW'

#Birthdayblooms #KOCreationscards #Handmadecards #Oldworld #Yearsgoneby #Stampinup #Watercolouring

I hope you have enjoyed my card today.

If you would like to purchase any of the items I used to make my card, I have listed them for you in the carousal below for your convenience.


Don't forget that if you buy three (3) DSP packs you will get one (1) DSP pack for FREE! 
ALL FOR THE MONTH OF OCTOBER!

Click HERE to shop for your DSP now

THANK YOU FOR STOPPING BY

If you have an y questions please feel free to ask in comments below. 
I always reply :)


Monday, 3 October 2016

#CTC005 Challenge-Water Colours

WATER COLOURS

#CTCOO5

WELCOME
This week's challenge is to CASE this card from Juan Ambida (BELOW) from Juanacreate

As this card is all about water colour, 
So then,
Today's blog is all about water colouring, with Stampin' Up Ink pads.

Here is Juan's card


I chose to stay true to the Juan's original design and used a floral theme.
I used 2 different Hostess stamp sets called 'GIFT OF LOVE' and 'FABULOUS FLORA'
Both of which become available to purchase just for hosting a party or a workshop with me.


'GIFT OF LOVE'


#Giftoflove #Hostessgifts #KOCreationscards #Handmade #Watercolouring #Springflowers #Fabulousflora #Stampinup


How to make 'Gift of Love'

  • Ink colours used are as follows - Emerald Envy, Flirty Flamingo, Sweet Sugarplum, Peekaboo Peach and Whisper White.
  • For the card stock I used Flirty Flamingo cut to 10.5 x 15 cm, Stampin' Up Water Colour paper and a sheet of vellum both cut to fit so you can see the all four edges of the card base and the vellum under the water colour paper. 
  • The vellum sheet under the water colour paper has been edged in silver after being trimmed to size. This was achieved by putting the sides/edges into the vellum into Versamark ink pad and running it along the whole side, doing the same on all four edges. Then dipping each edge into Silver Embossing powder and heating until smooth.
  • Stamping my sentiment sideways onto a strip of vellum I glued this in place using Fine-tip Glue pen.
  • When all painting had been finished I placed Metallic enamel shapes randomly on the front and a couple inside too.
 TIPS - Before Stamping any image that is to be heat embossed, always remember to use your Embossing buddy. Have a large piece of scratch paper under your work to catch any excess powder. This helps stop any of the embossing powder from clinging to unwanted areas. If any does manage to stick somewhere you don't want it to, first tap the back of your paper sharply with your finger nail. Then if you still find some clinging, get a fine tip paint brush and carefully remove those pieces with the tip only. Always making sure the excess falls onto your scratch paper.
IMPORTANT! When finished bend your scratch  paper in half so that all excess powder is in the middle and then pour your excess back into your container. Don't throw it away! It can be re-used!

For the Water Colouring
  • Dust your water color paper with your embossing buddy and stamp your images in versamark where desired. Pour your embossing powder over the image, making sure all of the stamped area has been covered. Follow the instructions as above in TIPS. Put all of this way and clean your work area. If you like having the inside of your card the same them as your front, make two images at this time.
  • Stamp Emerald Envy onto a clear block and Spritz, then Spritz your water colour paper so that it is just damp. Start by colouring all of the leaves and stems. Then thinning with the water start spreading the green around the areas you think will look effective. You can layer and deepen any of your colours by letting the paper dry (or heat drying) and recoloring again.
  • When you are happy move onto the flowers. Start with your lightest colour, being Gladioli they can be varied colours or all the one colour. I went a varied hue of the three ink colours I mentioned above.
  • After all is dry I stamped the splotches from the 'Gorgeous Grunge' stamp set in Emerald Envy, then went over this with the same stamp, but in Whisper White.
  • When completing the inside coloring for your card remember to leave an area that is clean for writing a personal note.


Inside View
#Giftoflove #Hostessgifts #KOCreationscards #Handmade #Watercolouring #Springflowers #Fabulousflora #Stampinup


'FABULOUS FLORA'


#Giftoflove #Hostessgifts #KOCreationscards #Handmade #Watercolouring #Springflowers #Fabulousflora #Stampinup


'Fabulous Flora' has been created using almost the same methods as 'Gift Of Love' BUT instead of  water colouring to start, I used the smooshing technique (click HERE to see the video).
When I had finished with the smooshing, I coloured the flowers and leaves as I did with 'Gift of Love'
The sequins for the front have been removed from the silver Sequin Trim before adding to the card..

Inside View
#Giftoflove #Hostessgifts #KOCreationscards #Handmade #Watercolouring #Springflowers #Fabulousflora #Stampinup


If you would like to purchase any of the items used to create these cards, use the carousal provided below. 
Remember you must host a party (can be an online party) or host a workshop to be eligible to purchase the stamp sets I used today.


Thank you for stopping by my blog today. I do hope you enjoyed my cards. 

If you have any questions about anything I have done please don't hesitate to ask. 

Just comment below with your question. 

I always reply!