Showing posts with label #Giftoflove. Show all posts

Wednesday, 15 March 2017

International Blog Highlights - All Things Thanks


Welocme back crafter's :)


Thanks for coming to my blog today! We are being highlighted internationally by Kylie Bertucci and you are able to VOTE for my project. 
You can do that here - http://bit.ly/KyliesMarchHighlights

Our theme for this highlight is using the stamp set 'All Things Thanks!' 
This is a Wonderful stamp set with so many gorgeous sentiments. 
We wanted to highlight how versatile it really is.

 I had a stack of back grounds, die cuts and other bits and bobs laying around from previous card makes and technique trials. I thouht this would be a perfect opportunity for me to show this stamps sets versatility.

I quite often make 2 full A4 sheets of backgrounds, but may only get time to make 2 or 3 cards including the insides....I also have a little bag filled with excess diecuts and offcuts.

 Here is a quick shot of what I had to work with from my stash!

#Wastenotwantnot #Allthingsthanks #Usingscraps

I only ended up with a third of the little bits left and that was because, once again I ran out of time.... School pick up became more important!

I will now share the cards I made using the 'All Things Thanks' stamp set to complete these cards....


There is just one shot of each card.

CARD 1


#Justforthehostess #Giftoflove #Watercolour #Resistemboss #Emeraldenvy #Allthingsthanks

CARD 2


#Birthdayblooms #Inkblending #Mintmacaron #Dapperdenim #Allthingsthanks

CARD 3


#Helpingmegrow #Bokeheffect #Inkblending #Peekaboopeach #Watermelonwonder #Allthingsthanks

CARD 4


#Builderbirdcage #Bokeheffect #Inkblending #Allthingsthanks

CARD 5

Would have been if I remembered the sentiment! pffft lol

#Helpingmegrow #Wisteriawonder #Vellumstamping #Sticthedshapes #Allthingsthanks


This little gorgeous Wisteria Wonder number above is being entered into #GDP078  I was intending to make a card for this challenge tomorrow...but when I looked at the challenge this afternoon I realised what I already had made fit the challenge perfectly!!! And yes I forgot to stamp a sentiment lmao...I only noticed after the picture was taken
'Forehead Slap'

here is the sketch challenge this week.
Psssst I was lucky enough to be a winner last week!! You can click HERE to see that winning project. So excited about that...I adore entering what I make into little challenges. The challenges themselves help to keep my creative juices flowing and sometimes when I don't have the mojo they really help to bring it back!


  Continuing on with 'All Things Thanks' once again.

CARD 6


#Allthingsthanks #Handmadebackground #Allthingsthanks


CARD 7


#Detaileddragonflythinlits #Inkblending #Positiveandnegative #Allthingsthanks


CARD 8


#Justforthehostess #Fabulousflora #Watercolour #Resistemboss #Allthingsthanks


CARD 9


#Liftmeupbundle #Liftmeup #Bokeheffect #Inkblending #Allthingsthanks


CARD 10


#Liftmeup #Upandawaythinlits #Bokeheffect #Inkblending #Allthingsthanks

Did you notice the whisper white ballons in the background!?!

AND 

CARD 11


#Specialreason #Bokeheffect #Inkblending #Allthingsthanks

Well! What do you think???

All of these cards will be sent either as R.A.K cards or given as thanks to my customers to show my appreciation.

Thanks for visiting my blog today, make sure you head over to Kylie's blog - http://bit.ly/KyliesMarchHighlights to vote for my project. 
I would love to be chosen to do an international blog hop.


Don't forget Sale-A-Bration is still happening! 
Until the 31st MARCH
Spend $90 to earn one FREE product. 
You can choose any of the products in the images below as your FREE item!.
1st release Catty

No automatic alt text available.

2nd Release Catty

Image may contain: text


If you live in Australia and LOVE paper Crafting of any desription or perhaps you would like to earn extra money, then Stampin Up may be just the thing you need!
I am always looking for new people with a love of papercrafting to join my team.
AND
What an AMAZING time to join Stampin Up...Not only do you get a 20% discount on all of your products for joining BUT $169 gets you $235 worth of gear- PLUS 2 free stamp sets. 
If you are a crafter, its a great time to join!!! Awesome deal too!

Click HERE  to sign up and start getting your %20 discount on all your Stampin' Up! products!


Thank you for stopping by my blog today.
I hope you have enjoyed my creative efforts.

If you have any questions please ask them in comments below. 
I always reply x 


Friday, 16 December 2016

Honey to the Bee - #GDP066


WELCOME 

Today I have created a project using 4 yes FOUR
different stamp sets a die set + the GORGEOUS and NEW 
Hexagonal Dynamic TIEF.
Thanks for coming to my blog today! We are being highlighted internationally by Kylie Bertucci and you are able to VOTE for my project. The top ten winners will get to be part of an international blog hop so please vote for my project. You can do that here - VOTE from the 29th Dec 2017
Our theme for this highlight is encouragement as we all need a kind word said to us to build us up.

I wanted to make a card for the weeks challenge over at Global Design Project, as I saw their sketch and had this idea forming from it. 

You will see 4 upcoming and soon to be released to the public items, from the *NEW* Occasions Catalogue used for this card project.
Showing how all of our products at Stampin' Up!® work so well together!

Here is the Sketch from GDP for the challenge #066.


and here is my card that I created using the sketch above.


 "HONEY TO THE BEE"

#Hardwood #Touchesoftexture2of2 #Cooltreats #Dragonflydreams #Hexagonaldynamictief #KOCreationscards #Handmadecards #Australianmade #Giftoflove #Honeybees #Sweet

CARD STOCK:

Crushed Curry, Basic Black, Chocolate Chip, Very Vanilla and Water Colour Paper.

STAMPS:

*Dragonfly Dreams* 142924, *Cool Treats* 142982, Touches of Texture 2 of 2, Hardwood.

EMBOSSING FOLDERS AND DIES:

Layering Ovals Framelits, *Hexagonal Dynamic Textured Impressions Embossing Folder* 143231

TOOLS:

Big Shot, Paper Piercing Tool, Sponge Brayer, Aqua Painter, Stampin Trimmer and Paper Snips.

INKS:

Crushed Curry, Chocolate Chip, Basic Grey, Crumb Cake and Stazon Jet Black.

EPHEMERA:

Bakers Twine Basic Black, 3 x *Falling in Love Embellishments* 142791

ADHESIVES:

Glue Dots, Tear and Tape, Fine-Tip Glue Pen and Stampin' Dimensionals.


SIDE VIEW

"HONEY TO THE BEE"


#Hardwood #Touchesoftexture2of2 #Cooltreats #Dragonflydreams #Hexagonaldynamictief #KOCreationscards #Handmadecards #Australianmade #Giftoflove #Honeybees #Sweet

Making this card I realised just how versatile Stampin' Up! really is. 
Everything works in partnership with nearly ANY product we have or can easily fit with another theme!!
And this new Occasions Catalogue WOW...If you haven't got your copy yet then PLEASE let me know. At the top of my page I have catalogue form requests...Just go there and fill out your details and I can send you a NEW Occasions Catalogue for FREE!


BASIC DIRECTIONS:

  • Cut your card base from Crushed Curry A4 sheet at 10.5 cm  length ways and then score and fold in half. 
  • Cut the two sets of layers to fit the front and inside, I just eyeballed them to get my sizing so I had a small edge for both.
  • Stamp the front with the Hardwood Background Stamp 1 fully and one by only stamping half of the stamp up with ink and then gently dabbing away some ink with a baby wipe. Join both sets of layers together.
  • Die cut the oval shape window from the layer that is fully inked and stamped up. Do this by using the second largest plain Oval Framelit die. 
  • Cut a frame for this window using Very Vanilla card stock and the Largest and the second largest oval Framelits. 
  • Die cut a piece of Crushed curry using the largest plain Oval Framelit Die. 
  • Run this oval shape through the Big Shot with the *Hexagonal Dynamic TIEF. (WOW I adore this thing!!!!)
  • Sponge with the Sponge Brayer using Crushed Curry over the top of the embossed oval. Then using an Aqua Painter, colour the inside of the hexagonal (the small part) with Crushed Curry. Once coloured fill some random hollows with Glue from the Fine-tip Glue pen. Let dry! 
  • Once dry cut out some of the small inner hexagons. Back this embossed and coloured oval with a piece of Chocolate Chip.
  • Using Water Colour Paper Stamp a Bumble bee from the *Dragonfly Dreams stamp set and 5 bees from the Touches Of Texture Stamp set in Stazon Black. Colour them using Crushed Curry Stampin' Write Marker or your Aqua Painter and Crushed Curry Ink.
  • Fussy Cut them out!
  • Cut a length of Basic Black Bakers Twine (enough to wrap around at least 4 times) Tie the *Falling in Love embellishment in place to the bakers twine.
  • Stamp you sentiment using the sentiment from the *Cool Treats Stamp Set onto Very Vanilla, cut and adhere to back of the embellishment using a Glue Dot.
  • Glue your embossed oval in place, then adhere the front layers with dimensionals to the base.
  • Adhere the other two embellishments in place and then attach Bees in desired places with Glue dots remembering to add one inside :)

OPEN VIEW

"HONEY TO THE BEE"

#Hardwood #Touchesoftexture2of2 #Cooltreats #Dragonflydreams #Hexagonaldynamictief #KOCreationscards #Handmadecards #Australianmade #Giftoflove #Honeybees #Sweet

Thanks for visiting my blog today make sure you head over to Kylie's blog -  to VOTE for my project from 29th Dec 2017 . I would love to be chosen to do an international blog hop.

Any questions please ask!

I do hope you enjoyed my project.

If you would like to purchase any of these products (EXCEPT THE NEW RELEASE THEY BECOME AVAILABLE ON THE 4TH JANUARY 2017)
Please click SHOP NOW!

Cant wait that few extra weeks or are interested in JOINING!?!  
Then I would love to have you on my TEAM
Just Click HERE to join my team and enjoy cheaper products and all the benefits that come with being a Stampin' Up!® Demonstrator 


Thanks again and have a 
WONDERFULLY SWEET DAY :)


Thursday, 17 November 2016

Sending Smiles Across the Miles - #CTC011


Welcome  :)

I have a surprise for you !

Today I am showcasing a new product suite that will be available for purchase to your my lovely customers from January 4th 2017
The suite consist of a stamp set called 'Lift Me Up' and matching die set called 'Up and Away' + if you spend $90 you can get the Matching DSP for FREE during Sale-A-Bration!

There are so many gorgeous sets in thes new catty. Over the next few weeks I will be sharing a stamp set + matching dies whenever I get the chance. This will give you an idea on what you can do, what you want and what you may NEED lol.
I am so very excited about some of these new products...There is even a gorgeous set of water colour pencils (for those who have been around a while YAAAAY they are back!) in a gorgeous range of colours. Shhhh I still have the old set....I love using them and can't part with them....THAT'S HOW GOOD THEY ARE, but just keep that between you and me :)

OK enough prattle from me.
I am entering the two cards (yes I made 2) into Jessie Holton's new card challenge pictured below.
 I have also entered the 'Sending Smiles' card into Kylie's weekly Highlights... Please click here for voting : Weekly Highlights  


Here is my first card 

'Thanks For Lifting Me Up'


#Liftmeup #Upandaway #Carriedaway #Masculine #Giftoflove #KOCreationscards #Stitchedshapeframelits

I have stamped the hot air ballon images in Peekaboo peach , water melon wonder and Mint Macaron, the die cut them. I have mounted them onto a  the Night of Navy clouds DSP from 'Carried Away' which was cut using the largest oval Stitched Shape Framelit die. Another must have item ...They really help to give some embellishments or card toppers that finished look!
*These framelits are going to be taken of the available list soon due to their popularity, as stock has run out. If you would like to purchase them, make sure when you enter the order number (145372) when you order,  say you want to be notified of their return availability when that information notification pops up!


Open view

#Liftmeup #Upandaway #Carriedaway #Masculine #Giftoflove #KOCreationscards #Stitchedshapeframelits

You can see that I have made the inside of this card a pop up style...Not as hard as it looks...I will post a video showing how easy this is ASAP...Hopefully in a week or so!

Which brings me to another set in the new catalogue! BALLOON POP UP THINLIT DIES!!!!!
OMG it is AMAZING!

Okay moving on lol


Partially closed view

#Liftmeup #Upandaway #Carriedaway #Masculine #Giftoflove #KOCreationscards #Stitchedshapeframelits


the large balloon die is quite intricate...for this particular image I cut two of the images. There are also slices of the balloon shape in the dies that you can cut DSP to fill the areas with as you can see the different papers on the balloon pictured. After I have glued to slices of colour in place I laid a piece of Black Bakers Twine up the centre of the balloon and then glued the twin image in place to hold it.


Closed view


#Liftmeup #Upandaway #Carriedaway #Masculine #Giftoflove #KOCreationscards #Stitchedshapeframelits

You can see that my balloon hangs out a little, this just means that it needs a larger envelope :) lol
I like how it hangs out, it gives the recipient another reason to open their card!


And now for the second card

'Sending Smiles Across The Miles'


#Liftmeup #Upandaway #Carriedaway #Masculine #Giftoflove #KOCreationscards #Stitchedshapeframelits


I decided for this card to make the weather just a little chilly looking, it also matches the Smokey Slate colour that the hundreds of balloons are flying over :) I used the largest circle from the Layering Circle framelits for this card.


Open View


#Liftmeup #Upandaway #Carriedaway #Masculine #Giftoflove #KOCreationscards #Stitchedshapeframelits

For the inside I have just stamped the balloons onto clean white paper using a cut out die shape as a mask, so I could make them all look like they were flying over, around and above each other.


Side View.

#Liftmeup #Upandaway #Carriedaway #Masculine #Giftoflove #KOCreationscards #Stitchedshapeframelits

Due to some of these items not being available yet until January 2017, the carousal below will be a little light on this time. 
But all the available products used will be listed as usual for your convenience :)


Thank you so very much for visiting my blog today. If you have any questions or you would just like to comment you can do so in the comment section below.
I always reply :)


Sunday, 23 October 2016

Crazy Crafters Blog Hop with Bibi Cameron


Welcome to the CRAZY CRAFTER'S BLOG HOP with Bibi Cameron
Today all of our crazy hoppers have chosen a card from the super talented  Bibi's designs, a card that has inspired us in some way,  and we are CASEing it. 

I have chosen this gorgeous design below.

www.bibicameron.co.uk
  Isn't this just the cutest set of baby cards ever!


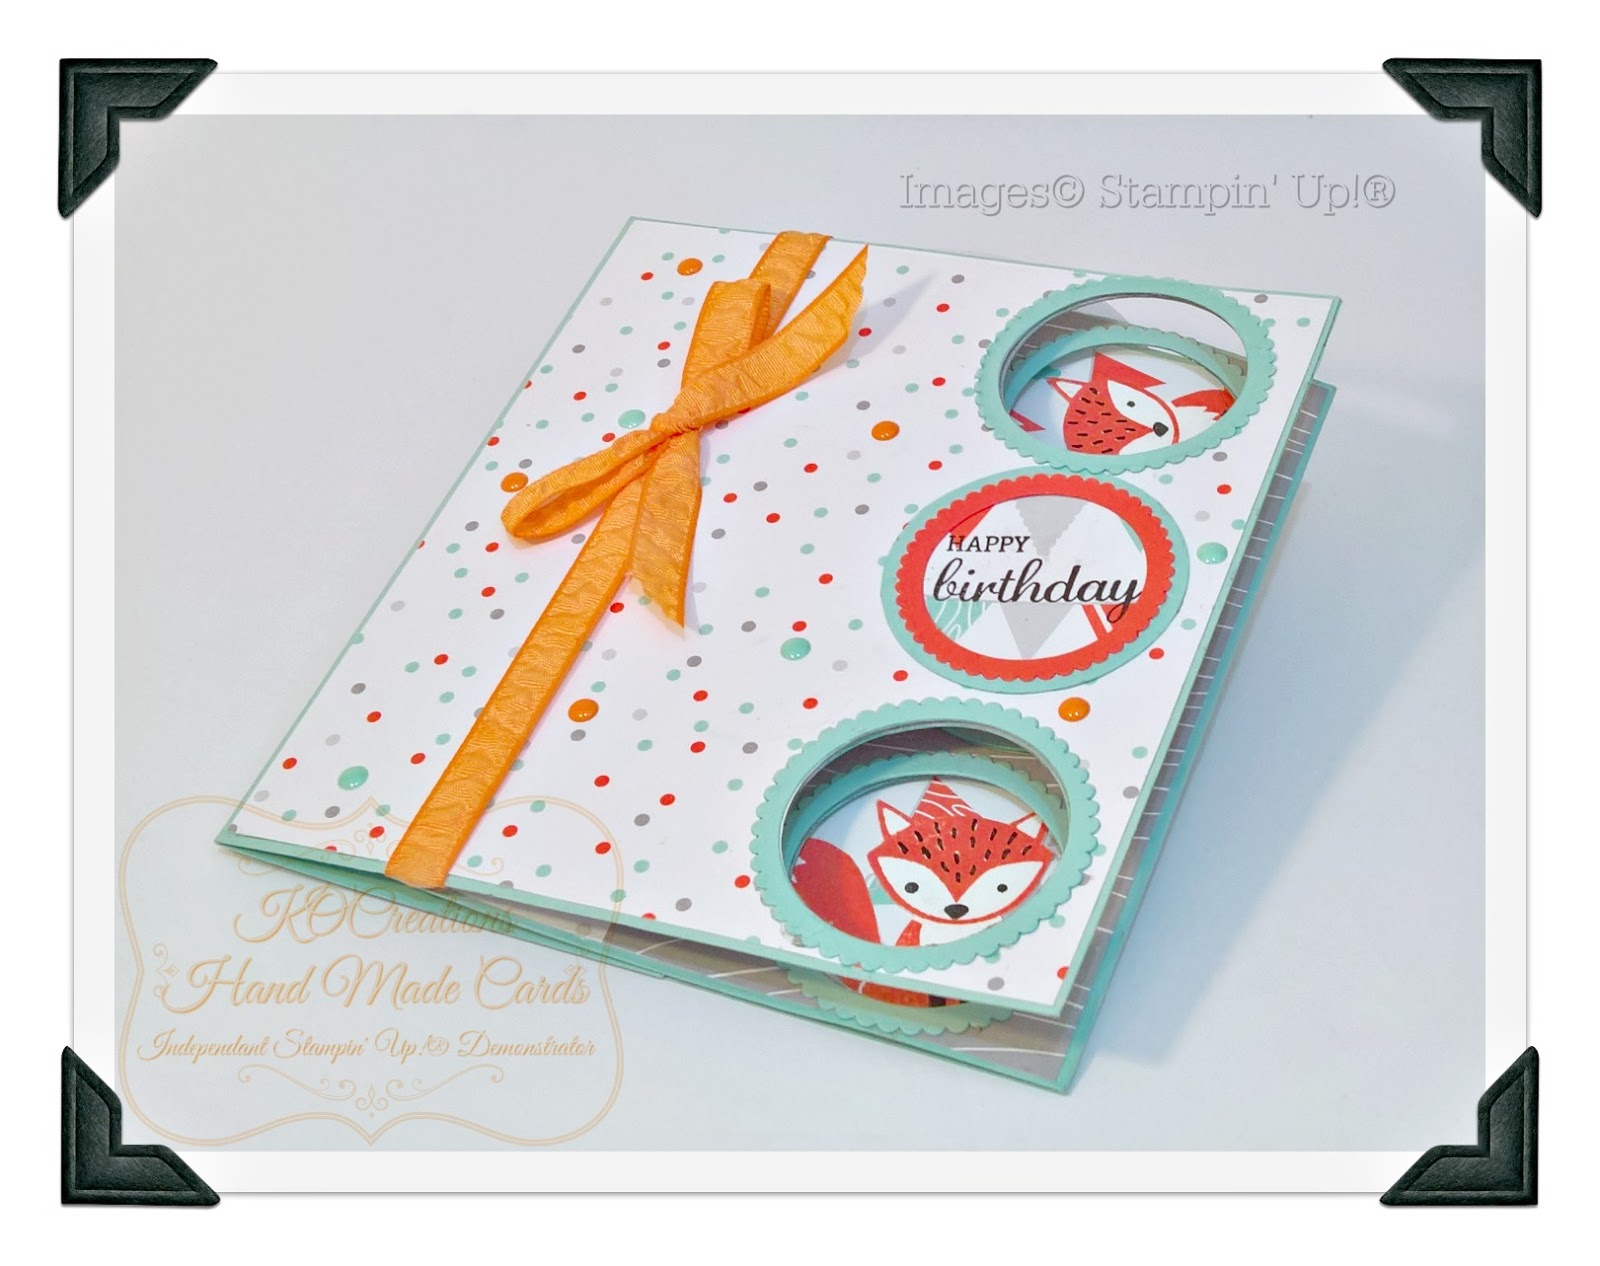
For my card design, I knew I needed it to be movable, so I incorporated a slider partition into Bibi's design, keeping the 3 round windows for a similar peekaboo look.


THE TUTORIAL VIDEO IS AT THE END OF THIS BLOG :-)

Currently you are here with me (Kim Oliver) you will find a list with names at the bottom of the page after the tutorial video, so you can keep moving through the hop and viewing all of the other gorgeous designs.

 'FOR CASSIDY'

#Foxyfriends #KOCreationscards #Handmadecards #Australianmade #Peekaboocard #Happybirthday #Giftoflove

As one of my nieces is having a birthday soon and she just ADORES foxes, I thought this would be the perfect time to whip out my Foxy Friends stamp set, punch and gorgeous DSP


'FULL OPEN VIEW'

#Foxyfriends #KOCreationscards #Handmadecards #Australianmade #Peekaboocard #Happybirthday #Giftoflove

'TOP VIEW'

#Foxyfriends #KOCreationscards #Handmadecards #Australianmade #Peekaboocard #Happybirthday #Giftoflove


 'FRONT VIEW'

#Foxyfriends #KOCreationscards #Handmadecards #Australianmade #Peekaboocard #Happybirthday #Giftoflove

To keep hopping with us please click the name after mine.


'Tutorial Video'


If you would like to purchase any of the items I used to create this card, I have put them all together for you below in the carousal


Thank you so much for visiting my blog today. 

If you have any questions, please ask in comments below. 

I always reply!


Monday, 3 October 2016

#CTC005 Challenge-Water Colours

WATER COLOURS

#CTCOO5

WELCOME
This week's challenge is to CASE this card from Juan Ambida (BELOW) from Juanacreate

As this card is all about water colour, 
So then,
Today's blog is all about water colouring, with Stampin' Up Ink pads.

Here is Juan's card


I chose to stay true to the Juan's original design and used a floral theme.
I used 2 different Hostess stamp sets called 'GIFT OF LOVE' and 'FABULOUS FLORA'
Both of which become available to purchase just for hosting a party or a workshop with me.


'GIFT OF LOVE'


#Giftoflove #Hostessgifts #KOCreationscards #Handmade #Watercolouring #Springflowers #Fabulousflora #Stampinup


How to make 'Gift of Love'

  • Ink colours used are as follows - Emerald Envy, Flirty Flamingo, Sweet Sugarplum, Peekaboo Peach and Whisper White.
  • For the card stock I used Flirty Flamingo cut to 10.5 x 15 cm, Stampin' Up Water Colour paper and a sheet of vellum both cut to fit so you can see the all four edges of the card base and the vellum under the water colour paper. 
  • The vellum sheet under the water colour paper has been edged in silver after being trimmed to size. This was achieved by putting the sides/edges into the vellum into Versamark ink pad and running it along the whole side, doing the same on all four edges. Then dipping each edge into Silver Embossing powder and heating until smooth.
  • Stamping my sentiment sideways onto a strip of vellum I glued this in place using Fine-tip Glue pen.
  • When all painting had been finished I placed Metallic enamel shapes randomly on the front and a couple inside too.
 TIPS - Before Stamping any image that is to be heat embossed, always remember to use your Embossing buddy. Have a large piece of scratch paper under your work to catch any excess powder. This helps stop any of the embossing powder from clinging to unwanted areas. If any does manage to stick somewhere you don't want it to, first tap the back of your paper sharply with your finger nail. Then if you still find some clinging, get a fine tip paint brush and carefully remove those pieces with the tip only. Always making sure the excess falls onto your scratch paper.
IMPORTANT! When finished bend your scratch  paper in half so that all excess powder is in the middle and then pour your excess back into your container. Don't throw it away! It can be re-used!

For the Water Colouring
  • Dust your water color paper with your embossing buddy and stamp your images in versamark where desired. Pour your embossing powder over the image, making sure all of the stamped area has been covered. Follow the instructions as above in TIPS. Put all of this way and clean your work area. If you like having the inside of your card the same them as your front, make two images at this time.
  • Stamp Emerald Envy onto a clear block and Spritz, then Spritz your water colour paper so that it is just damp. Start by colouring all of the leaves and stems. Then thinning with the water start spreading the green around the areas you think will look effective. You can layer and deepen any of your colours by letting the paper dry (or heat drying) and recoloring again.
  • When you are happy move onto the flowers. Start with your lightest colour, being Gladioli they can be varied colours or all the one colour. I went a varied hue of the three ink colours I mentioned above.
  • After all is dry I stamped the splotches from the 'Gorgeous Grunge' stamp set in Emerald Envy, then went over this with the same stamp, but in Whisper White.
  • When completing the inside coloring for your card remember to leave an area that is clean for writing a personal note.


Inside View
#Giftoflove #Hostessgifts #KOCreationscards #Handmade #Watercolouring #Springflowers #Fabulousflora #Stampinup


'FABULOUS FLORA'


#Giftoflove #Hostessgifts #KOCreationscards #Handmade #Watercolouring #Springflowers #Fabulousflora #Stampinup


'Fabulous Flora' has been created using almost the same methods as 'Gift Of Love' BUT instead of  water colouring to start, I used the smooshing technique (click HERE to see the video).
When I had finished with the smooshing, I coloured the flowers and leaves as I did with 'Gift of Love'
The sequins for the front have been removed from the silver Sequin Trim before adding to the card..

Inside View
#Giftoflove #Hostessgifts #KOCreationscards #Handmade #Watercolouring #Springflowers #Fabulousflora #Stampinup


If you would like to purchase any of the items used to create these cards, use the carousal provided below. 
Remember you must host a party (can be an online party) or host a workshop to be eligible to purchase the stamp sets I used today.


Thank you for stopping by my blog today. I do hope you enjoyed my cards. 

If you have any questions about anything I have done please don't hesitate to ask. 

Just comment below with your question. 

I always reply!


Sunday, 26 June 2016

Blooms & Wishes 'For You' #PPA306 Sketch Challenge from Mary Fish

Blooms & Wishes

'For You'


#PPA306 Sketch Challenge from Mary Fish

PPA-306-June23


My card for today's blog was inspired by this weeks Pals Paper Arts sketch challenge, also the 'Blooms & Bliss' DSP and the 'Blooms &  Wishes' stamp set

I love the soft colours throughout the whole set in the 'Blooms & Bliss' DSP but because of the sketch & what I had in mind I had to balance the colours carefully so as to not over power any particular section of my design.....
I thought I would also add this to my cards made to send for the #frommetoyouwhenyouarefeelingblu in July, to help combat depression.


Here is my card for this weeks challenge


'For You'


#Bloomsandwishes #Foryou #KOCreationscards #PPA306 #Burlapribbon #Giftoflove #frommetoyouwhenyouarefeelingblu


How I made 'For You':

  • I chose Thick A4 Whisper White as my Card Base and for the small squares on the front. I made those using the plain layering squares. 
  • For the backing I chose Rich Razzleberry to lift that small amount of colour in the DSP to the fore. I also used this colour under the small squares using the scalloped layering square.
  • I stamped my flowers in Sweet Sugarplum & Blushing Bride the fussy cut them
  • I stamped onto my squares the leaves in Sahara Sand then layed the flowers on top using dimensionals.
  • I stamped my sentiment in Rich Razleberry using ink refills spread over a clear stampin block, as for some reason I had the refill but not the stamp pad ....go figure! Hence the sentiment looks a little washed out....I had to stamp off the paper first just to get it that good. Must order that stamp pad! You can see one of the flowers has a different colour also... I tried Wisteria Wonder to see how it would look.
  • I layered small pieces of Burlap ribbon under the top two flower squares and a strip under the bottom square running the whole way across.
  • I raised the squares on dimensionals  to add a little more depth to the card.
  • I fussy cut around the outside sentiment and placed that over the longer strip of burlap ribbon.
  • I added Rhinestones to the centre of each flower and also touched up the centres with clear Wink of Stella. Which you can just see in the pictures above.
  • I layered my card front onto the base also using dimensionals .... I think I am becoming addicted to Dimensionals!

#Bloomsandwishes #Foryou #KOCreationscards #PPA306 #Burlapribbon #Giftoflove #frommetoyouwhenyouarefeelingblu


I do hope you like my card today. 
Thank you for stopping by.
Dont forget to take a look at all of the other lovely cards that have been created for this challenge by clicking HERE

#Bloomsandwishes #Foryou #KOCreationscards #PPA306 #Burlapribbon #Giftoflove #frommetoyouwhenyouarefeelingblu

If you would like to purchase any of the items that I used to make my card then please use the carousal below.