Showing posts with label #KOCreationcards. Show all posts

Thursday, 15 February 2018

Stampin' Dreams Blog Hop - Colouring


Welcome 😊
You are joining me today for a blog hop with the Stamping Dreams crew.
We are all focusing on colouring this month. Using some of Stampin' Up!'s fabulous colouring range.

I can't say I have a favourite of them, but I do enjoy colouring with the new Stampin' Blends that are now available.

You are currently here with me Kim Oliver. I will have a full list of blog hop participants closer to the end of this post.
  I have chose to use the wonderfully easy to use Stampin' Blends and the gorgeous Designer Series Paper from the Occasions catalogue called Petal Passion, along with the Petal Palette bundle.

It's perfect for colouring as you can see below.

#kocreationcards #petalpassion #petalpalette #cardmaking #stampinup #stampinblends #birthdaycards #valentines

Here are my cards

Happy Birthday to You

#kocreationcards #petalpassion #petalpalette #cardmaking #stampinup #stampinblends #birthdaycards #valentines


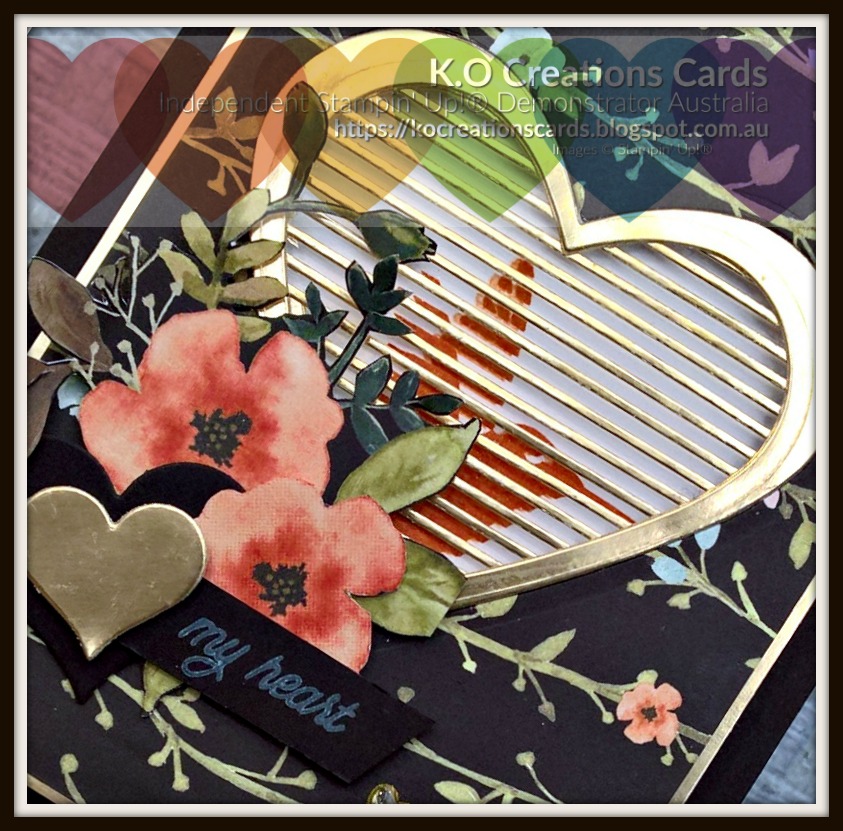
I coloured my sheet (almost) completely before I decided to cut into it. I hated cutting it too 😢  But in the end I think I managed to showcase the coloured paper as much as I could and created something beautiful to give as well.

 From The Heart

#kocreationcards #petalpassion #petalpalette #cardmaking #stampinup #stampinblends #birthdaycards #valentines

For both cards I have used the layering circle framelits plus the stitched shapes to create the focal area.

To continue moving through the hop please click the name directly after mine.


Live in Australia? Love shopping online for your product? Then click the link below to shop for your craft product today.
http://bit.ly/ShopwithKOCreationscards


When shopping with me for the month of February please use this hostess code 

 QZPSPX24

Also Free with any product purchase of $50 during the month of February is this fabulous tutorial bundle:

Free with Product Purchase of:  $50 AU 

Or you can purchase this bundle separately just by clicking below.
Please add a note with your payment with the word 'February' for my reference, thank you. I will then email you the complete tutorial bundle within 48hrs


If you live in Australia and would like to purchase any of the items I have used to create with today then please use the carousel below. 
It has all items listed and is linked directly to my store.


Thank you so much for stopping by today.

I do hope you have enjoyed my post.

If you have any questions, please feel free to ask them on the comments section below. 
I always reply to questions 😉


Wednesday, 30 August 2017

Enjoy The Little Things In Life Design Team - Vacation Memories


Image may contain: text

Welcome back crafty people 😊 I am so happy you could join me today.
The Video Blog Hop Design Team are a groups of demonstrators from all over the world. We on the last Wednesday of each month.
We have some wonderful projects and tutorials to share with you today, we hope to inspire you with new ideas and hopefully give you somehelpful along the way.
Today's theme is - Vacation Memories.

 As I have just recently returned from New Zealand paper crafting retreat  now is a perfect time to share something I created over there thanks to a class 😊 Plus you get to see some more of my pictures.

Our guest tutor while on the retreat was Susan Wong and she taught us how to make this gorgeous Straw Mini Album.
And I straight away, asked if it was OK to share this fabulous idea with you all 😇

Naturally Eclectic Mini Album


#Minialbum #Holidaymemories #KOCreationcards #Naturallyeclectic #Memorykeeping #Bragbook


View of Naturally Eclectic Album from differing angles.

#Minialbum #Holidaymemories #KOCreationcards #Naturallyeclectic #Memorykeeping #Bragbook


Here is a link for the written tutorial for this album that I have written up and added to my Google Docs to share..
You must have google drive to view this document.
MINI ALBUM TUTORIAL

As I have had 2 sick children for the past week and a half my time hasn't been condusive for creating a video.
Susan provided me with the original video from Renate Ecklmayr that she used to learn how to create these cute albums.
I will give you this link to Renate's blog HERE (the blog is written in german but you can use the translate button)
The video is also in German


This video along with my written tutorial will give you an idea of how the album goes together.

I almost have a video created though, and I will upload it to my You Tube Chanel as soon as it is ready.

I will now add a couple of more pictures of my already filled album for your viewing pleasure.

MINI ENVELOPE

Folded out to show card insert.

#Minialbum #Holidaymemories #KOCreationcards #Naturallyeclectic #Memorykeeping #Bragbook


TAG INSERT

Partly pulled out.

#Minialbum #Holidaymemories #KOCreationcards #Naturallyeclectic #Memorykeeping #Bragbook

ACCORDION FOLD 

Unfolded out and down

#Minialbum #Holidaymemories #KOCreationcards #Naturallyeclectic #Memorykeeping #Bragbook

ACCORDION FOLD

Unfolded out and up.


#Minialbum #Holidaymemories #KOCreationcards #Naturallyeclectic #Memorykeeping #Bragbook


These would make perfect gifts for those about to travel, new parents and grand parents too. What a wonderful way to share their new family members or some of those treasured holiday photo's.
Make one for a 21st or an 18th and fill ot with memories leaving a few spots for new memories 😉

You are currently here with me Kim Oliver of Australia.
You will find a list for the names of the other DT members below, just click the name after mine to continue through the blog.


If you are looking to purchase any of the items I used to create this gorgeous mini album with then please use the carousel below.


Thank you so very much for visiting my blog today.
I do hope that you have enjoyed my efforts.

If you ahev any questions please ask then in comments below.
I always reply.

Friday, 7 July 2017

My Heart Flutters - You Move Me - Whole Lot of Lovely


#KOCreationcards #wholelotoflovely #youmovemebundle #flutteringhearts #myheartflutters #cardmaking #stampinup #pulltabcard
Welcome back everyone 😊
Today I get to craft just for me ...Oh it feels good too lol.
I found a few things in the catalogue that I fell in love with as soon as I saw them and purchased athose items as soon as I was allowed. 
This is the first time I have had to actually play with them!

The items that I fell in love with are the 'You Move Me' bundle and the Whole Lot of Lovely DSP.

I am entering this card into the Global Design Project challenge this week. 
The challenge for this week is a sketch #GDP094


Here is my card

My Heart Flutters

#KOCreationcards #wholelotoflovely #youmovemebundle #flutteringhearts #myheartflutters #cardmaking #stampinup #pulltabcard


What a gorgeous pairing these two turned out to be!

My card base is basic black with a layer of gold foil under the sheet of trimmed DSP.
I used the Sweet and Sassy framelits to create the hearts frame over the top of the slotted air con style slots. 
I cut a matching heart into the DSP using the framleits, glueing the slots with the heart frame from underneath.
Trimming any excess slots away from the edges.
I then added the gold foil layer.
I trimmed this so that it has only a 2mm edge showing around the DSP.
I added two fussy cut flowers along with two sassy die cut hearts, one in black and one in gold.
My sentiment is from the 'You Move Me' stamp set and has been stamped in craft ink mixed with  Island Indigo to give a hint of blue.

Angeled and Inside View


#KOCreationcards #wholelotoflovely #youmovemebundle #flutteringhearts #myheartflutters #cardmaking #stampinup #pulltabcard

The gorgeous little fluttering hummingbird was stamped in Pumpkin Pie and Peekaboo Peach on whisper white.
I did try black card stock, but the colours just wouldn't stand out enough.

I have added a little video to show how it looks with the flutttering action using the pull tab


Have you ever heard the saying ...'My heart flutters like a caged bird!'...it can be used to express feelings of love.
I am trying to get that quote/sayong across with my card. 'My heart flutters like a caged bird'.
Sometimes I see things when creating that doesn't translate, but I think this really does come across once you pull the tab and see the action.

If you would like to purchase any of the items I used to create this gorgeous card with, then please use the carousel below. It has every item listed and is linked directly to my store.


When shopping with me don't forget to enter the Hostess code for July
ZB34WRCT
Make sure you enter your details correctly so you cango into the draw to win some fabulous prizes drawn at the end of every month!


Thank you so much for visiting today.
If you have any questions please ask them in comments section below.
I always reply!


Wednesday, 3 May 2017

Flourishing Fairy Celebrations


Welcome back to my blog crafters

Today I am sharing a card made for a sweet little girl who is turning 7 on Thursday.

I created this card using the 'Fairy Celebration' stamp set mixed with 'Falling Flowers' stamp set and the matching May Flowers dies

Happy Birthday

#KOCreationcards #Imbringingbirthdaysback #Fairycelebration #Fallingflowers #Mayflowerframelits #Watercolouring


For the original card I chose to use the same colour as a layer as the colour I used for the flowers and spots.

I adored how this turned out. By adding a small flourish and flower to the top left corner inside the card  I carried the theme through nicely.

I loved it so much that when I had completed it I decided to make 3 more to put with and order for my outlet. I had been asked for a certain few cards and birthday cards for younger girls was one request.  These are perfect!

I also make cards for friends, family and of course my customers, just to say thank you 😍. 
Then there is the Random Act of Kindness cards too... A wonderful group I am part of that exists soley to bring a smile to others. We share ideas using current Stampin' Up! product and it is so much nicer to find a card in your ail box than a bill!. 
You join, add your name to the files and monthly event and then randomly select  a few names of a list of particpating people. Then send them out the cards, it's that simple! Oh the theme is ecouragement...not birthdays, christmas etc.. Only as some people don't celebrate these times and occasions.


Below you can see some of the steps that are taken to create these cards. I wrote a description for the steps under the picture.

Creating Steps


#KOCreationcards #Imbringingbirthdaysback #Fairycelebration #Fallingflowers #Mayflowerframelits #Watercolouring
   

  1. Trim all cards stock to size and then stamp and die cut flowers.
  2. Stamp images, then mask and daub colour inside masked area. I used Wild Wasabi for this.
  3. Colour images...I coloured with a single colour at a time....moving through the images.  Once completed I added Clear Wink of Stella over the top of the flowers and Fairy wings. The cards are very sparkly IRL...I tried to capture it, but failed ...sorry.
  4. Die cut the are previously masked. Then die cut out a scalloped oval in matching coloured card stock to flowers and spots. Also cut an oval in the diamond glitter paper.
  5. Assemble layers.
  6.  NOT PICTURED. I covered the fairy wings and spots with Fine-Tip glue.


#KOCreationcards #Imbringingbirthdaysback #Fairycelebration #Fallingflowers #Mayflowerframelits #Watercolouring


And here are all 4 cards together. 

#KOCreationcards #Imbringingbirthdaysback #Fairycelebration #Fallingflowers #Mayflowerframelits #Watercolouring


I hope you enjoyed these cards. 

If you are looking for a cpmplete list of items used to create a set for yourself then please check the carousel below. 
I have added then here for your convenience.
Three ink pad colours that I used are now retired, so if not available any more in store, they can be substituted with a similar shade. (retired colours were Cucumber Crush, Delightful Dijon and Watermelon Wonder)

When shopping with me online please use the MAY HOSTESS CODE 33EJUTN upon checkout. 

You can be entered into the draw to win some fab prizes just for shopping with me, as long as yu enter your contact details too!


Want to stay up to date with news and offers from me, then please join my news letter mailing list by clicking below. I only send out 1 email a month.


Thank you so much for stopping by today and I hope you found some inspiration.

If you ahve any questions pleask ask them in comments below. 
I always reply!

Wednesday, 26 October 2016

Seaside Shore - Here's Hoping Your Day Goes Swimmingly - #GDP059

 Welcome !
Today  am sharing some cards I made using the stamp set 'Seaside Shore'.
I have had this set for a little while now, just waiting for the right opportunity to showcase it.
 I am entering one of these cards into the weekly challenge at Global Design Project #GDP059
There theme this week is Animals/Pets.


I used the 'Smooshing' technique (Click HERE to see more)  for the 2 cards at the back, pictured below. 

#Seasideshore #KOCreationcards #Australianmade #Inspiredbynature #Cardmaking #Smooshingtechnique #Hopingyourdaygoesswimmimgly

Before colouring of any kind began, I stamped all of my images in Stazon black ink, where I wanted them to be. 
I then masked them all using MOLOTOW art masking liquid. You must leave this to dry before applying any colouring.
When this had dried I then proceeded to colour the backgrounds in my chosen colours. 

'Fish Bowl'


This card below is the one I am entering into #GDP059
#Seasideshore #KOCreationcards #Australianmade #Inspiredbynature #Cardmaking #Smooshingtechnique #Hopingyourdaygoesswimmimgly

For the fish bowl, I used the largest circle Layering framelit and drew around one quarter creating the side of the bowl, moving it over just little, I drew the opposite side. I hand drew the base and the top trying to give the same effect as if stamped. 
For the back ground of the bowl, I used Aqua painters, with and a mix of Island Indigo, Bermuda Bay, Tip Top Taupe, Crushed Curry and Pool Party stamp pads. The sentiment has been stamped in Emerald Envy and embellished with Emerald Envy Bakers Twine and topped with a silver enamel shape..... The shadow was created using Smoky Slate stamp pad and Aqua Painter.


 'Front View of FISH BOWL'


#Seasideshore #KOCreationcards #Australianmade #Inspiredbynature #Cardmaking #Smooshingtechnique #Hopingyourdaygoesswimmimgly

For the next 2 card images I used the Smooshing technique for the background (Clike HERE to see the tutorial)


 'Swimming Free'


#Seasideshore #KOCreationcards #Australianmade #Inspiredbynature #Cardmaking #Smooshingtechnique #Hopingyourdaygoesswimmimgly

Once all water colouring had completely dried (I left mine overnight) I removed the Molotow masking fluid.
I then proceeded to colour the images accordingly. 
For the 3 fish images above and below I used a mix of Daffodil Delight, Real Red, Pool Party with the Clear Wink of Stella. The single fish was created using Bermuda Bay, Real red and Wink of Stella. The weeds were coloured using Pear Pizzazz and Garden Green. The bubbles were embellished with Silver Metallic Enamel Shapes.

'Side view of Swimming Free' 

#Seasideshore #KOCreationcards #Australianmade #Inspiredbynature #Cardmaking #Smooshingtechnique #Hopingyourdaygoesswimmimgly

'Front View of Free Swimming'


#Seasideshore #KOCreationcards #Australianmade #Inspiredbynature #Cardmaking #Smooshingtechnique #Hopingyourdaygoesswimmimgly
The colours used for the backgrounds for these two images are the same as above also using the Smooshing technique. For the 3 fish images I used the Gold Wink of Stella and for the little single fish I used the same as the precious card. I added some small pearls under the sea weed next to the shells for this card.

'Side View of Free Swimming'

#Seasideshore #KOCreationcards #Australianmade #Inspiredbynature #Cardmaking #Smooshingtechnique #Hopingyourdaygoesswimmimgly

If you are looking to purchase any of the items I used to create these cards, I have added them all to the carousal below.


Tuesday, 6 September 2016

Swirly Bird Love over @ #WWYS80

Swirly Birds

Thinlits & Stamps

I participate in a few challenges and thoroughly enjoy the little push outside my comfort zone that these challenges give me. I have been wanting to join in over at the What will you stamp (WWYS) blog for some time now. Finally the stars have aligned I have a spare day & they are showcasing a stamp set I adore! 

Swirly Birds & Swirly Scribbles Thinlits


& here is my card

SWIRLY BIRD LOVE

#Swirlybirds #Swirlyscribbles #Sunshinewishes #KOCreationcards #Flourishthinlits #Handmade #Love #StampinUp

I have added this card to Kylie Bertucci's blog highlights this week. To vote for my card or any of the other entrants please click HERE Voting starts tonight x


#Swirlybirds #Swirlyscribbles #Sunshinewishes #KOCreationcards #Flourishthinlits #Handmade #Love #StampinUp

#Swirlybirds #Swirlyscribbles #Sunshinewishes #KOCreationcards #Flourishthinlits #Handmade #Love #StampinUp

How I Made Swirly Bird Love :

  • I Cut the base card thick Whisper White to 15 cm x 15 cm
  • I also cut a acetate window sheet to 15 cm x 18 cm. I folded this on the 15 cm mark leaving a 3 cm flap at the back
  • I cut the front panel from the thick whisper white at 7.5 using the wavy lines thinlits from the Swirly Scribbles set. I trimmed it to the fold leaving the bottom half intact as shown above.
  • So the top of the acetate and the card base lined up I used a marker I&lined up where I wanted the long scribbles thinlits to sit. I then ran them through the bigshot .
  • Once both the acetate and the base were cut I lined them up and stuck them together by adding Tear & Tape to the 3 cm flap of the acetate. I had to trim the top of the 3 cm flap down by hand to fit snugly.
  • I cut a piece of Crumb Cake card stock 14 cm wide and then marked the top at 14 cm high. I used the swirly scribbles thinlit to match the top of the card base.
  • I used all of the swirly stamps to make rose shapes all over a piece of  Sugar Plum card stock. I used Blushing Bride, Sweet Sugarplum & Whisper White ink pads for this, layering the colours for effect.
  • I also stamped a few roses onto whisper white card stock.
  • I then cut the stamped Sweet Sugarplum to measure 13 cm wide and marked it at 13 cm high. I placed the wavy thinlits there at the mark and ran through the big shot.
  • I layered these onto the back of the card, as you can see in the picture below.
  • Using the same technique of measuring and trimming to size I cut two layers for the middle of the card as seen above.
  • I only needed one layer to add to the front and that was the Crumb Cake on top of the existing white card base.

#Swirlybirds #Swirlyscribbles #Sunshinewishes #KOCreationcards #Flourishthinlits #Handmade #Love #StampinUp
  • I then cut two strips if the wavy scribbles in Crumb Cake & Sugar Plum. 
  • After adhering these strips to the front and the middle using my snail adhesive I cut my stamped roses using the scribbles rose and placing the middle of that over the stamped image. 
( I do wish I had a stand to make a video to show you)
  • I also used the smallest shapes from the Swirly Scribbles set and die cut some little centres out of my stamped rose images.
  • I die cut 3 sets of green leaves from the 'Flourish' thinlits set. 2 of these I cut down so I had 3 leaves at the top and a small stem. I then cut the last two leaves so that one had a stem and one was just a leaf on it's own. These were added to each page of the card. Please see pics for more detail.
  • I added 3 roses each to the front and the middle of the card using dimensionals, 1 large and 2 small.
  • I die cut the heart & 3 words - the Heart in Sweet Sugarplum, 'Hope' in Whisper White, 'Sunshine' in Sweet Sugarplum & 'LOVE' in Crumb Cake.
  • I layered the words, one on each page of the card. On the last page I placed the heart under the word Love and also stamped some splatters in Sweet Sugarplum. 
  • I stamped the sweet little bird in Sweet Sugar Plum onto Crumb Cake and fussy cut around him. Stamping his feet onto the card then adding him by adhering with a dimensional.
  •  To finish it all off I added rhinestones to the center of each flower and tied a piece of Thick Whisper White Bakers Twine around the middle of the card.
  • I added a touch more sparkle by adding \clear Wink of Stella to the lightest part of each rose.
#Swirlybirds #Swirlyscribbles #Sunshinewishes #KOCreationcards #Flourishthinlits #Handmade #Love #StampinUp

Well I do hope you have enjoyed my card creation today. If you have any queries please ask in comments below. If you have any ideas about a stand for a phone so I can do videos, also let me know lol.

Thank you so very much for stopping by.

As always if you would like to purchase any of these items you can do so by using the carousal below


Thanks again :-) Toodles

Friday, 24 June 2016

'Happiness' #GDP041 | Colour Challenge

'Happiness'

'In This World' 

Happiness like beauty, is in the eye of the beholder.

 #GDP041

Today's blog creation was made especially for the #GDP041 Challenge using Sweet Sugarplum, Whisper White & Night of Navy.

Oh what a divine colour palette to work with, yummo!

As I had been rather busy this week, I didn't have a lot of time to actually think about what I was going to create....I saw the colour palette early and remembered thinking OMG that is just heavenly! Normally I find inspiration in day to day life....Seeing designs or even just seeing a stamp set. This time was different, I decide I was going to make something that reflects me & what makes me happy.

I hope you like it 


'HAPPINESS'


#Inthisworld #Numberofyears #Timelesstextures #Happiness #Dowhatyoulove #KOCreationcards


Being a mum of 2 VERY active kids, I love the peace and quiet of nature, it gives me time to reflect, re-charge and it helps to energize me for future hectic days.
Another of my favorite things is vintage/steampunk...unfortunately there really wasn't alot of steampunk items among Stampin' Up! 
Until recently that is WHOooHooo lol...we are now getting more gorgeous stamps that really can be used in this format...

So, my happiness!
That is how I decided on my stamps for this challenge :)

#Inthisworld #Numberofyears #Timelesstextures #Happiness #Dowhatyoulove #KOCreationcards

#Inthisworld #Numberofyears #Timelesstextures #Happiness #Dowhatyoulove #KOCreationcards

How I made Happiness:


  • I Decided I wanted a soft look for this stamp set being that the colours are so bold.
  • I used Thick Whisper White A4 card stock for my base and my card front.
  • The sponging was done in layers with Sweet Sugarplum until I reached the desired depth and tone.
  • With the  chair from 'in This World' stamp set, I used Versamark under the Night of Navy colour and then embossed with clear powder & my heat tool, so I could also add Sweet Sugarplum shading and keep the darker lines perfect. This was the first image stamped. I also stamped another plain image onto reflex paper to use for a mask. 
  • After masking and adding the Butterfly and lines using the same technique that I used for the chair I stamped, embossed and fussy cut another butterfly. This was added and raised using a dimensional.
  • I decided that the card needed texture, so I used my 'Timeless Textures' stamp set for this. Using the stamp off the paper then onto the paper technique.
  • For the leaves I used the stamp image from 'Number of Years' stamp set and the roses from the same set.
    I added small rhinestones to the centre of each rose for some sparkle.
  • Then after colouring the other images I added 'Wink of Stella' in gold and clear over selected areas.
  • I added the stamped and fussy cut key with a little sentiment fro the same set & tied a little piece of Sweet Sugarplum ruched ribbon.
  • I stuck the Whisper White card base to the Night of Navy using dimensionals.


If you like this and would like to try it for yourself, I have listed all items used below.


Thank you for stopping by my blog, please don't forget to click HERE to see all the other gorgeous creations entered this week