Wednesday, 28 March 2018

Enjoy The Little Things In Life Design Team Blog Hop - Technique


Welcome back everyone 😊

I am desiging today with the 'Enjoy The Little Things I Life' Design Team, this hop is hosted by Martha Groeger.

Today we are all sharing a technique.
I decided on which technique to do when I had a fantastic response to a card I created last week. I was asked specifically to share what I do.
So, my technique is watercolouring.

You are here with me Kim Oliver - KOCreations Cards.
I have a list of hop participiants closer to the end of this post.


Here are my projects.

From the Heart

#kocreationscards #southernserenade #watercolor #watercolour #petalpalette #cardmaking #stampinup #papercrafts #techniques #enjoythelittlethingsinlife


Happy Birthday

#kocreationscards #southernserenade #watercolor #watercolour #petalpalette #cardmaking #stampinup #papercrafts #techniques #enjoythelittlethingsinlife


Here is my video showing how I created these water colour cards.


Items Used for cards in video

  • Card Stock : A4 Crumb Cake keeping scrap pieces for oval focal etc, A4 Thick Very Vanilla, A4 Early Espresso plus the scrap pieces for sentiments.
  • Petal Palette Clear-Mount bundle and Southern Serenade stamp set
  • Ink Pads: Blushing Bride, Garden Green, Pumpkin Pie and Chocolate Chip.
  • Stiched Shapes framelits.
  • Pearl Basic Jewels, Rhinestone Basic Jewels.
  • Stampin' Blends: Dark Crumb Cake and Bronze.
  • Copper trim.
  • Burlap ribbon.
  • Decorative Ribbon Border Punch.
  • Aqua Painter.
  • Adhesives: Foam Adhesive Strips, Multi Purpose Liquid Glue (tombow), Glue Dots.

Basic Instructions

  1. Place Crumb Cake card stock into Stampin' Trimmer portrait style and score the length at 10.5 cm, Fold on score line turn and cut in half at 14.9 cm =  2 Crumb Cake bases @ 10.5cm x 14.9cm in landscape orientation. 
  2. Cut 2 pieces of  Early Espresso card stock at 14.5 x 10.1 cm.  Cut two more pieces, 1 at 2.3cm x 9.7cm and another at 7.9cm x 9.7cm for split panel card
  3. Cut 2 pieces of Very Vanilla card stock at 14.1 cm x 9.7 cm. Cut two more pieces, 1 at 2.1cm x 9.7 cm and another at 7.7cm x 9.7cm for split panel card. 
  4. Layer the two strips of Very Vanilla onto the Early Espresso leaving the edge showing along the length of one side only.
  5. Adhere the stamped Very Vanilla layers to the Early Espresso layers for both cards. 
  6. For the Baronia flower card only adhere the two strips of layered Early Espresso and Very Vanilla together and adhere to the painted Very Vanilla card stamped image with foam strips.
  7. Punch Decorative Ribbon Border an trim to size from a piece of Early Espresso card stock
  8. Stamp sentiments onto scrap pieces of Very Vanilla
  9. Layer one for the split panel card over stamped, painted and fussy cut image with a crumbcake stitched oval behind. 
  10. Placethe other on Petal Palette rose card front after layering and stapling together. Hold in place using glue dots.
  11. Colour pearls with Stampin' Blends Dark Crumb Cake and Bronze and adhere them and rhinestones into desired positions.

Conversion from metric to imperial


Southern Petals

Group picture

#kocreationscards #southernserenade #watercolor #watercolour #petalpalette #cardmaking #stampinup #papercrafts #techniques #enjoythelittlethingsinlife


To continue moving through the hop please click the name directly after mine.


If you are looking to purchase any of the items I used to create with today then please use the carousel below.
It has most items listed and is linked directly to my store.

When shopping with me for the month of March please use the hostess code below.

 EA6AHBAH


As an added bonus you get Free with any product purchase of $50 during the month of MARCH this fabulous tutorial bundle using the Myths and Magic suite PLUS the True Gentleman suite.


Free with product purchase of:  $50 AU 

Or 

You can purchase this bundle separately just by clicking below.
Please add a note with your payment with the word 'MARCH' for my reference. 
I will then email you the complete tutorial bundle within 48hrs


This is available for purchase world wide.

Thank you so very much for visiting today. If you have any questions please don't hesitate to ask in the comments section below.

I appreciate all comments .
I will always respond to a question 😊

Monday, 26 March 2018

Tassie Demos Autumn Blog Hop


Hello and welcome.

I am hopping today with a few fellow Tasmanian Stampin' Up! ® demonstrators. 
We are each sharing a little bit about where we live and ourselves along with a project created with an Autumn theme.
Are you a Tasmanian Stampin' Up!® Demonstrator? Contact us to join our FB group or request to join HERE 

A bit about my home town

My home town is called Ringarooma and it is mostly a Dairy farming community. We are a close knit community which pull together extremely well for all sorts of occasions. I am originally a city girl, but knew that the city life wasn't my cup of tea. I have enjoyed living here for over 20 yrs now have really got about to see so many of our local tourist gems.


 A bit about me

I am a nature girl at heart and enjoy being out in it.
One of my ways of relaxing is by walking early mornings when ever I get the chance. When I do I thoroughly enjoy taking sunrise photo's. 
Here are a few that I have snapped on some of my walks.
And yes, I LOVE taking photo's.


We also have some very picturesque bush walks that are extremely close to where I live. Bush walking is another passion of mine.

One of these walks leads to a place called Ralphs Falls. 


The drive to Ralph Falls car park and the actual walk is absolutely gorgeous, but at certain times of the year it becomes stunning.
There are of course a few other bush walks that are quite close to my home town, for example: Mt Saddleback, Mt Victoria, Paradise Plains and also Mt Albert.

Okay enough about me and my town 😊
onto my project.
My project is inspired by nature (of course) and the theme of Autumn.

Because You Are You

#kocreationscards #lovelyasatree #watercolor #colourinkspiration #natureinspired #leaves #acorns #trees #cardmaking #papercraft #stampinup

Did you notice all of the trees in my photo's?

Well that is what I used for inspiration for this card.

The colours I used are from a past Colour Inkspiration palette and are as follows:

  • Lemon Lime Twist
  • Soft Suede
  • Sweet Sugarplum
  • Bermuda Bay

Angled View


#kocreationscards #lovelyasatree #watercolor #colourinkspiration #natureinspired #leaves #acorns #trees #cardmaking #papercraft #stampinup

I used the ink pads along with Aqua Painters and Stampin' Write markers to colour my images.

I do hope that you have enjoyed my post and my project.
To continue moving through the hop and getting to know our next Tassie SU Demonstrator please click the next button below.
This will take you to the lovely Mae Collins blog post


Below you will find a carousel containing links to all items that were used to create this project with, PLUS
 Hostess Codes and TUTORIALS.

When shopping with me for the month of MARCH please use the hostess code below.

 EA6AHBAH

As an added bonus you get Free with any product purchase of $50 during the month of MARCH is this fabulous tutorial bundle using the Myths and Magic suite PLUS the True Gentleman suite.


Free with product purchase of:  $50 AU 

Or 

You can purchase this bundle separately just by clicking below.
Please add a note with your payment with the word 'MARCH' for my reference. 
I will then email you the complete tutorial bundle within 48hrs


This is TUTORIAL available for purchase world wide.

Thank you so very much for visiting today. If you have any questions please don't hesitate to ask in the comments section below.

I appreciate every comment made and I always respond to a question 😊

Sunday, 25 March 2018

Crazy Crafters blog hop with special guest Cathy Caines


Hello everyone and welcome.

I am participating in a blog hop as part of the Crazy Crafters. 
Our special guest today is super talented Cathy Caines of In The Cat Cave


We have all chosen a project of Cathy's to CASE and are sharing everything with you today.

You are currently here with Kim Oliver - KOCreations Cards. I have a complete list of hop participants closer to the end of this post.

Here is the project I have chosen to CASE


I love that this design is simple and uses up some lovely DSP.

I tend to hoard my DSP so this is one of the reasons for choosing this design.

Here is my project.

Birthday Foils


#kocreationscards #springtimefoils #2018saleabration #2018occasions #stampinblends #loveitchopit #cardmaking #papercraft #stampinup #simplecards


As you can see it is rather a simple layout.
My card base is Crumb Cake with a layer of the Springtime Foils Designer Series Paper (copper foil accents).  I fussy cut a small flower from another sheet of the DSP, coloured it and adhered it to a medium stitched circle cut from Crumb Cake card stock. I scrunched up a length of copper thread under the circle and adhered all to my card front.
I added a copper heat embossed sentiment to the focal to finish.
Voila a pretty and super easy card.

 Angled View

#kocreationscards #springtimefoils #2018saleabration #2018occasions #stampinblends #loveitchopit #cardmaking #papercraft #stampinup #simplecards

I do hope you have enjoyed my simple but pretty project today.

To continue moving through this wonderful hop please click the name directly after mine.


Only 6 days left of SALE-A-BRATION

Did you know that just by purchasing the items I used to create this card -
Crumb Cake card stock, Stitched Shapes, Copper Metallic thread, Cherry Cobbler Stampin' Blends and dimensionals that you can get the Springtime Foils DSP for FREE during Sale-A-Bration!
Sale-A-Bration closes 31st March 2018.


All items are listed for your convenience in the carousel below.

When shopping with me for the month of March please use the hostess code below.

 EA6AHBAH


As an added bonus you get Free with any product purchase of $50 during the month of MARCH this fabulous tutorial bundle using the Myths and Magic suite PLUS the True Gentleman suite.


Free with product purchase of:  $50 AU 

Or 

You can purchase this bundle separately just by clicking below.
Please add a note with your payment with the word 'MARCH' for my reference. 
I will then email you the complete tutorial bundle within 48hrs


This is available for purchase world wide.

Thank you so very much for visiting today. If you have any questions please don't hesitate to ask in the comments section below.

I appreciate all comments .
I will always respond to a question 😊

Tuesday, 20 March 2018

Colour Inskpiration for Petal Palette #CI29


 Hello 😊
Welcome to today's post.

I am sharing with you a gorgeous old world colour palette from Colour Inkspiration
Colour Inkspiration is a facebook group dedicated to inspiring us to create and share with the fortnightly gorgeous colour palettes chosen by the Design Team.
If you love creating with colour then this page is for you. 
Click HERE to request to join.

    
Here is this fortnights colour Palette.
Do you see why I am thinking old world charm?
I find inspiration in all sorts of places, these colours reminded me of some very old paper that I used to have many years ago. I had a little go at recreating the old world feel of that paper in my project.


Here is my creation using this gorgeous colour palette

Congratulations

#kocreationscards #wedding #engagement #cardmaking #petalpalette #colourinkspiration #roses #oldworldcharm #CI29 #stampinup


For my project I used a combination of Stampin' Up! ink pads and Stampin' Write Markers along with Aqua Painters.

Items Used

  • Card Stock : A4 Crumb Cake, A4 Thick Very Vanilla and 14.5cm x 10cm Chocolate Chip and scrap piece for sentiment.
  • Bundles: Petal Palette Clear-Mount 145974
  • Ink Pads: Blushing Bride, Garden Green and Chocolate Chip
  • Pearl Basic Jewels
  • Stampin' Blends: Dark Crumb Cake and Bronze.
  • Aqua Painter.
  • Adhesives: Foam Adhesive Strips, Multi Purpose Liquid Glue (tombow)

Basic Instructions

  1. Place A4 Crumb Cake on Stampin' Trimmer in a landscape orientation and score at 14.9cm. Turn and cut at 10.5cm . Fold both pieces on score line and burnish. You will now have two card bases 14.9cm x 10.5cm. Keep one aside for front focal die cut.
  2. Cut 1 piece of Chocolate Chip card stock at 14.5 x 10 cm. Cut two more pieces, 1 at 2.3cm x 14.2cm and another at 5.1cm x 14.2cm
  3. Cut 1 piece of Very Vanilla card stock at 14.1 cm x 9.6 cm. Cut two more pieces, 1 at 2.1cm x 14.2 cm and another at 4.9cm x 14.2cm. Have another 10cm x 10cm piece on hand ready for stamping the extra rose image.
  4. Layer the two strips of Very Vanilla onto the Chocolate Chip leaving the edge showing along one full length.
  5. Colour rose image stamps with Blushing Bride ink pad and then colour the leaves with the Stampin' Write marker Garden Green. Huff on stamp and then stamp images left of the centre line on Very Vanilla layer. Repeat this step for the extra rose image on the spare 10cm x 10ccm Very Vanilla. Die cut with thinlits and bigshot.
  6. Colour images with matching inks and Aqua Painters. Note I also coloured the background area with a light cover of Chocolate Chip.
  7. Adhere the stamped Very Vanilla layer to the Chocolate Chip layer. Adhere the two strips of layered Choc Chip and Very Vanilla to the front of the stamped image with foam strips.
  8. Die cut the lattice from the put aside piece of Crumb Cake.
  9. Stamp the sentiment in Versamark onto scrap piece of Choc Chip, dust with White embossing powder. Heat to melt. Die cut with label thinlit in bundle.
  10. Layer rose with lattice and sentiment over stamped images.
  11. Colour pearls with Stampin' Blends Dark Crumb Cake and Bronze and adhere into desired position.

Front View

#kocreationscards #wedding #engagement #cardmaking #petalpalette #colourinkspiration #roses #oldworldcharm #CI29 #stampinup

I am sooo in love with how this card looks finished. Having the paper effect behind the raised panels and then using the same floral image as a focal bought it all alive.

 Angled View

#kocreationscards #wedding #engagement #cardmaking #petalpalette #colourinkspiration #roses #oldworldcharm #CI29 #stampinup

I do hope you have enjoyed my project today. 


When shopping with me for the month of March please use the hostess code below.

 EA6AHBAH


As an added bonus you get Free with any product purchase of $50 during the month of MARCH this fabulous tutorial bundle using the Myths and Magic suite PLUS the True Gentleman suite.


Free with product purchase of:  $50 AU 

Or 

You can purchase this bundle separately just by clicking below.
Please add a note with your payment with the word 'MARCH' for my reference. 
I will then email you the complete tutorial bundle within 48hrs


This is available for purchase world wide.

Thank you so very much for visiting today. If you have any questions please don't hesitate to ask in the comments section below.

I appreciate all comments .
I will always respond to a question 😊

Friday, 16 March 2018

Ink It Stamp It - Myths and Magic


Welcome to the Ink It! Stamp It! Blog Hop.
This month we will be sharing projects that are 3D.
The full line up towards the end of this post will guide you through all projects.

I have chosen to use the super cute Magical Day bundle along with the Myths and Magic DSP

Magical Knights


This little pizza box has 4 note cards inside along with 4 matching envelopes.

Below you can see some of the steps taken to complete my card set.

Step By Step


  • I started by measuring the pieces I would need to cover my pizza box with. 
  • I then made my note cards and a cover layer for them.
  • I stuck my layers to the cards and the box and then stamped my required images. I coloured them using my Stampin' Blends alacohol markers. I also fussy cut from the DSP the small castle, the orange dragon along with two knights.
  • I added all my bits and pieces to the cards and the box to complete each design.
  • To finish I stamped some images onto the closing flap of the note card envelopes.


Thank you so much for joining us today.
We hope that you will join us again next month. I'm Kim Oliver - KOCreation Cards. To keep hopping around please refer to the list below to find out who is up next.


When shopping with me for the month of March please use the hostess code below.

 EA6AHBAH


As an added bonus you get Free with any product purchase of $50 during the month of MARCH this fabulous tutorial bundle using the Myths and Magic suite PLUS the True Gentleman suite.


Free with product purchase of:  $50 AU 

Or 

You can purchase this bundle separately just by clicking below.
Please add a note with your payment with the word 'MARCH' for my reference. 
I will then email you the complete tutorial bundle within 48hrs


This is available for purchase world wide.
Thank you so very much for visiting today. I you have any questions please don't hesitate to ask in the comments section below.
I always respond to questions 😊

Thursday, 15 March 2018

SDBH - Easter Theme


Hello 😊

Welcome back to my blog.

Today I am hopping with the Stampin' Dreams Blog Hop DT.
Our theme for today is Easter.

My children love Easter time....as most kids do hahaha.
But, so does my Mum. I try to spoil her a bit every year by creating a gift and card for her. 
Below is my card created for her this year.
 You are here with me Kim Oliver - KOCreations Cards. I have a complete list of all blog hop participants closer to the end of this post.

Happy Easter

#kocreationscards #youreinspiring #easter #cardmaking #stampingup #stampinblends  #saleabration2018 #2018occasionscatalogue
I have used an eclectic mix of a few different sets from the 2018 Occasions Catalogue to create this card with.
  • You're Inspiring Stamp set pg 31
  • Myths and Magic washi tape pg 37
  • Petals and More thinlits dies pg 23

My background 

Hmmmm
Well this happened by accident really.
I had nearly coloured a whole card front in light Pool Party, but had accidentally picked up the dark Pool Party while chatting, and well, you guessed it. I started colouring with it mindlessly 😂 just filling in the spaces I hadn't earlier.
OMG
I looked down and nearly had a freaking heart attack!
S&%T! What am I gonna do!
Oh well lets have a play I thought. Whats the worst that could happen hahaha.
I started by trying to lift out the darker colour and blending it in. I noticed then that, because I had left part of it to dry, it (the Pool Party) was streaking before lifting.
This gave me an idea of like a whirlpool. 
So, I started spinning the paper little by little as I lifted colour. If I went to much I just added in some light Pool Party again. 
I repeated this until I was happy with how it was looking.


For my focal I coloured the daffodil stamped image with the stampin' Write markers Old Olive and Daffodil Delight.
I then cut it out using the stitched shapes oval  and layered that onto a scalloped oval.

 Front View

#kocreationscards #youreinspiring #easter #cardmaking #stampingup #stampinblends #saleabration2018 #2018occasionscatalogue
I love the finished product, it has a very hypnotic effect hehe.
It's amazing how sometimes even a mistake can created into something beautiful.

Now I just hope my Mum loves it too.


To continue moving through the hop please click the name directly after mine from the list below.


When shopping with me for the month of March please use the hostess code below.

 EA6AHBAH

As an added bonus you get Free with any product purchase of $50 during the month of MARCH this fabulous tutorial bundle using the Myths and Magic suite PLUS the True Gentleman suite.


Free with product purchase of:  $50 AU 

Or 

You can purchase this bundle separately just by clicking below.
Please add a note with your payment with the word 'MARCH' for my reference. 
I will then email you the complete tutorial bundle within 48hrs


This is available for purchase world wide.
Thank you so very much for visiting today. I you have any questions please don't hesitate to ask in the comments section below.
I always respond to questions 😊

Wednesday, 14 March 2018

International Blog Highlights- Celebrate Love


Hello again 😊 and welcome.


As usual my life is busy with my family and my work commitments, but I do love making time for the International Highlights that Kylie Bertucci holds each month. This showcases ideas from around the world PLUS our peers (YOU) get to vote for your favourite projects.
You can VOTE for my project HERE
Each month has a different theme.

This month we have the theme of LOVE.


 🎶🎵🎶 All You Need Is Love 🎶🎵🎶
One of my fave songs 😍


Love is the reason we create, share and give.

My project today stems from my love for a good friend who has been struggling for some time now. I try hard to be there, but I can't always do so. So, I am sending her this to let her know that I am thinking of her and remind her how awesome she really is.


Here is my project

Amazing You

#kocreationscards #sweetsoirée #madewithlove #cardmaking #stampinup #2018saleabration #2018occasions
My card base is Thick Whisper White layered with Berry Burst and Marina Mist  topped with Whisper White.
For my focal area I have used a small piece of Sweet Soirée Specialty Designer Series Paper die cut using the Sweet and Sassy hearts framelits. I fussy cut  small posy of flowers and offset them to the side of the heart shape.
I have die cutting the word Amazing from Silver Glimmer paper and the word YOU from Berry Burst. I layered the word amazing with 2 layers of Basic Black just to give the illusion of a shadow and depth.
To finish I have added 3 metallic silver enamel hearts,

Angled View 

#kocreationscards #sweetsoirée #madewithlove #cardmaking #stampinup #2018saleabration #2018occasions

I do hope you like my project today. Don't forget you can vote for my card  HERE

Below you will find a carousel containing links to all items that were used to create this project with, PLUS
 Hostess Codes and TUTORIALS.

When shopping with me for the month of MARCH please use the hostess code below.

 EA6AHBAH

As an added bonus you get Free with any product purchase of $50 during the month of MARCH is this fabulous tutorial bundle using the Myths and Magic suite PLUS the True Gentleman suite.


Free with product purchase of:  $50 AU 

Or 

You can purchase this bundle separately just by clicking below.
Please add a note with your payment with the word 'MARCH' for my reference. 
I will then email you the complete tutorial bundle within 48hrs


This is TUTORIAL available for purchase world wide.

Thank you so very much for visiting today. I you have any questions please don't hesitate to ask in the comments section below.
I always respond to questions 😊

Sunday, 11 March 2018

Stampin Sunday Blog Hop - True Gentlman


Hello and welcome 😊

I am here today with the Stamping Sunday Blog Hop hosted by Sara Levin.
Our theme today is The True Gentleman suite from the Occasions catalogue. This classy collection can be found on pages 44 and 45 of the catalogue.


You are currently here with Kim Oliver - K.OCreations Cards and I have a full list of blog participants towards the end of this post.


Here are my projects using True Gentleman suite.

Celebrate In Style

#kocreationscards #truegentleman #dad #fathersday #malebirthday #giftbox #tutorial #hearthappiness #goldembossing #technique

I have kept the colour scheme quite simple for this design as I wanted to use Gold Embossing as highlights.
With a combination of repeat stamping (background) and e small square of the True Gentleman DSP I managed to create a good base to work with.
The card stock with the repeat stamping was wiped around the edge with versamark ink and then lightly dusted with gold embossing powder and heated to melt. I repeated this process until I was happy with the effect. I then wiped Night of Navy ink over the  gold embossing to add an aged effect.

Treat Box


#kocreationscards #truegentleman #dad #fathersday #malebirthday #giftbox #tutorial #hearthappiness #goldembossing #technique


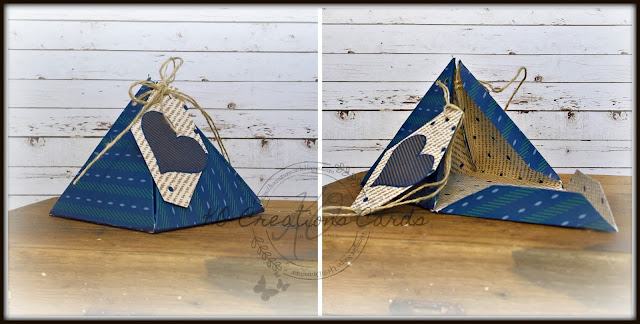
I have created a matching treat box using a matching square of the True Gentleman DSP.
This gorgeous little box is perfect for the DAD that has everything but you still like to give him little treats. The size I created fits a Ferraro chocoalte nicely. You can make this box large (as your square DSP allows) or as small as you like.
Here is a template that is readily available online for you to convert to any size square you desire.

 Triangle Box Template

#kocreationscards #truegentleman #dad #fathersday #malebirthday #giftbox #tutorial #hearthappiness #goldembossing #technique


Below you can see a quick snap shot of this set ready for DAD's birthday

Card and Box

#kocreationscards #truegentleman #dad #fathersday #malebirthday #giftbox #tutorial #hearthappiness #goldembossing #technique


Thank you for visiting me today.
To continue moving through and finding more inspiration using the True Gentleman suite please click the name directly after mine.


When shopping with me for the month of March please use the hostess code below.

 EA6AHBAH


As an added bonus you get Free with any product purchase of $50 during the month of MARCH this fabulous tutorial bundle using the Myths and Magic suite PLUS the True Gentleman suite.


Free with product purchase of:  $50 AU 

Or 

You can purchase this bundle separately just by clicking below.
Please add a note with your payment with the word 'MARCH' for my reference. 
I will then email you the complete tutorial bundle within 48hrs


This is available for purchase world wide.
Thank you so very much for visiting today. I you have any questions please don't hesitate to ask in the comments section below.
I always respond to questions 😊