Tuesday, 28 June 2016

'Friend to Friend' Global Design Project #042 | Sketch Challenge


Hi and welcome back...

I am going away for a short break to visit with family, so I decided to get one last blog in before I go.


Today's card was inspired by nature and a sketch from the team over at GDP this week.

 #GDP042


I had been thinking about all the new colours that are available this season from SU ....I & I noticed I hadn't seen very much of one in particular (Emerald Envy) , so I thought I would incorporate that colour into my card today. 

Here is my card.

'Friend to Friend'


#Botanicalblooms #KOCreationscards #Teenytinysentiments #Emeraldenvy  #Serenescenery

How I made 'Friend to Friend':

  • I used thick Whisper White for my card base cut to 10.5cm  x 15cm portrait style.
  • For the card front, I cut a frame with Crumb Cake card stock using the large square framelits...I did this by marking how big I wanted my frame to be and then marking the corners to show how wide my frame needed & then moving the square from corner to corner lining up the edges before running through my bigshot.
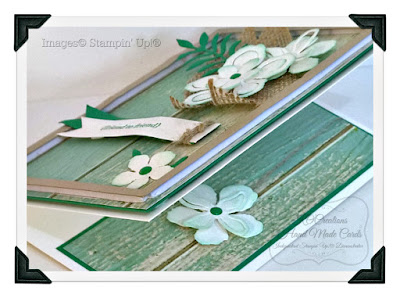
  • I used the both of the little pop up flowers from the Botanical Builder Framelits set set plus the ruffled edge style as well. I edged all in Pool party to match the DSP underneath.
  • I cut 3 different lengths of Burlap Ribbon and glued them under where I wanted my flowers. 
  • I then added the flowers after adding height by layering with dimensionals.
  • For each flower centre, I added an Emerald Green enamel circle.
  • For the sentiment I stapled the banners together then layered using dimensionals. I then tied some linen Thread around the end & hung a small flower, so it swings with the card.
  • I layered the Crumb Cake frame onto the painted timber DSP using Foam Adhesive strips.
  • Then using Tear and Tape I placed all of this onto Emerald Green card stock.
  • I then layered my completed card front onto the card base using dimensionals.
  • I also added a little of the front style into the inside, just for continuity.
  • I also added Clear Wink of Stella to the flowers and the sentiment for a little added sparkle.
#Botanicalblooms #KOCreationscards #Teenytinysentiments #Emeraldenvy  #Serenescenery

Thank you for stopping by today.

I look forward to seeing you all again in around 2 weeks.


If you would like to purchase any of the items I used to make my card, please use the carousal below.


Sunday, 26 June 2016

Blooms & Wishes 'For You' #PPA306 Sketch Challenge from Mary Fish

Blooms & Wishes

'For You'


#PPA306 Sketch Challenge from Mary Fish

PPA-306-June23


My card for today's blog was inspired by this weeks Pals Paper Arts sketch challenge, also the 'Blooms & Bliss' DSP and the 'Blooms &  Wishes' stamp set

I love the soft colours throughout the whole set in the 'Blooms & Bliss' DSP but because of the sketch & what I had in mind I had to balance the colours carefully so as to not over power any particular section of my design.....
I thought I would also add this to my cards made to send for the #frommetoyouwhenyouarefeelingblu in July, to help combat depression.


Here is my card for this weeks challenge


'For You'


#Bloomsandwishes #Foryou #KOCreationscards #PPA306 #Burlapribbon #Giftoflove #frommetoyouwhenyouarefeelingblu


How I made 'For You':

  • I chose Thick A4 Whisper White as my Card Base and for the small squares on the front. I made those using the plain layering squares. 
  • For the backing I chose Rich Razzleberry to lift that small amount of colour in the DSP to the fore. I also used this colour under the small squares using the scalloped layering square.
  • I stamped my flowers in Sweet Sugarplum & Blushing Bride the fussy cut them
  • I stamped onto my squares the leaves in Sahara Sand then layed the flowers on top using dimensionals.
  • I stamped my sentiment in Rich Razleberry using ink refills spread over a clear stampin block, as for some reason I had the refill but not the stamp pad ....go figure! Hence the sentiment looks a little washed out....I had to stamp off the paper first just to get it that good. Must order that stamp pad! You can see one of the flowers has a different colour also... I tried Wisteria Wonder to see how it would look.
  • I layered small pieces of Burlap ribbon under the top two flower squares and a strip under the bottom square running the whole way across.
  • I raised the squares on dimensionals  to add a little more depth to the card.
  • I fussy cut around the outside sentiment and placed that over the longer strip of burlap ribbon.
  • I added Rhinestones to the centre of each flower and also touched up the centres with clear Wink of Stella. Which you can just see in the pictures above.
  • I layered my card front onto the base also using dimensionals .... I think I am becoming addicted to Dimensionals!

#Bloomsandwishes #Foryou #KOCreationscards #PPA306 #Burlapribbon #Giftoflove #frommetoyouwhenyouarefeelingblu


I do hope you like my card today. 
Thank you for stopping by.
Dont forget to take a look at all of the other lovely cards that have been created for this challenge by clicking HERE

#Bloomsandwishes #Foryou #KOCreationscards #PPA306 #Burlapribbon #Giftoflove #frommetoyouwhenyouarefeelingblu

If you would like to purchase any of the items that I used to make my card then please use the carousal below.


Crazy Crafter's June Blog Hop-CASEing Frenchie

KO Creations ODE to Frenchie


Hello and welcome to my Blog for the Crazy Crafter's Blog Hop....Today we are casing Frenchie (France Martin)
 I thoroughly enjoyed going through Frenchie's creations to find some cards to CASE...BUT as I had been trying to come up with a simple & male orientated card for a beginners card class,

I chose 2 cards to CASE 
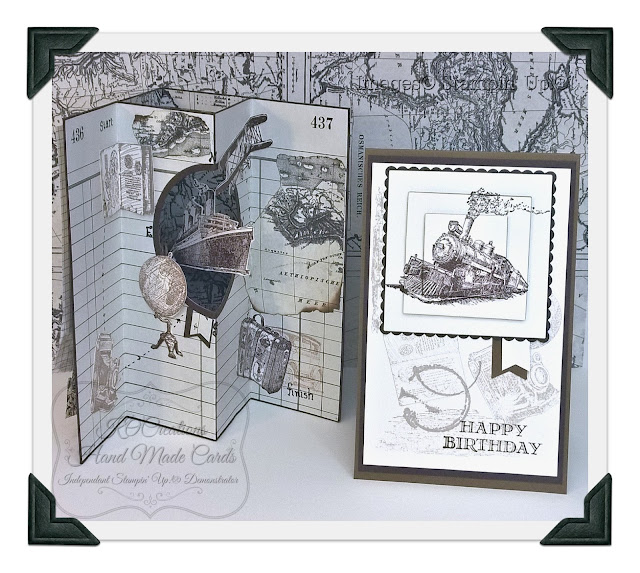
1 male themed, telescopic card & one with a tunnel inside!

Here they are
Just click either picture to go to Frenchies blog about either card.


 I chose the 'Traveler' stamp set for both of my cards.....Like the telescopic card on the left.

here they are.

'Serial Traveler'

Front view

#KOCreationscards #Traveler #Guygreetings #Skyisthelimit #Birthday #Men #Timelesstextures


'Serial Traveler'

  Inside Views 


#KOCreationscards #Traveler #Guygreetings #Skyisthelimit #Birthday #Men #Timelesstextures


#KOCreationscards #Traveler #Guygreetings #Skyisthelimit #Birthday #Men #Timelesstextures


How I made my cards 

'Serial Traveler'

  • I chose Chocolate Chip card stock for the bases of my cards & Very Vanilla as the card fronts
  • I also used Chocolate Chip & Crumb Cake Stampin ink pads.
  • Unfortunately the DSP I used for the tunnel card is now retired, so sad.
  • I stamped images onto Very Vanilla & fussy cut those I wanted inside. 
  • For the passport inside of the tunnel card, I wanted a book effect, so I stamped and cut 2 then layered them.
  • On the front of my tunnel card I used the Timeless Textures stamp set + Chalk talk.
  • I also wanted the front of my tunnel card to be a but old world & resemble a tattered notebook.... So I hand stitched along the edge of my card front with linen thread using blanket stitch and layered DSP and some stamped images under the front, then tore and distressed the corners.
  • I used the Layering Squares Framelits for the fronts of both cards & Layering Circles framleits for the inside of the tunnel card.
  • I used a mixture of Tear n Tape....Glue....Dimensionals to put everything where I wanted it to be..sometimes rearranging on more than 1 occasion.
  • I added a tiny banner to each card, as a nod to Frenchie's designs.
After loads of rearranging and ending up with glue in places you don't want to know about! 
I was finally happy enough to share both of my creations on my Blog and hopefully honor Frenchie as well.
+ I got another card for my Make & Take card class
So I actually CASEd 3 of Frenchies cards!?!

LOOK

#KOCreationscards #Traveler #Guygreetings #Skyisthelimit #Birthday #Men #Timelesstextures

Thanks so very much Frenchie,
 I have really enjoyed using your creations as inspiration!

Don't forget to keep hopping to all other blogs that have joined in on this hop...Just click the link below on the name after mine


For items I used please take a look at the carousal

Friday, 24 June 2016

'Happiness' #GDP041 | Colour Challenge

'Happiness'

'In This World' 

Happiness like beauty, is in the eye of the beholder.

 #GDP041

Today's blog creation was made especially for the #GDP041 Challenge using Sweet Sugarplum, Whisper White & Night of Navy.

Oh what a divine colour palette to work with, yummo!

As I had been rather busy this week, I didn't have a lot of time to actually think about what I was going to create....I saw the colour palette early and remembered thinking OMG that is just heavenly! Normally I find inspiration in day to day life....Seeing designs or even just seeing a stamp set. This time was different, I decide I was going to make something that reflects me & what makes me happy.

I hope you like it 


'HAPPINESS'


#Inthisworld #Numberofyears #Timelesstextures #Happiness #Dowhatyoulove #KOCreationcards


Being a mum of 2 VERY active kids, I love the peace and quiet of nature, it gives me time to reflect, re-charge and it helps to energize me for future hectic days.
Another of my favorite things is vintage/steampunk...unfortunately there really wasn't alot of steampunk items among Stampin' Up! 
Until recently that is WHOooHooo lol...we are now getting more gorgeous stamps that really can be used in this format...

So, my happiness!
That is how I decided on my stamps for this challenge :)

#Inthisworld #Numberofyears #Timelesstextures #Happiness #Dowhatyoulove #KOCreationcards

#Inthisworld #Numberofyears #Timelesstextures #Happiness #Dowhatyoulove #KOCreationcards

How I made Happiness:


  • I Decided I wanted a soft look for this stamp set being that the colours are so bold.
  • I used Thick Whisper White A4 card stock for my base and my card front.
  • The sponging was done in layers with Sweet Sugarplum until I reached the desired depth and tone.
  • With the  chair from 'in This World' stamp set, I used Versamark under the Night of Navy colour and then embossed with clear powder & my heat tool, so I could also add Sweet Sugarplum shading and keep the darker lines perfect. This was the first image stamped. I also stamped another plain image onto reflex paper to use for a mask. 
  • After masking and adding the Butterfly and lines using the same technique that I used for the chair I stamped, embossed and fussy cut another butterfly. This was added and raised using a dimensional.
  • I decided that the card needed texture, so I used my 'Timeless Textures' stamp set for this. Using the stamp off the paper then onto the paper technique.
  • For the leaves I used the stamp image from 'Number of Years' stamp set and the roses from the same set.
    I added small rhinestones to the centre of each rose for some sparkle.
  • Then after colouring the other images I added 'Wink of Stella' in gold and clear over selected areas.
  • I added the stamped and fussy cut key with a little sentiment fro the same set & tied a little piece of Sweet Sugarplum ruched ribbon.
  • I stuck the Whisper White card base to the Night of Navy using dimensionals.


If you like this and would like to try it for yourself, I have listed all items used below.


Thank you for stopping by my blog, please don't forget to click HERE to see all the other gorgeous creations entered this week


'Jar of Love' - Throw Kindness Around Like .... FISHES!?!


Happy Birthday!

This special Blog post has been scheduled just for today....
You see, I sent one of these cute cards to a sweet friend for their BIRTHDAY!!!!
AND
today is that day!! 

This person is also into card creating, like myself. 
But boy is this person talented! 
Soooooo, I wanted something I wouldn't be ashamed to send....
Something original, funny, cute and artistic!

BIG ask!
 lol

I had been seeing so many gorgeous 'Jar of Love' cards...I have even made a couple myself (yet to be blogged)
But they all seemed very similar....flowers in a jar, hearts in the jar,even a fish in a jar
 Another creator Stephanie Fischer had just made a card called 'Ahoy There' (no jars anywhere) BUT it gave me an idea :)

I thought,  'Lets tip the jar over a little so it's almost spilling it's contents but not quite!
And have fishies inside, Jumping OUT!'
I think to myself....WOW!, yes that sounds original & allowed myself a little WHOOP of joy.
 AND got to creating...

Here is it.....

Happy Birthday ! 


#Jaroflove #Happybirthday #frommetoyou #sentwithlove #KOCreationscards


#Jaroflove #Happybirthday #frommetoyou #sentwithlove #KOCreationscards

The little one on the right is my first effort. Then came version 2 .... not alot different but made a little larger, just so I could add some little extra detail & not overwhelm the card.


You are probably wondering what I did for the inside??? Can you see inside a little :) 

Ok I will stop teasing!
 hahahaa

Here is an open pic of the card.

I couldn't let the poor little fishies jump, not without having somewhere safe for them to land!

LOL
#Jaroflove #Happybirthday #frommetoyou #sentwithlove #KOCreationscards

I do hope she liked it...
As I scheduled this post on Sunday (19/6) and haven't as yet posted the card to her!!!
Gosh I am excited! hehehe

Anywho...

How I made my 'Jar of Love' cards:

  • I used Peek-a-boo Peach  A4 card stock & in colour backgrounds DSP. 
  • Thick Whisper White was used as my card base and for the fronts.
  • I used the 'Jar of Love' stamp set for the jars, stamped onto an acetate window sheet in Stazon Jet Black. 
  • The sentiment is a mixture of two from the same Jar of Love set and has been stapled together then attached using dimensionals.
  • I cut both jar outlines using Everyday Jars Framelits.
  • I coloured using my aqua painters and my Stampin' Write marker Island Indigo scribbled onto a stampin' block...I mixed  the blue at times with Craft Stampin Ink whisper White
  • For the inside I stamped the small jar in Stazon jet black as I didn't want it to bleed or run when painting my flowing water.
  • I stamped the fish in Peek-a-boo Peach and colored very carefully around it.
  • The flowers have been stamped in Peeka-boo-Peach while the leaves were stamped with Emerald Envy.
  • I added the smaller Rhinestones to the smaller flowers on one card.
  • I used the foam adhesive strips to frame up the fish jar (the one sent for the birthday) as it is a shaker card. I used it to raise the front on the smaller card. I used Stampin' Dimensionals under some flowers, to add more depth.


#Jaroflove #Happybirthday #frommetoyou #sentwithlove #KOCreationscards


If you would like to purchase any of these items please use the 'Carousel' 

below


Monday, 20 June 2016

A Special Note of THANKS To You - Using 'Floral Phrases Bundle'

PPA305 – A Color Challenge by Windy Ellard

Floral Phrases 

For this weeks #PPA305 Challenge we were given  the  gorgeous colour palette below

Pals Paper Arts #PPA305

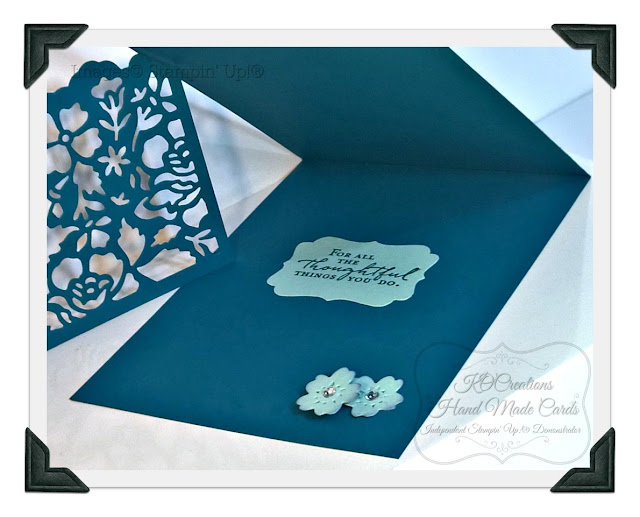
Now I have chosen for this card the Floral Phrases & the Detailed Floral Thinlits dies.
I made a card based on this only last week Click > HERE to see last weeks design.
But I thought I could do a little better than that design.
It is along the same lines, inlaid pieces highlighting parts of the design. BUT this card has more detail, AND the colours just make it sublime!

Without ANY further a do here is my card.

'A special note of THANKS to you' 

#KOCreationscards #Floralphrases #Detailedfloralthinlits #Thanks #PPA305

How I made my card :

  • I chose the cards stock according to the challenge that had been put forward. Island Indigo is my base, Pool party is the second layer and on top it Whisper White.
  • After cutting one lot of the Floral thinlits for the front, without using the piece that cuts completely. I cut the second lot for my contrasting inlay in Island Indigo.
  • I glued the Whisper White to the Pool Party base & then proceeded to glue pieces from the Island indigo into the desired positions.
  • I used two of smallest flowers from the Bloomin' Hearts Thinlits set as added accents to the front and the larger ones for inside. Both sets of flowers have been lightly inked with Island Indigo around the edges for depth.
  • I added Rhinestone basic jewels to the centre of my flowers to give sparkle.
  • Both sentiments are from the Floral Phrases stamp set. I placed the inside one using the label punch after stamping.
  • I mounted the Pool Party card front with Stampin' Dimensionals onto the Island Indigo card base to finish.


Thank you for taking the time to read my blog.

Don't forget to check out all other card entries this week over at Pals Paper Arts Showcase  > HERE


I do hope you have enjoyed my card today
 &
I hope it inspires you to create your very own too!


If you are looking to find items used to make your own, look no further than below in the carousal. 


Thursday, 16 June 2016

'HELLO' #GDP040 | CASE the Designer

'HELLO'


#KOCreationscards #Thewildernessawaits #Inthemeadow #Lovelyasatree #Jaroflove #Sponging

This week we have the opportunity to CASE the super talented Shawn de Oliveira.


As you can see from the design below Shawn's water coloring & sponging is just divine. 

 #GDP040


When CASEing you can choose any element from the card to replicate. Be it the stamp used, the design or the technique.


 I thought I would give the water coloring and card design a bash.


'HELLO'

#KOCreationscards #Thewildernessawaits #Inthemeadow #Lovelyasatree #Jaroflove #Sponging

Please forgive my image quality today, it is extremely overcast here so I had to have all lights on as well as the lamp. So I have a few extra shadows in some pictures.

How I made 'Hello':

  • I started by stamping two images of the fox from 'The Wilderness Awaits' stamp set, one onto whisper white & one onto reflex paper. I cut the reflex image out and used it as a mask to stamp the tree behind the fox.
  • I then stamped the image of the tree onto reflex paper and cut that out also.
  • Stamping the smaller flowers and grass from the 'In The Meadow' stamp set in front of the fox gives the whole image some more depth.
  • Placing my masks over the fox and tree. I spritzed the paper with water then I picked up some Dapper Denim ink onto my sponge and lightly sponged around the background area. Redoing areas I wanted a little darker.
  • I colored the fox & trees using my Stampin' Write markers, scribbled onto a stamping block then picked up with an aqua painter.
  • I let dry and trimmed to the required size.
  • After trimming I distressed the edges using a file. 
  • Placing the water color image in the area I wanted on the backing card stock, I got my stamps that I wanted to carry over to the underside ready. I held them above my image in the general area then removed my water color and stamped onto the backing card stock.
  • Above the background card stamped area, I used the 'Hello' sentiment from the 'Jar of Love' stamp set.
  • Using my Tear n Tape I put my finished pieces together.
#KOCreationscards #Thewildernessawaits #Inthemeadow #Lovelyasatree #Jaroflove #Sponging

  • I finished of by creating a smaller image for the inside of the card
  • I tied twine around both images to the front and on the inside.

#KOCreationscards #Thewildernessawaits #Inthemeadow #Lovelyasatree #Jaroflove #Sponging

Thank you for stopping by my blog. I hope you enjoyed seeing & reading about my card creation.
If you would like to know what I used to make this card there is a list below.


Tuesday, 14 June 2016

Card For a Friend

Card For a Friend

Hello & welcome again to my Stampin' Up blog.

Happy Birthday Theresa!

Toady I finally finished a card that has been trying to get made since Sunday. 
It certainly wasn't as easy to create as it looks!
I made this gorgeous card for a lovely friends birthday that happened last week. I don't get to see her very much just lately due to work, family etc etc, but wanted her to know that I hadn't forgotten about her. She is a very kind & thoughtful person
&
I wanted something special for this card. 
Something that stood out. 
So, I used the Floral Phrases stamp & the Detailed Floral thinlits.


I thought that my colour scheme needed to be simple as the thinlits are so detailed!... The colors chosen for the DSP (Floral Boutique) in the catalogue that is used with this floral bundle seemed the way to go, Night of Navy on Whisper White on Night of Navy.
#KOCreationscards #Floralboutique #Birthdaycards #Sendinglove
I decide upon having an acetate window in-between the two panels, but I didn't want it to be see through all the way up & down the front of the card.....I wanted some surprises!
 So I cut a panel to match the front,top and bottom, then glued them inside. 
To attach the front to the back I made the back panel 1/2 a cm longer then scored along that 1/2 cm line, folded & burnished it. This created my hinge. I glued the folded piece along the top, on the inside of the floral acetate panel.
This enabled the card to sit and move as a normal card would.

#KOCreationscards #Floralboutique #Birthdaycards #Sendinglove

As points of interest, I placed a couple of Nights of Navy cut out pieces into the Whisper white die cut panels and added little Rhinestone to the centre of each of the flowers that I bought forward with the Night of Navy.

Thank you for stopping by & I do hope you enjoyed my creative attempts today.

If you liked this card and would like to create your own. Here is a list of items I used.


Thursday, 9 June 2016

Sending Smiles Part 2 #Frommetoyouwhenyouarefeelingblu

Sending Smiles 

Part 2

Continuing on from my last blog for Global Design Project's entry #GDP039 's 'Get Well Soon' theme I have made 2 more cards for another entry as well. 


But these cards have a dual purpose!


A lovely young lady Petra Tailor, who is part of a group that I also belong to, would like to start a mini movement of sorts for the month of July....And I am with her...It is to try and help those that we know who are feeling low, depressed or just in need of a friend, know that they are loved and cared about by sending a card. 
Petra say's it perfectly!
 'In this digital age, we send texts, but do you remember how lovely it is to receive something in the mail that isn't a bill!?! To know that someone cares enough to let you know they are there for you, with an encouraging sentence or two. It's something that you can keep forever and never forget......It is beautiful'

So if you are interested in joining the movement by helping a friend in July, Make a card and send it to a friend...If you like the idea, like me, post about it to get others involved in the month of July with the hashtag #Frommetoyouwhenyouarefeelingblu


Here are my cards


#frommetoyouwhenyouarefeelingblu #Numberofyears #Timelesstextures #Watercolorwings #KOCreationscards #Greatestgreetings #GDP039

For these cards I used a number of current stamp sets stamped onto Whisper white. Timeless Textures was stamped first in Basic Grey. I then stamped the leaves from the  Number of Years set in Pear Pizzazz.  Also from the Number of years set I stamped the different small flowers in Watermelon Wonder, Crushed Curry & Bermuda Bay.
#frommetoyouwhenyouarefeelingblu #Numberofyears #Timelesstextures #Watercolorwings #KOCreationscards #Greatestgreetings #GDP039

For the butterflies I used the Water Color Wings and stamped them in Crushed Curry first, then Watermelon Wonder and finished with the Basic Black...stamping off the paper first before stamping the image.

#frommetoyouwhenyouarefeelingblu #Numberofyears #Timelesstextures #Watercolorwings #KOCreationscards #Greatestgreetings #GDP039


I used the Layering Squares framelit for one sentiment, both sentiments have been stamped onto whisper white in Basic Grey using the Greatest Greeting stamp set. Then layered onto Basic Grey card stock.

#frommetoyouwhenyouarefeelingblu #Numberofyears #Timelesstextures #Watercolorwings #KOCreationscards
#Greatestgreetings #GDP039


Before putting my card fronts onto the Basic Grey backings I distressed the edges with a file. I added a thread pulled from my Burlap ribbon under the butterflies after they had been die cut using the Bold Butterflies thinlits. They were then raised onto dimensionals. 
I made the inside of the cards to match the fronts with a bit more space left clear, for a personal message.

Thank you for stopping by my blog and please feel free to CASE (Copy And Share Everything) anything you like.
If you would like to learn how to make these cards or any others like this contact me over at K.OCreations Hand Made Cards 
for booking a workshop or online party.


All items used in making these cards can be found below.


Wednesday, 8 June 2016

Sending Smiles Shadow box cards

Sending Smiles

Shadow box cards

For you today I have created 3 shadow box cards with the 2016-2017 'Love You Lots' hostess stamp set. 
I thought they would be perfect for this weeks #GPD039 challenge as the theme from the team is 'Get Well Soon' cards!


I chose the 'Love You Lots' hostess stamp set for a bright, loving & fun effect & the 'Botanical Blooms' stamps with the 'Botanical Builder' framelits for the flora accents. They give a pretty jungle or overgrown garden look. The acetate windows were inspired by Juan Ambida of JuanaCreate.


#Loveyoulots #Greatestgreetings #KOCreationscards #Hostessstamps #GDP039 
Making of the shadow box:

  • Using my simply scored board with my metric plate & whisper white card stock. I scored the whole length a 12 x 12 sheet @ 2cm, 4cm, 6cm, & 8cm I rotated and scored every side the same. 
  • Choosing one end I added a score to the second line @ 10cm on both inside edges.
  • Cutting away the corners as marked in the diagram, I then turned the sheet over and folded & burnished each score line.
  • I stamped the second rectangle line with my chosen image...group os small flower shapes from the 'Botanical Blooms' stamp set
  • I turned the sheet over again & placed my stamped and trimmed to size images in the required position before starting to make the frame of the box
  • I folded the champhored edges first into the box shape.

#shadowboxframedcard
I hope the diagram helps a little more, and please excuse the messy hand writing!


#Loveyoulots #Greatestgreetings #KOCreationscards #Hostessstamps #GDP039
This cute little Elephant & Mouse (above) was my first attempt & failure. It didn't go as planned at all lol I forgot to add shadows to the animals for starters...they are floating in mid air! lmao  AND I also ruined the acetate sheet by applying a heat gun trying to dry the ink quicker! Silly impatient woman I am!  I didn't factor in a writing area for a personal message either, so basically it's a cute standing shadow box!  Ha, live and learn  I say. Try fail and try again!
But in saying all of that I thought I would still share this card with you as it is terribly cute, even if not exactly as I planned!


   The Frog and the Hedgehog cards came today after a bit of thought overnight. I made up a couple of 12 x 12 templates this morning. I set up ready to start when my Mumsy arrived (Nancy) ... So I said to her 'I have these little creatures that I want to create into shadow box cards, are you up for learning a few new card making technique?' She said 'Sure' Soooo, I said 'Righto, follow my lead!'. 3 whole hours later we were done lol

 My Mums card is the cute Hedgehog card below.  Mumsy put together all of the elements that I had made & even learn't how to water color with aqua painters and the Stampin' Write markers, as well as learning how to create the shadow box card!   Her cute ladybirds on the hedgehog are adorable aren't they!?!

#Loveyoulots #Greatestgreetings #KOCreationscards #Hostessstamps #GDP039

Below is a top view of the Frog 'Sending Smiles' card, so you can see that I have added an area for a personal note for whom ever might be in need of a cute pick me up. 


#Loveyoulots #Greatestgreetings #KOCreationscards #Hostessstamps #GDP039

Below is a group shot of all the cuties together.


#Loveyoulots #Greatestgreetings #KOCreationscards #Hostessstamps #GDP039


Thanks so very much for stopping by, taking a look and having a read too. I hope I have inspired you to give this card design and the stamp sets a go. 
I would love to hear about what you created!


Here is a list of items I used to create my cards.

Just click on any item to go straight to my 'Shop With Me' site.


Saturday, 4 June 2016

You Are My Anchor

You Are My Anchor

I drew inspiration from a couple of different places for my cards today. One place was from a card I saw earlier Friday evening on Kylie Bertucci's Blog Highlights, Carolina Evans created a card that incorporated layered torn papers. 


Pals Paper Arts Color Challenge #PPA303
Sketch By Shawn de Oliveira
Sketch From Teneale Williams
I used the sketch from #GDP038 to incorporate the torn paper & the colour scheme from #PPA303
to create a male orientated card with a sea faring theme. 
I can take them with me to use as displays when I go to workshops or parties & they will be perfect to use them for Fathers Day later in the year!

OK enough talking about them :) 

Here they are

'You Are My Anchor'


#KOCreations #Fromlandtosea #Guygreetings1of1and2of2 #GDP038 #PPA303 #Fathersday #Youaremyanchor

 I used Night of navy as the card base and and cut one A4 sheet into 2 @ 10.5cm x 15cm. I used some scrap Night of Navy under the Sahara Sand card stock.I found some Perfectly Artistic  papers that I had left and wiped, with my dauber & Mint Macaron ink over the top... I daubed some whisper white in other places to tone down some areas. I stamped with Night of Navy onto the ink brushed & daubed DSP with the Anchor from the 'Guys Greetings' set 2 of 2. And made some panels for the inside of each card.


#KOCreations #Fromlandtosea #Guygreetings1of1and2of2 #GDP038 #PPA303 #Fathersday #Youaremyanchor
After applying some adhesive to the outside edges, I tore both of the inside edges with the Sahara Sand First & then followed with the Night of Navy trying to follow a similar tear pattern as the Sahara Sand. These panels were then added to the front using Stampin' Dimensional's.

#KOCreations #Fromlandtosea #Guygreetings1of1and2of2 #GDP038 #PPA303 #Fathersday #Youaremyanchor
                       

    I found some scrap Sahara Sand and stamped with Night of Navy the 'Ships Wheel' and the 'Lantern'  with the 'From Land To Sea' stamp set. I added these to the front of each card to make each slightly different. 

#KOCreations #Fromlandtosea #Guygreetings1of1and2of2 #GDP038 #PPA303 #Fathersday #Youaremyanchor

To finish these cards I added a long thread pulled from the Burlap ribbon and wrapped and tied it to either side of the front panels.
The sentiment has been stamped in Night of Navy onto a scrap of thew DSP and held in place with dimensional's. The centre dimensional's, under the sentiment, has been doubled up to give height and the effect of movement.


I hope you enjoyed my card creations today.
 If you are looking to purchase any of the items I used then take a look at the Carousel below.

Thank you for stopping by.